Articles
Tutorials
Interactive Guides
How to integrate Snyk and Bitbucket Cloud to enable DevSecOps

Simon Maple
Field CTO at Snyk
Achieve DevSecOps by integrating Snyk with Bitbucket Cloud and Jira.
Snyk integrates with multiple Atlassian products to enhance the workflows and pipelines of DevSecOps teams. This tutorial describes patterns to enable security to shift left by leveraging Atlassian Bitbucket and Snyk. These techniques enable your team to scan your application and container-based workloads at the pace of DevSecOps. You'll learn how to use these patterns to include security throughout your pipeline stages.
Time
15-minute read.
Audience
- Developers
- DevOps and DevSecOps Engineers
- Application Security and Application Development Teams
Prerequisites
You have a Snyk account, available here.
You have an Atlassian Bitbucket account. Log in here, or get started here.
Step 1: Configure your environment
Install the Snyk CLI
The Snyk CLI authenticates your machine by using your Snyk account. The CLI tool helps you find and fix known vulnerabilities in your dependencies, both manually and in your CI/CD pipeline. The full instructions to install the CLI are available at Snyk in multiple formats for popular operating systems and environments. For example, the CLI is available with brew with these commands:
brew tap snyk/tap
brew install snyk
Once you install the CLI, you next authenticate with the following command:
snyk authThis command opens a browser tab to complete the authentication process, and you are ready to scan your repository when you click on the Authenticate button. When the authentication is complete, you may return to your terminal and continue working.
Additional lab resources
The exercises contained in this tutorial include a combination of commands or code snippets that will be shared within the specified module pages, as well as templates and source code available in a public Bitbucket repository. Once your Bitbucket Cloud account is set up, you will need to copy these resources into your account. To do so, please follow these next steps:
Fork the repository
Click here to fork the upstream repository into your Bitbucket account. Atlassian’s documentation offers detailed instructions on how to fork a repository.
Clone your fork locally
When your fork is complete, you need to clone your forked repository. Please review Atlassian's documentation on how to clone a repository for detailed instructions.
Step 2: Connect Snyk to Bitbucket
In this section we will connect Snyk to Bitbucket in order to scan our Bitbucket application for open source vulnerabilities.
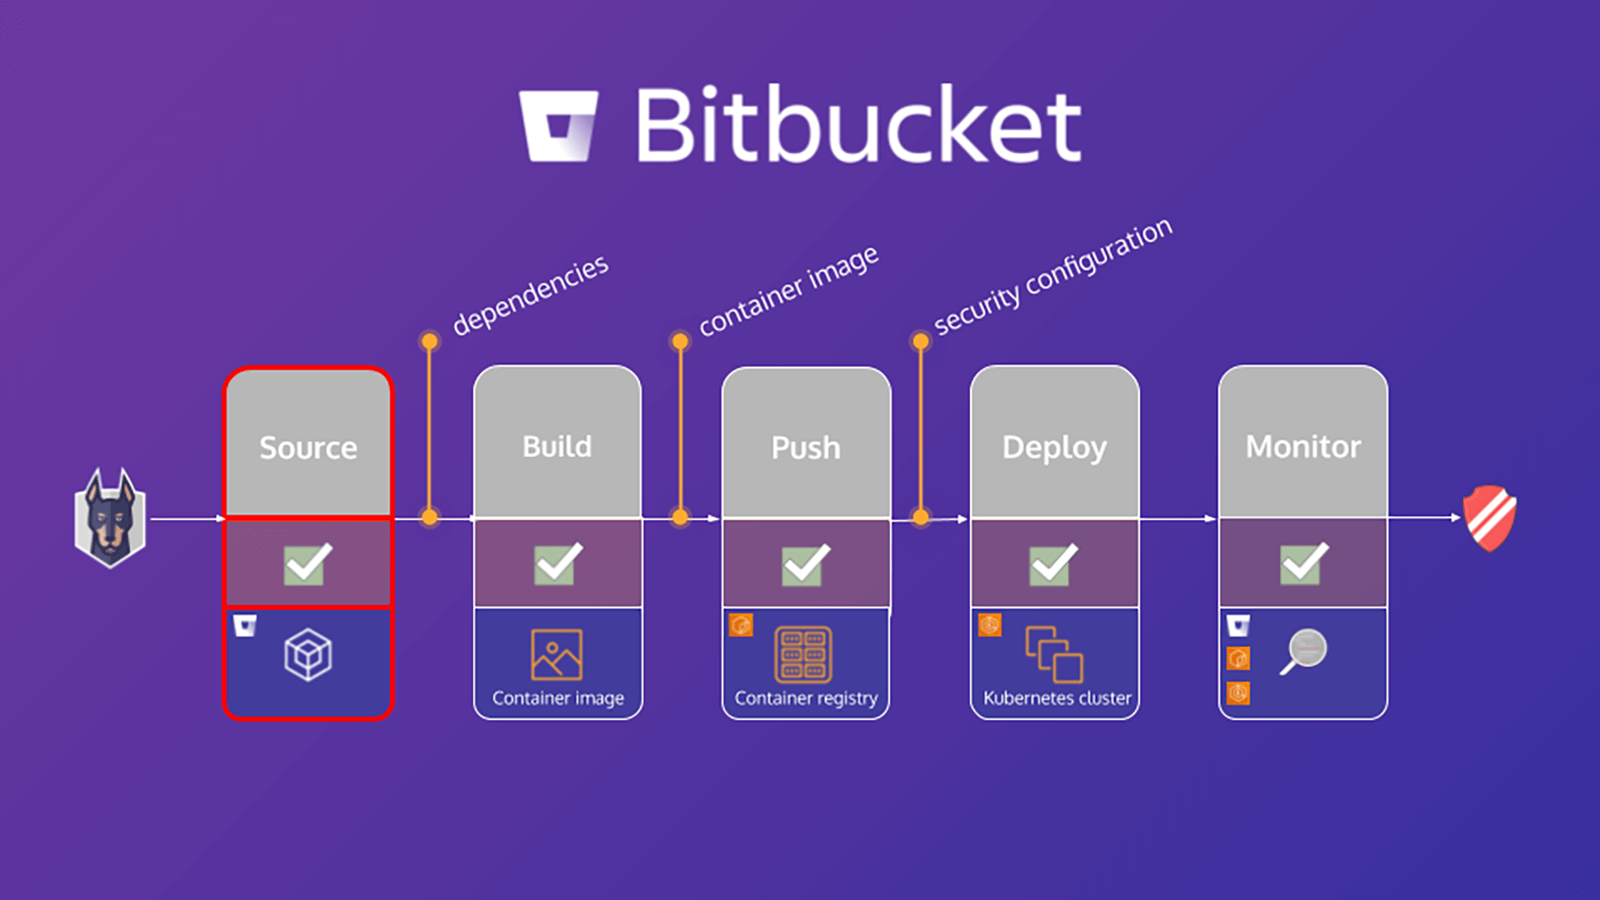
What is software composition analysis (SCA)?
Software composition analysis (SCA) is an open source component management tool. It generates a report listing all open source components in an application including direct and indirect dependencies. Using an SCA tool, development teams can quickly track and analyze open source components introduced into a project.
Although convenient and widely used, open source components have been traditionally difficult to track. As a result, developers have relied on manual processes such as emails and spreadsheets to mitigate the situation. However, these manual processes threaten to undo the convenience provided by open source and provide an incomplete solution. A more desirable approach is to leverage an SCA tool that provides immediate insight into each component.
Why use an SCA tool?
Open source components are major building blocks in software development across virtually every vertical. Regardless of the size of your organization, SCA helps identify open source components in the applications that are critical to your business. SCA tools enable developers to:
1. Understand dependencies used in applications.
2. Enforce security & compliance policies throughout the Software Development Life Cycle (SDLC).
3. Proactively fix potential vulnerabilities at the source.
4. Improve team efficiency and the company security posture.
Step 3: Create an app password
You will need to create an app password in order to authorize Snyk to access your repository and enable Snyk's Bitbucket Cloud integration.
To create an app password:
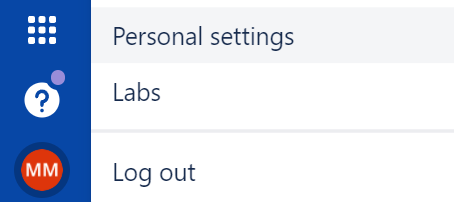
1. From your avatar in the bottom left, click Personal settings.
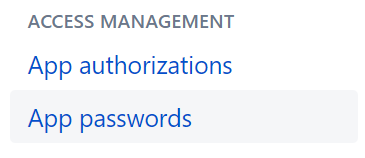
2. Click App passwords under Access management.
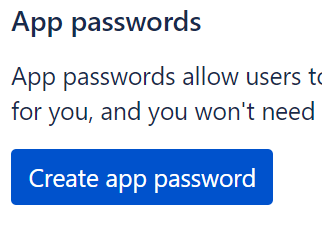
3. Click Create app password.
4. Give the app password a name related to the application that will use the password.
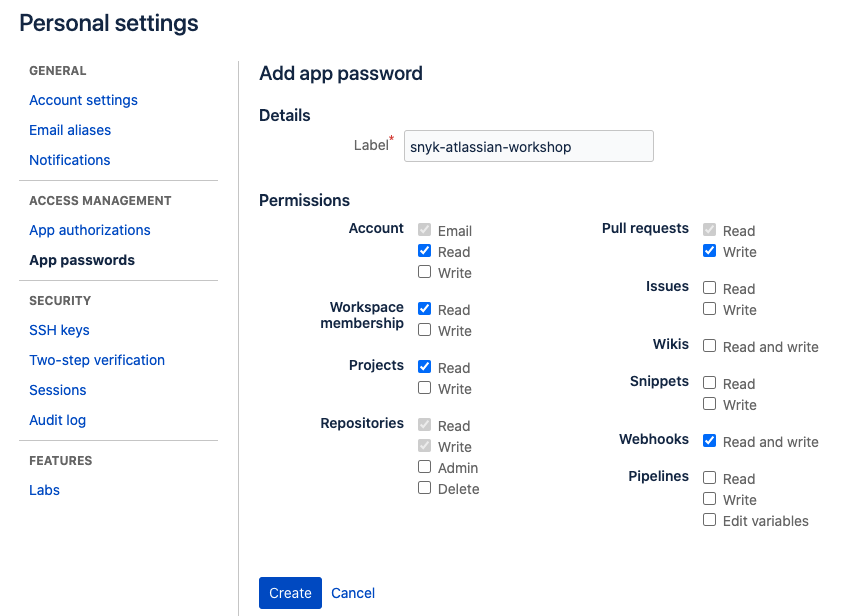
5. Select the specific access and permissions you want this application password to have.
- Account:
read - Team membership:
read - Projects:
read - Repositories:
read and write - Pull requests:
read and write - Webhooks:
read and write
6. Copy the generated password and either record or paste it into the application you want to give access. The password is only displayed this one time.
Step 4: Add repository variables
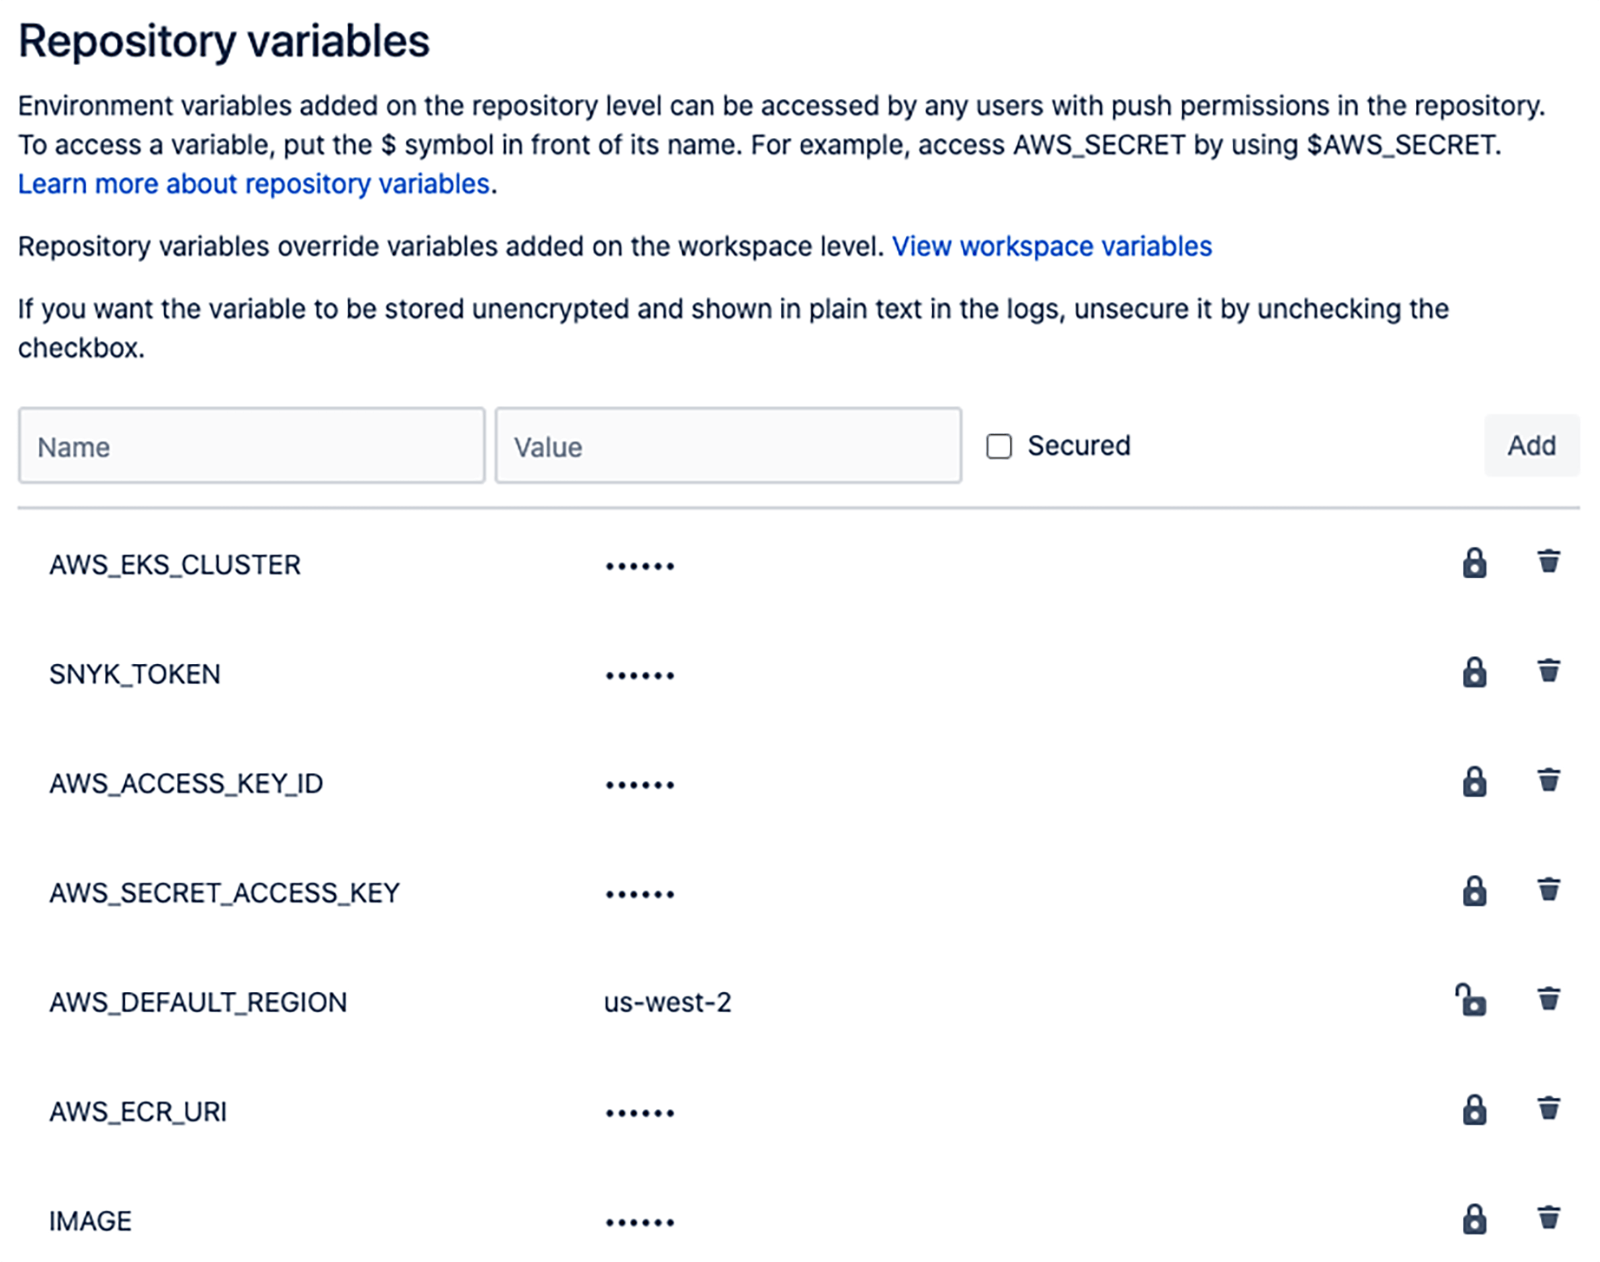
You will need to define repository variables at the repository level, which will later be referenced in your pipeline. These will consist of the following:
- SNYK_TOKEN - Snyk API token for authenticating with your Snyk account. This is a secured variable.
- IMAGE - Container image name. This is not a secured variable.
The other variables are for enhanced pipeline operations, not covered in this tutorial.
Step 5: Obtain your Snyk API token
1. Obtain your Snyk API token
From the Snyk console, navigate to Settings (the gears icon in the picture) and under the General menu Copy your Organization ID.
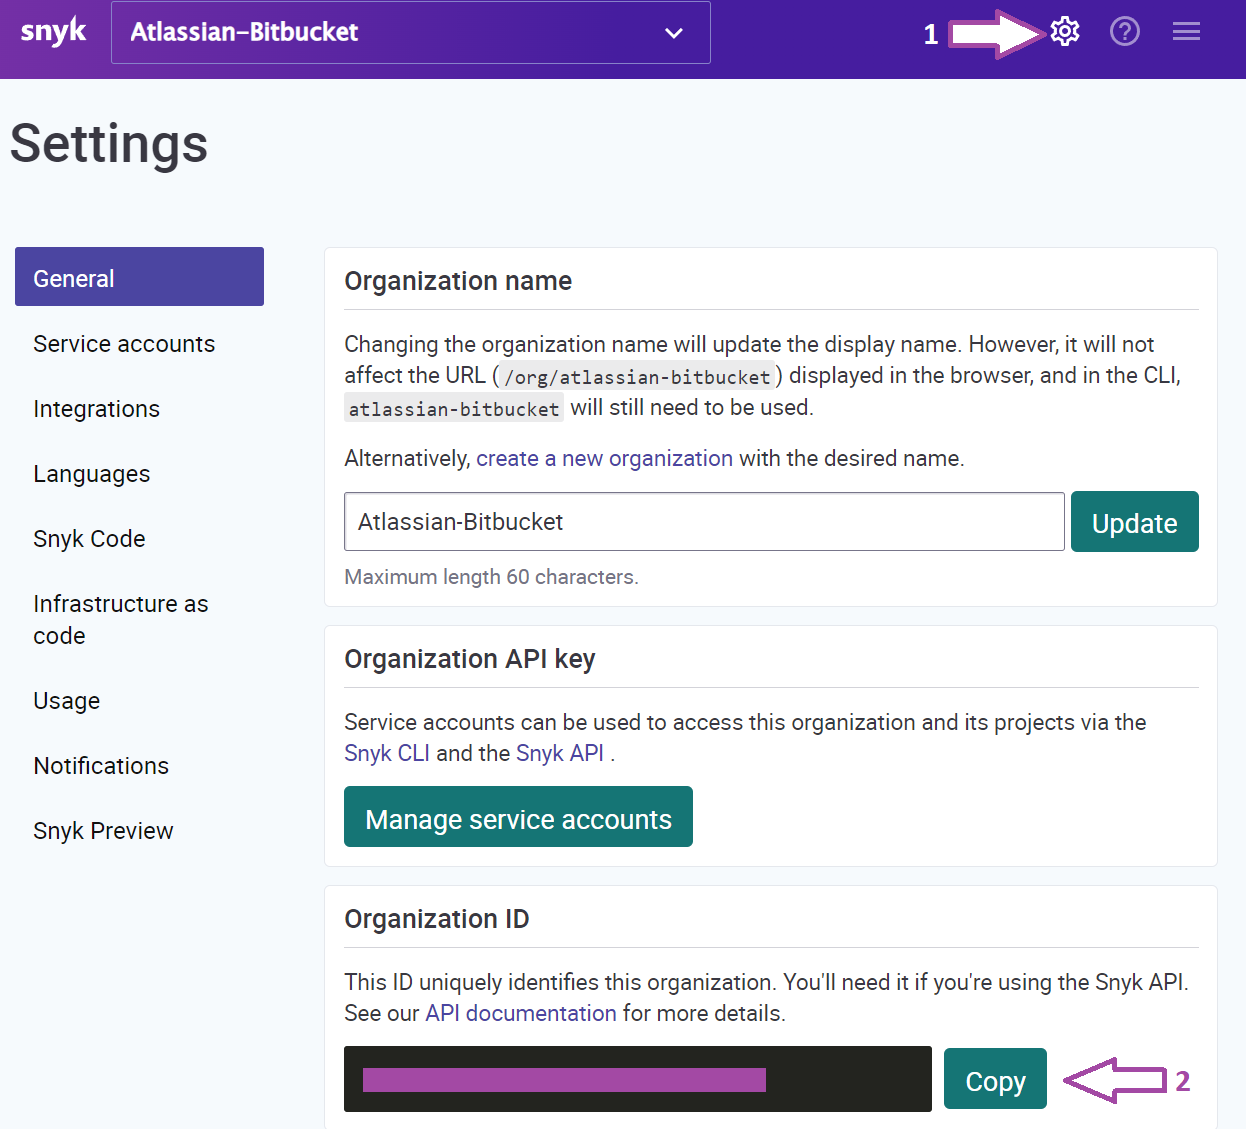
Once you have copied your token, go back to the Bitbucket Cloud UI and define the SNYK_TOKEN repository variable.
Step 6: Enable Bitbucket integration
From the Snyk console, navigate to Integrations and select Bitbucket Cloud.
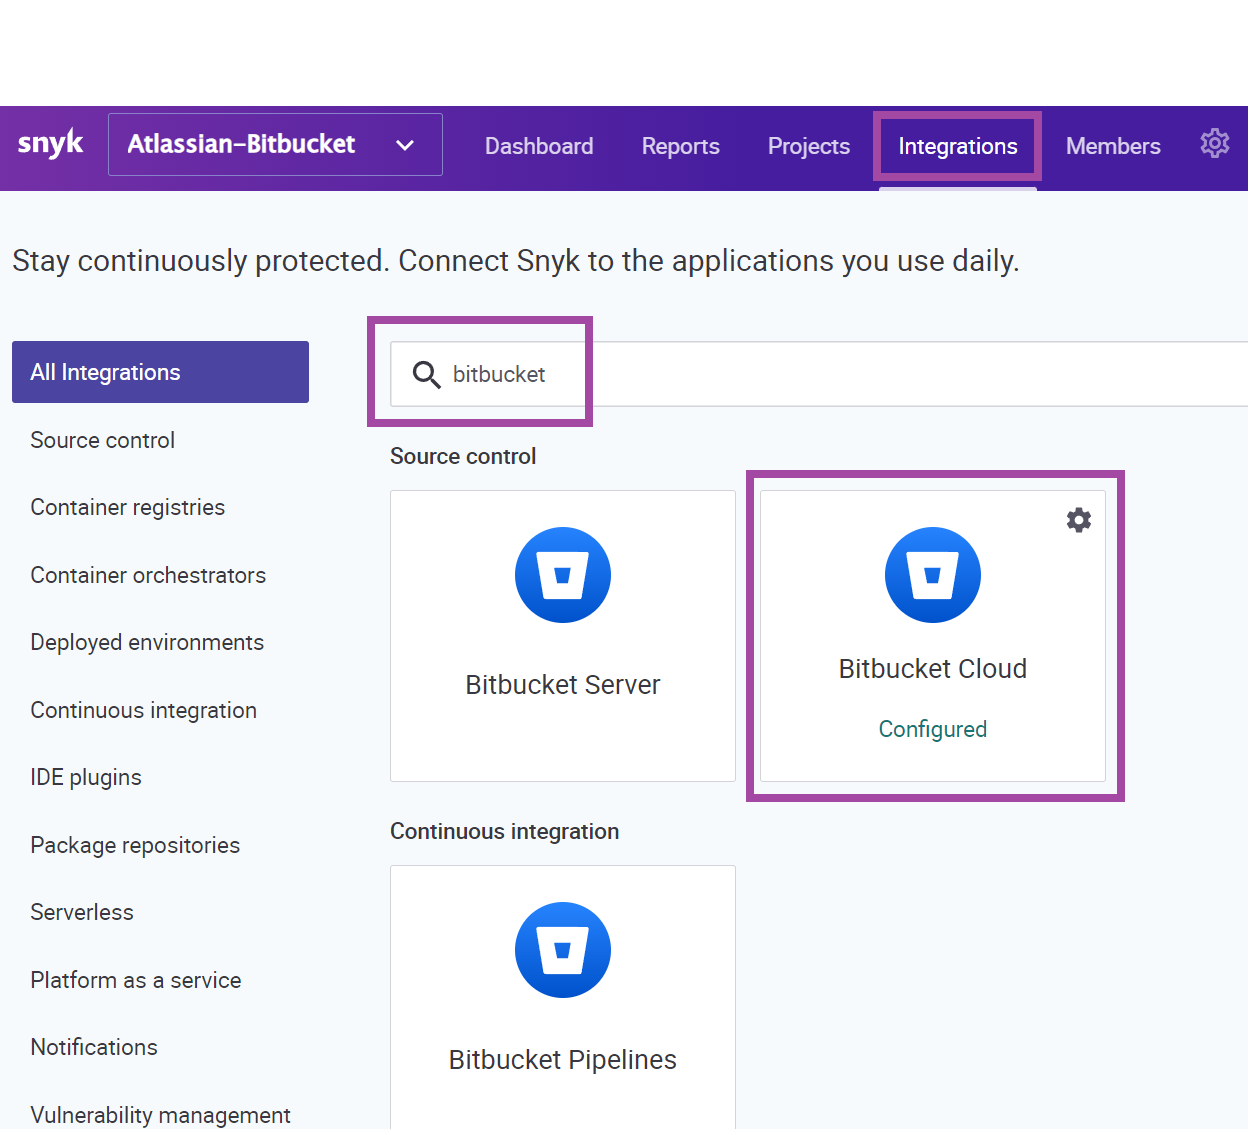
From the Bitbucket Cloud integration page, enter your Bitbucket username in the Username field and the Bitbucket app password from the previous step in the App password field. Then, click Save.
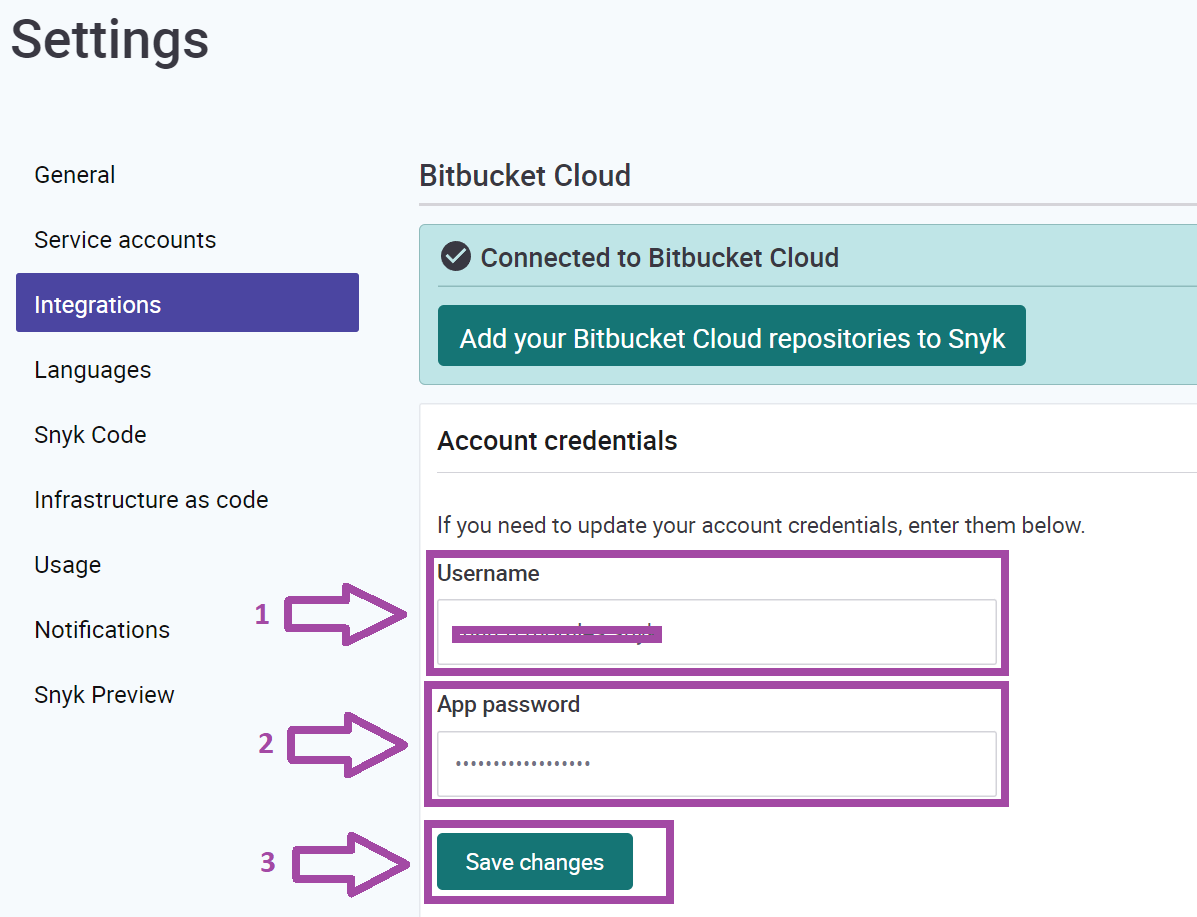
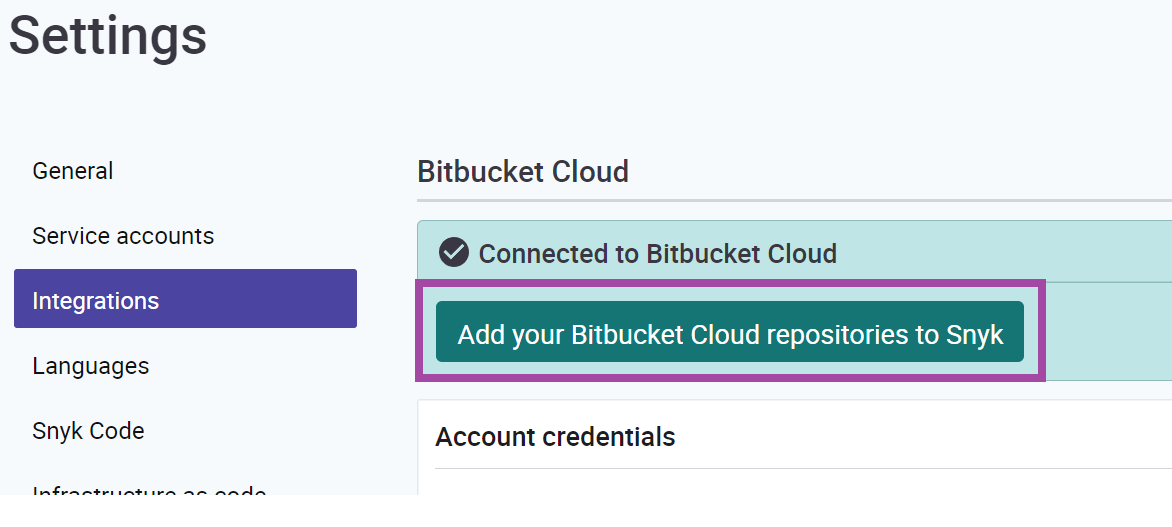
Once you have successfully connected your Snyk and Bitbucket accounts you will see a confirmation message and the ability to Add your Bitbucket Cloud repository to Snyk.
Stay on this page and in the next section, you will learn how to import a Bitbucket Cloud repository and scan it with Snyk.
Scan and monitor your Bitbucket application
Scanning your application for vulnerabilities in your open source dependencies begins at the source. In the previous section, we enabled the Snyk integration to Bitbucket and are in a position to import our first project.
Step 7: Add Bitbucket Cloud repositories to Snyk
From the last screen in the previous section, click Add your Bitbucket Cloud repository to Snyk.
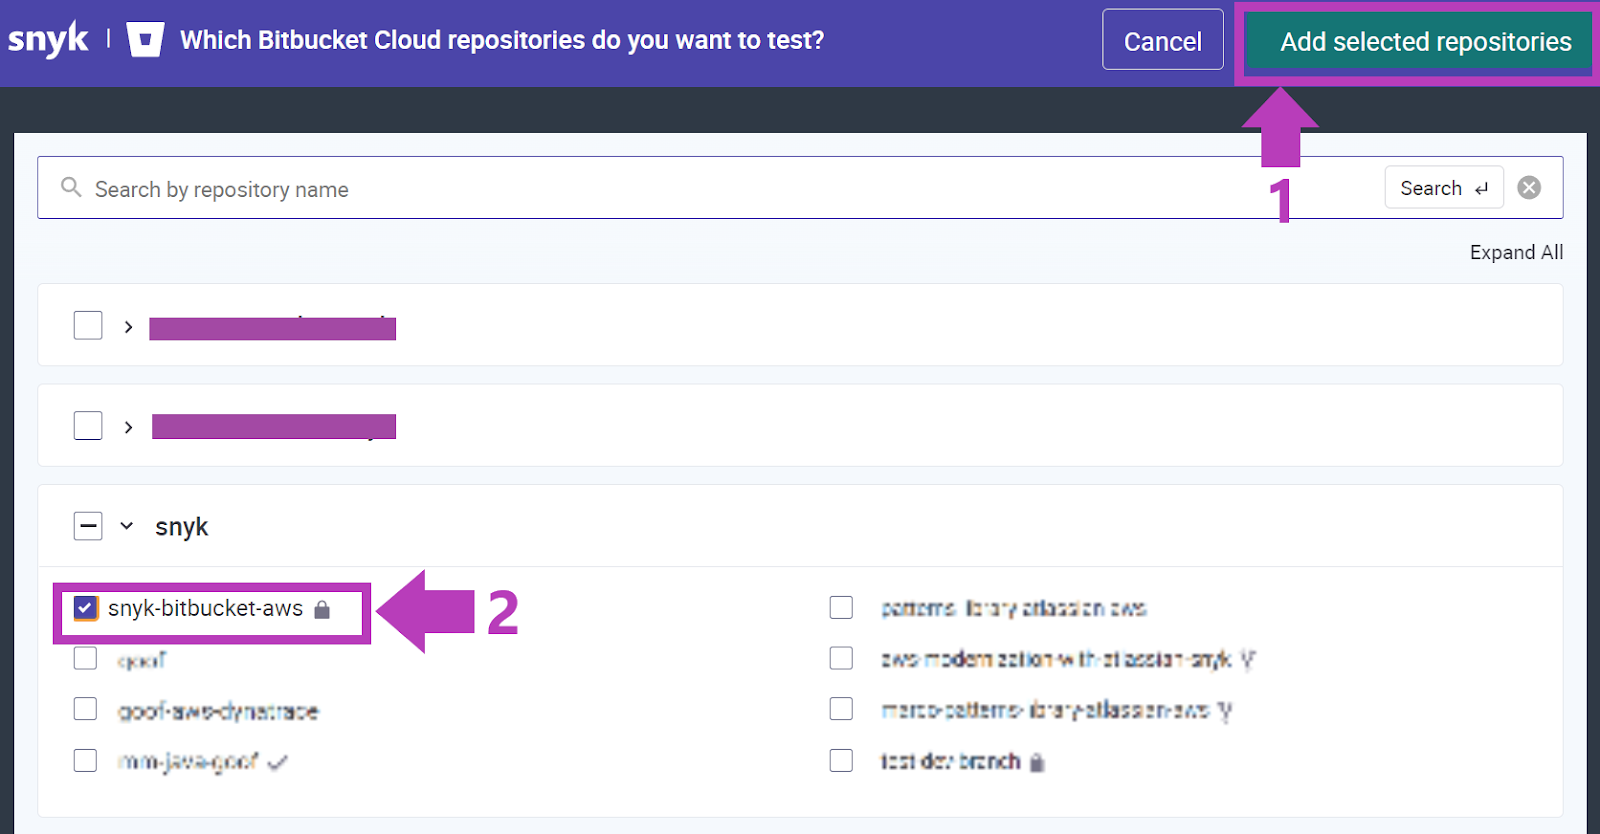
Find the repository you forked in the Configure Environment module. Click the checkbox to select it, then click the Add selected repository button to import your project.
Step 8: Review vulnerability report
You should see vulnerability counts based on packages.json, as well as detailed information for each. Click into the project that was just scanned and review the results in Snyk. You will not only receive context such as severity and exploit maturity for vulnerabilities, but also the following powerful features:
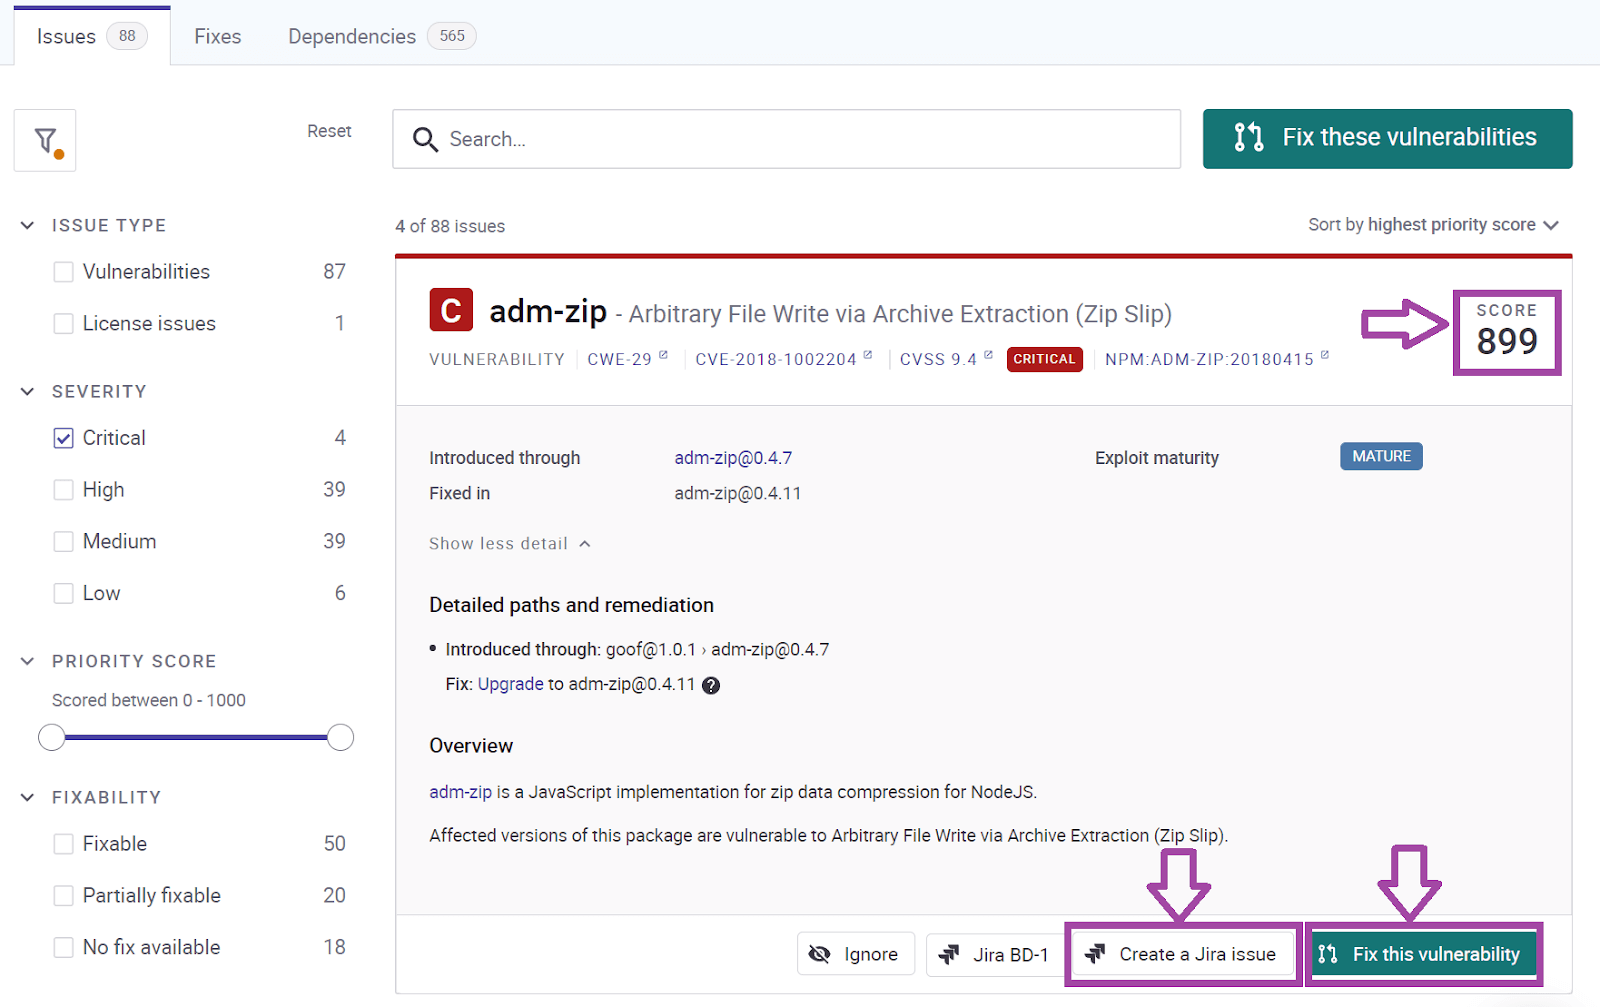
- Fix this vulnerability to help you fix vulnerabilities by either upgrading the direct dependencies or patching the vulnerability.
- Priority Score to help you effectively prioritize fixes. The score, ranging from 1-1000, is powered by a proprietary algorithm that processes a wide array of factors, such as CVSS score, the availability of a fix known exploits, how new the vulnerability is, and whether it is reachable or not.
- Jira integration to enable you to create issues in Jira.
See more integrations for Atlassian Open DevOps.
Share this article
Next Topic
Recommended reading
Bookmark these resources to learn about types of DevOps teams, or for ongoing updates about DevOps at Atlassian.
DevOps community

DevOps learning path
