Articles
Tutorials
Interactive Guides
How to connect feature flags to issues in Split and Jira

Kevin Li
Product Manager, Split
This tutorial details how to connect an issue to a feature flag and where to view the corresponding information in both Jira and Split.
Time
10 minutes
Audience
You use Jira Software and Split.
Prerequisites
- You have configured Jira Cloud in Split. See documentation.
- You have installed Split in Jira Cloud. Get it now.
Split is a unified feature delivery platform that combines the speed and reliability of feature flags with data to enable software teams to measure the impact of their code changes and deliver features that drive business outcomes.
Step 1: Connect a feature flag to an issue
Once you’ve created an issue, you will see a field for Releases under issue details, which is on the right-hand side of your screen. Click + Add Feature Flag and choose to Create Feature Flag or Connect Feature Flag.
A feature flag is a software development tool used to safely activate or deactivate features for testing in production, gradual release, experimentation, and operations.
If you choose Connect Feature Flag, you will be redirected to a form in Split where you can select the Workspace (chosen during the configuration of Jira Cloud in Split) and the feature flag (split) you wish to connect to this Jira issue. Notice the Jira issue number was prefilled in Split to save you time from copying and pasting between tools!
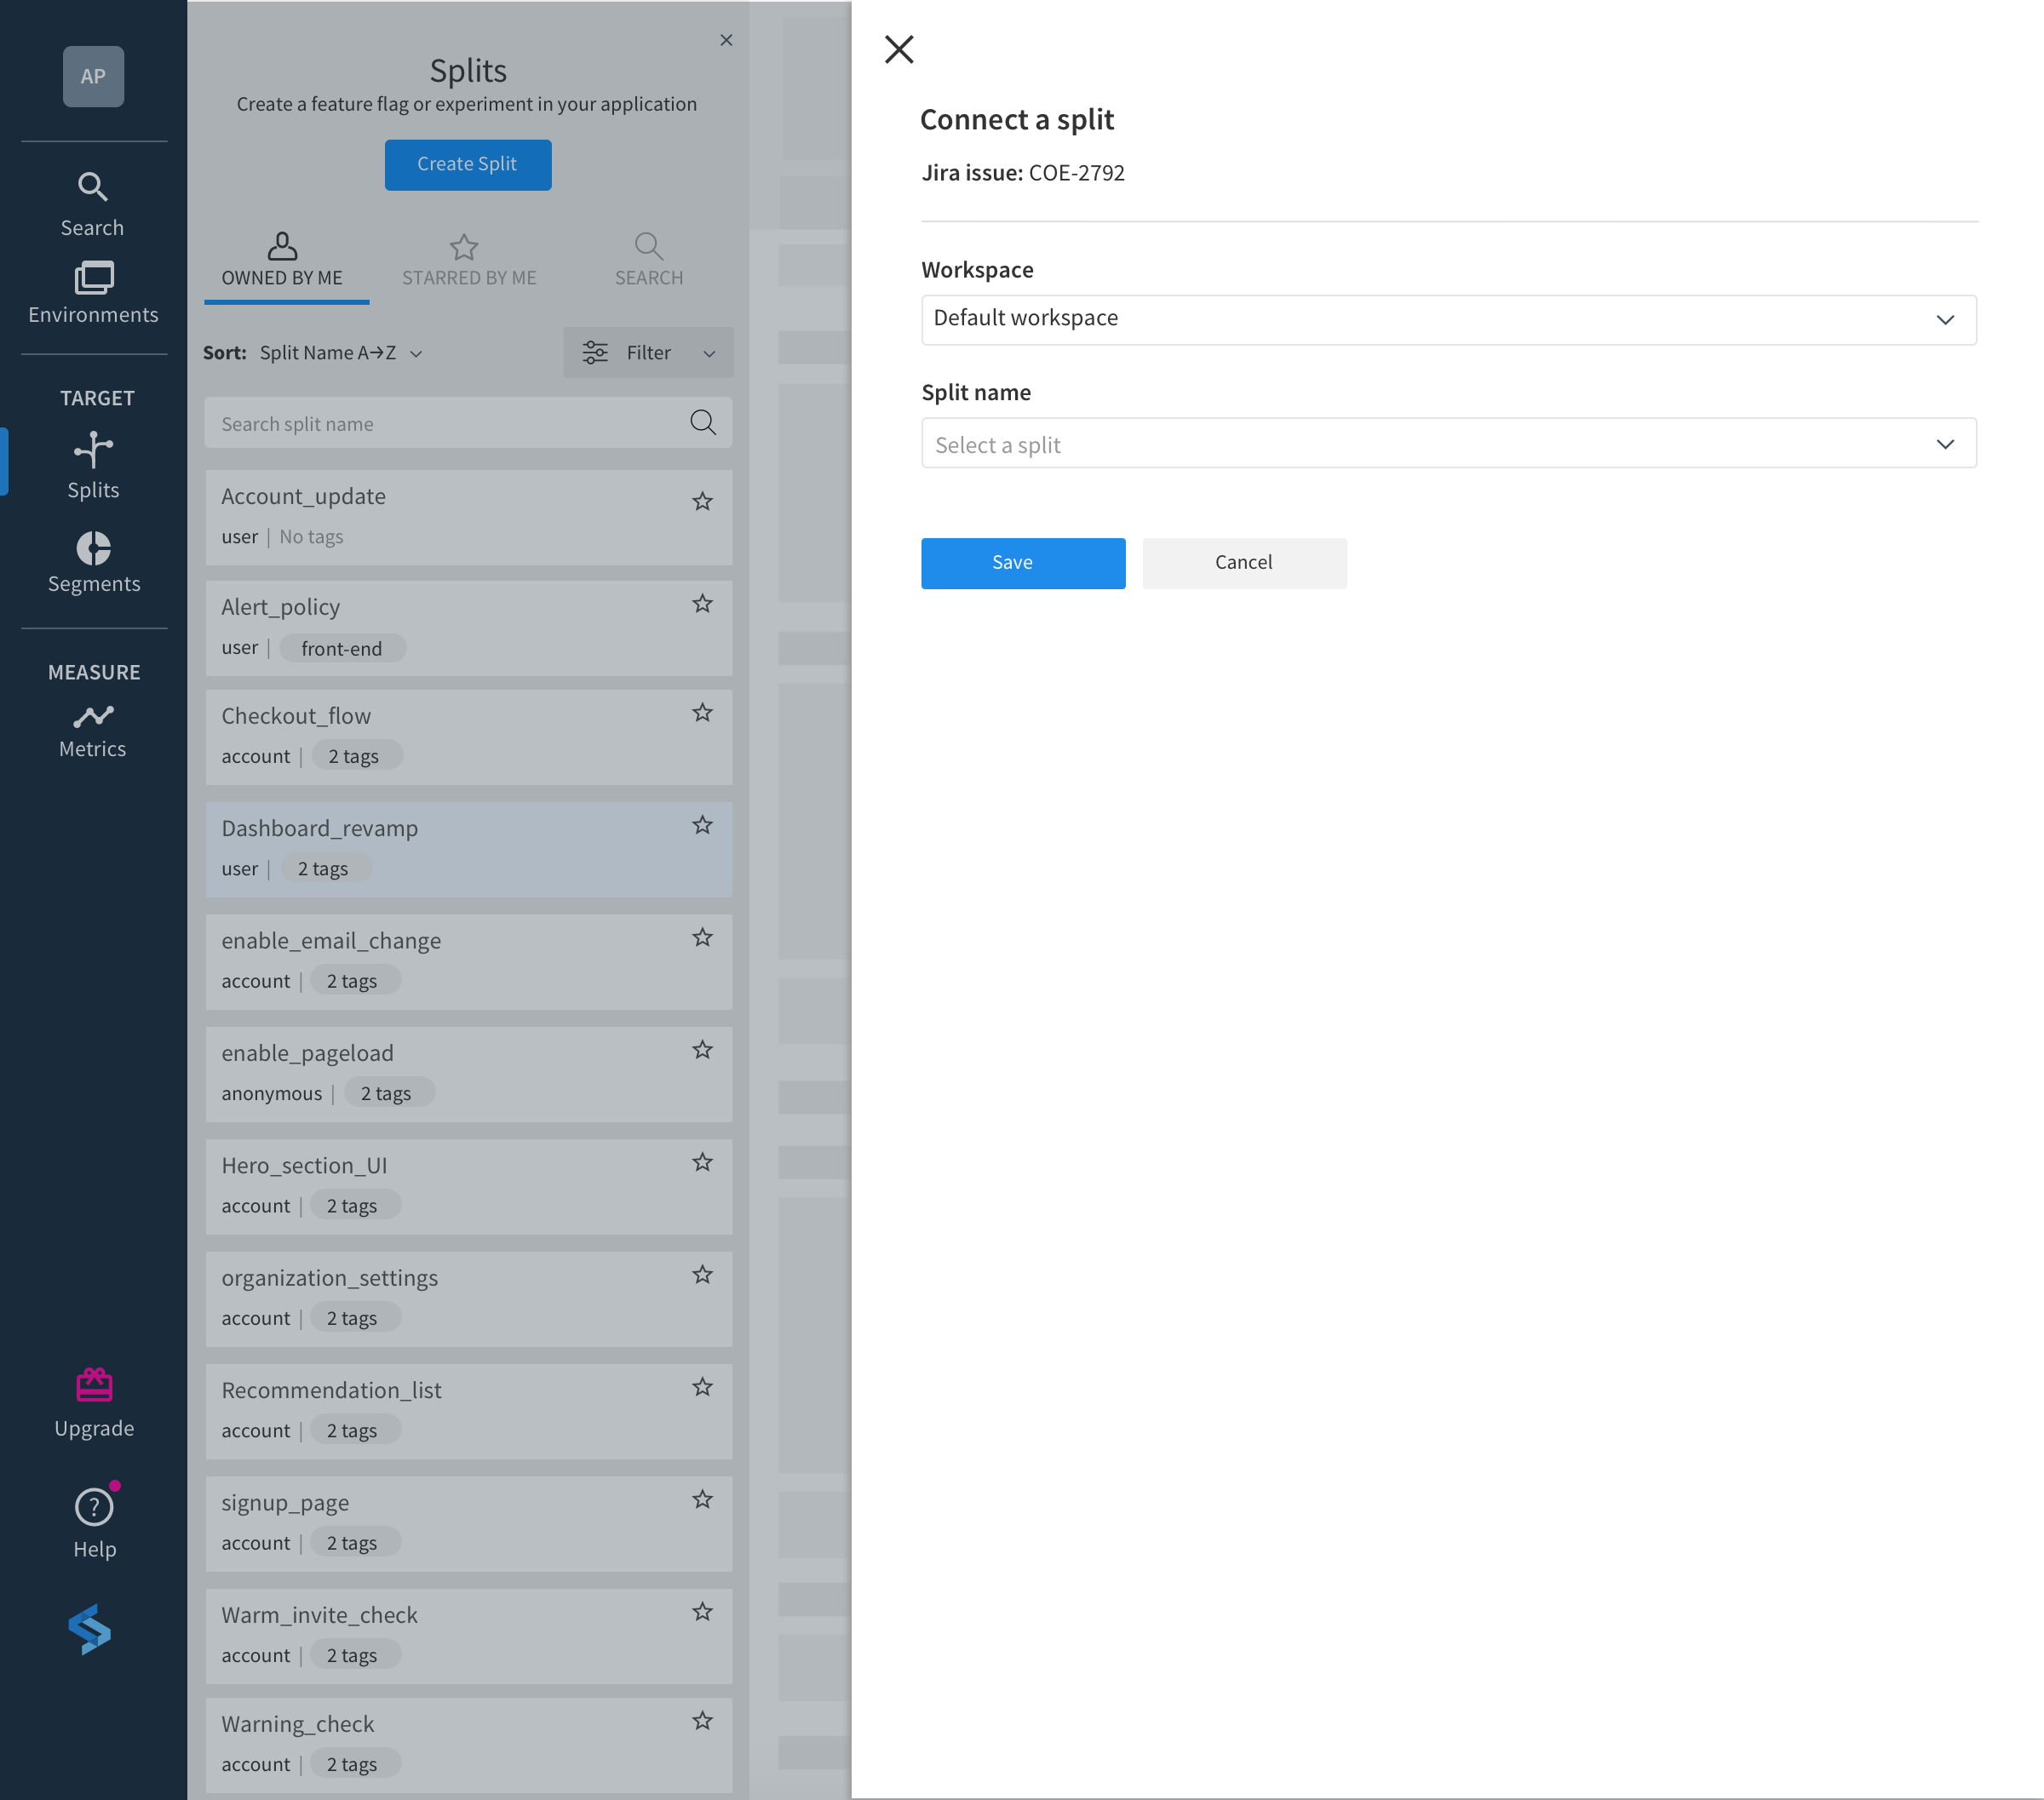
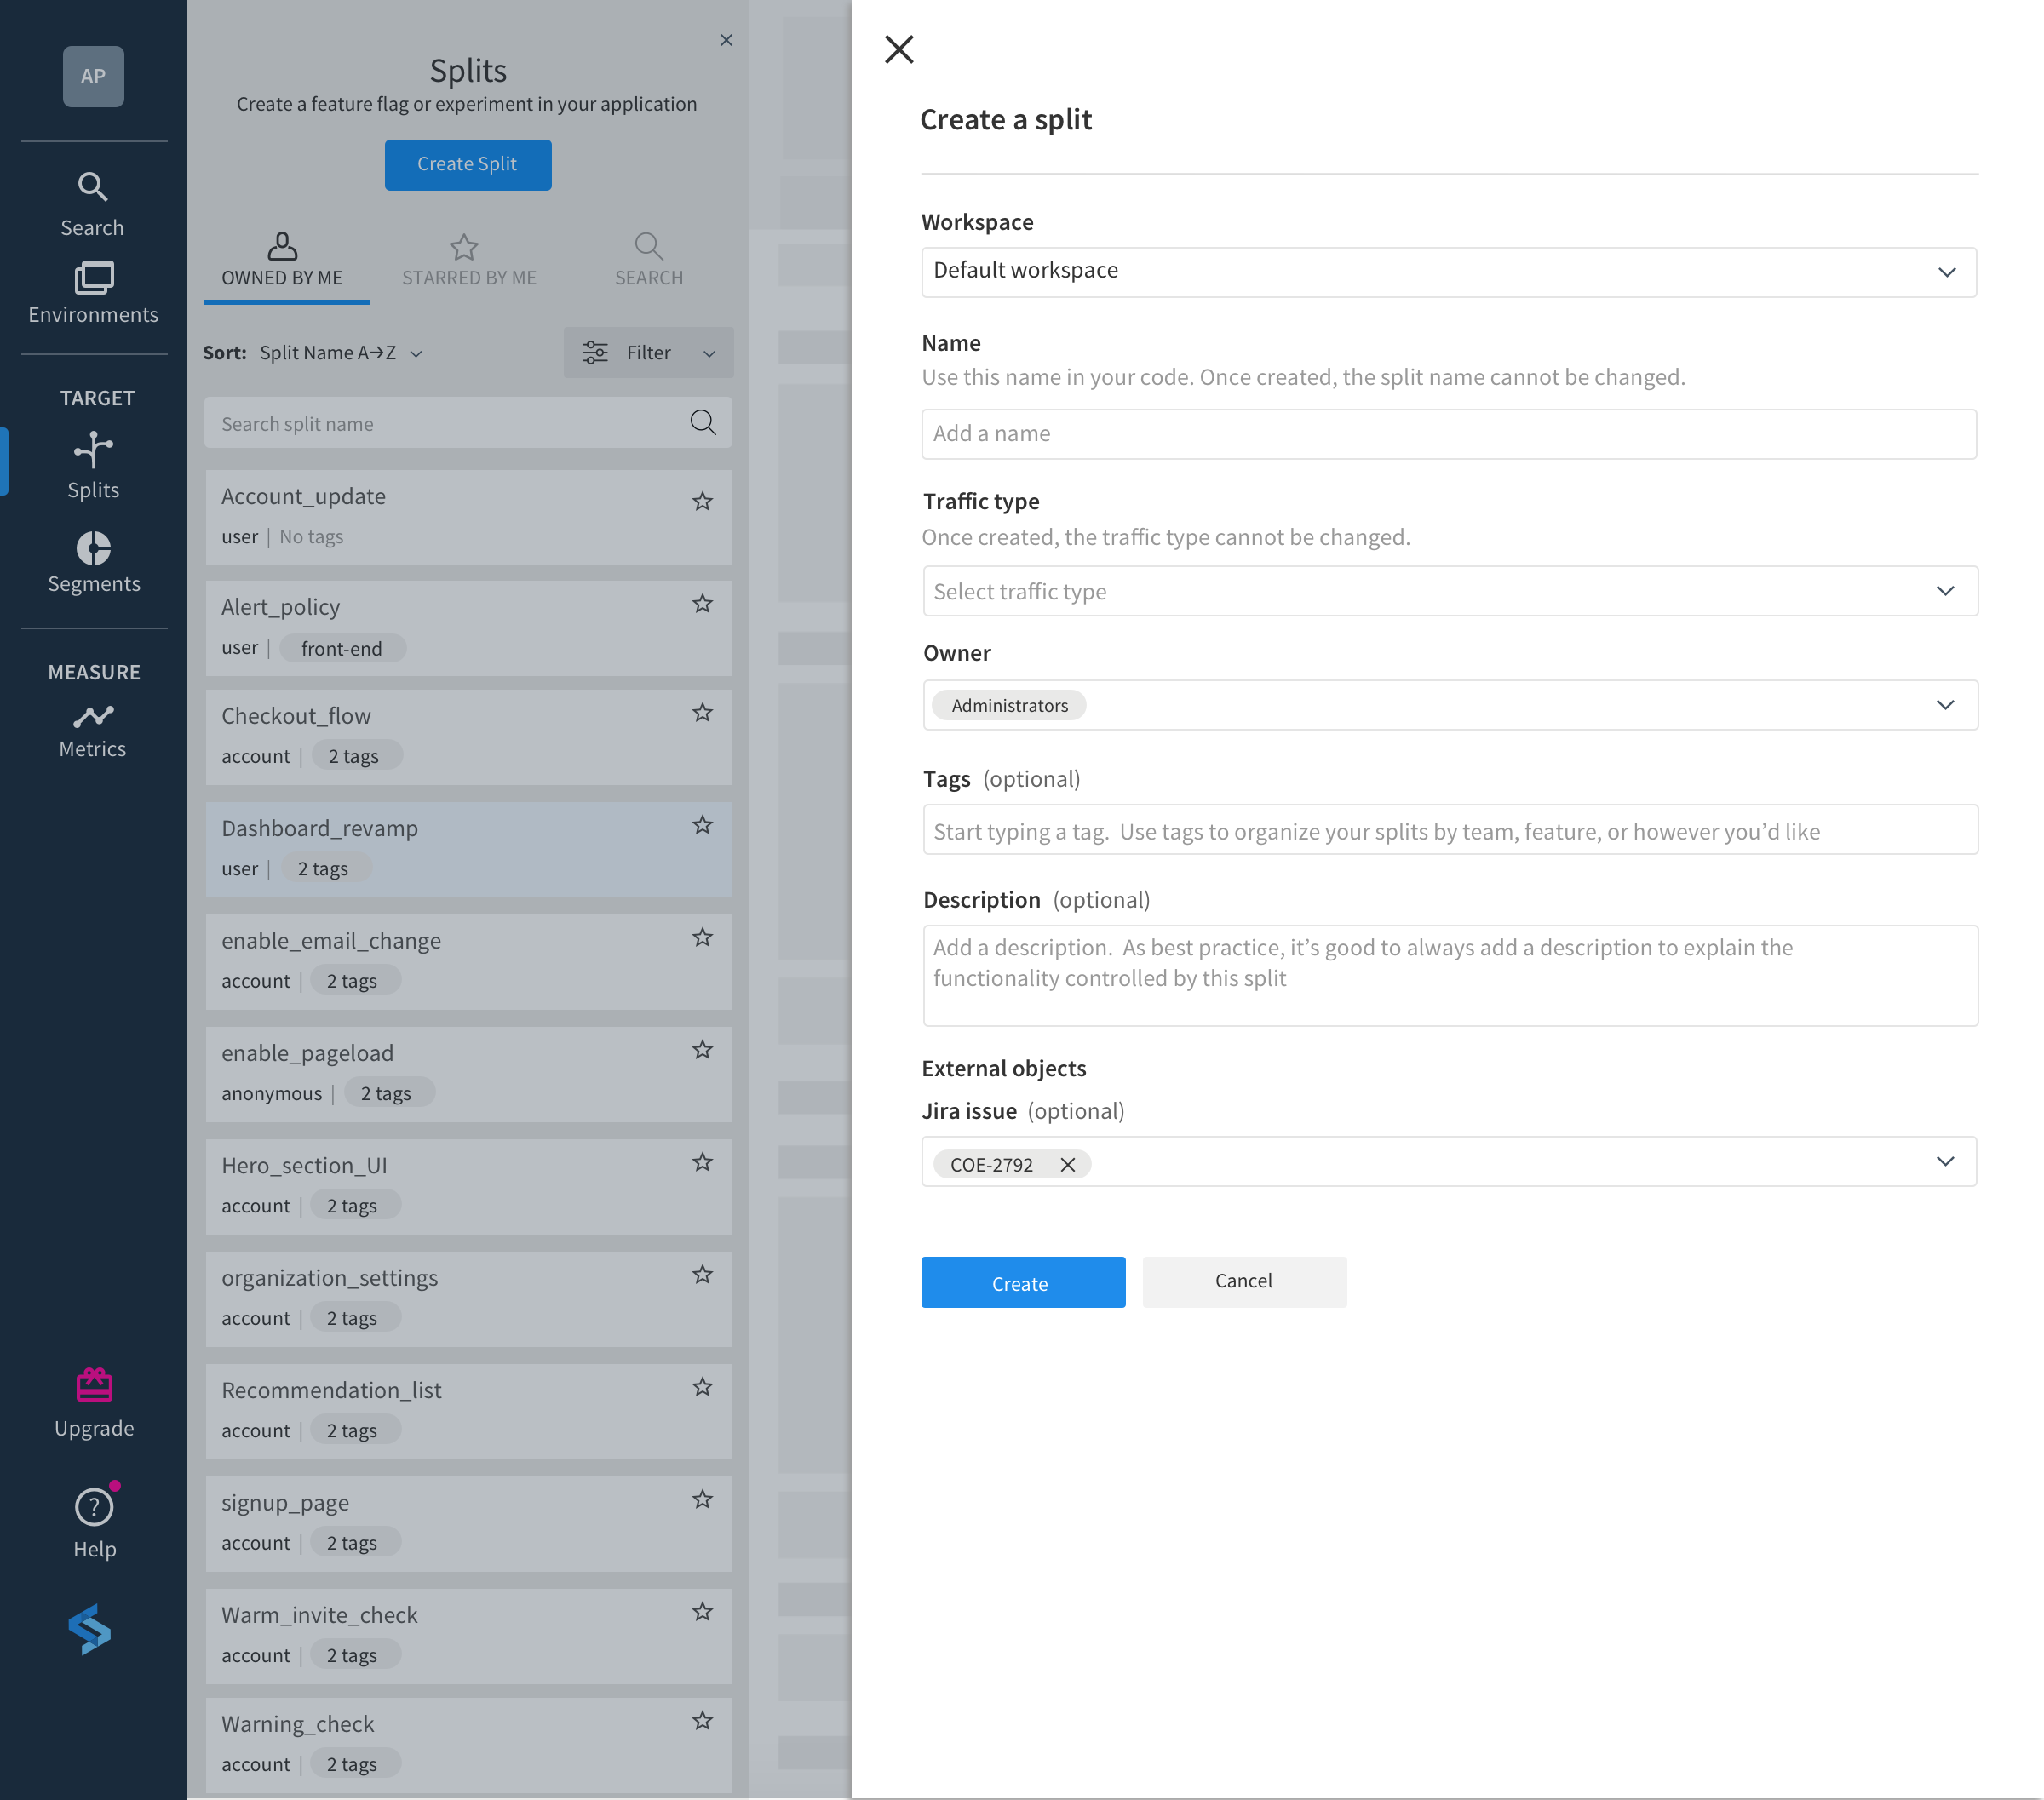
If you select Create Feature Flag, you will be redirected to the feature flag (split) creation form in Split. Here you simply need to select a Workspace (chosen during the configuration of Jira Cloud in Split), name your split, select the traffic type (the type of keys used for flag evaluation), and specify one or more owners (users who can edit this split). It’s good practice to add Tags and a Description to help you and your teams organize and identify splits as you scale.
Again, the Jira issue number was prefilled for your convenience. You can also add multiple Jira issues in the Jira issue field if applicable.
Now that you’ve successfully added a feature flag to your Jira issue, you’ll see the name and status of the feature flag in the Releases field. If your flag already has targeting rules configured, the status reflected in the Releases field will be “ON” (whether the flag is actively targeting users or killed). If no targeting rules are added to a flag, the status will be “OFF”.
Optionally, you can use the “+” icon next to Releases to add multiple feature flags if applicable. When there are multiple flags connected, you will see the number of flags in the “ON” state. If all flags are not configured with targeting rules, you will see the number of flags with the status “OFF”. Flag names are shown when you hover over the Releases field.
Step 2: Set targeting rules for your feature flag
Split provides multiple ways to target your users with feature flags in a controlled rollout.
A controlled rollout is a feature rollout with highly granular user targeting. It allows you to release new features gradually, ensuring a good user experience for smaller groups of users before releasing them to larger groups.
You can specify users for each treatment based on predefined lists: (segments), targeting rules, and percentage traffic allocation. Targeting rules can be based on any user attribute available to the Split SDK running in your application, such as location, age, size of shopping cart, etc. Together, these targeting methods give you fine-grained control when segmenting users for rollouts and experiments.
To start, we’ll guide you through a controlled rollout where a feature is released first to a certain percentage of users. This allows you to test a new feature in production on a small percentage of users to see how they (and your application) respond. If the response is positive, you can continue to dial up the percentage until 100% of your user base is on the new feature.
Running a controlled rollout by percentage is done using the Default Rule in Split. This rule is applied in the absence of any other targeting rules or on any users that do not meet the criteria specified in any other targeting rules.
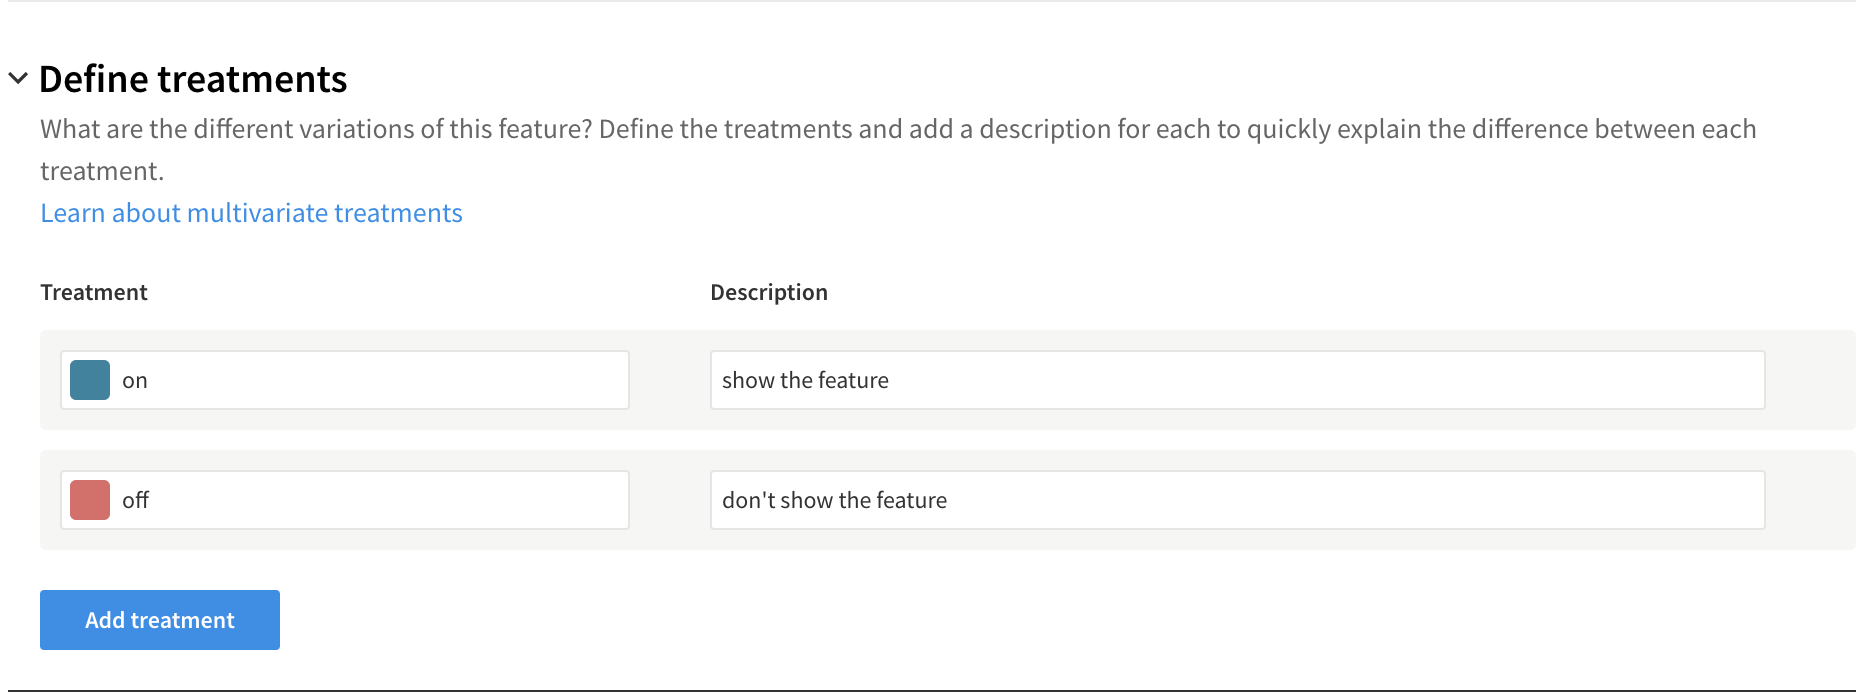
Click on the feature flag in the Releases field in Jira to be redirected to the flag’s Targeting rules tab in Split. Before creating any targeting rules, you’ll first need to Define Treatments. Flag treatments are different variations of the feature you wish to apply to users; in its simplest form this can be “on” (show the feature) or “off” (don’t show the feature).
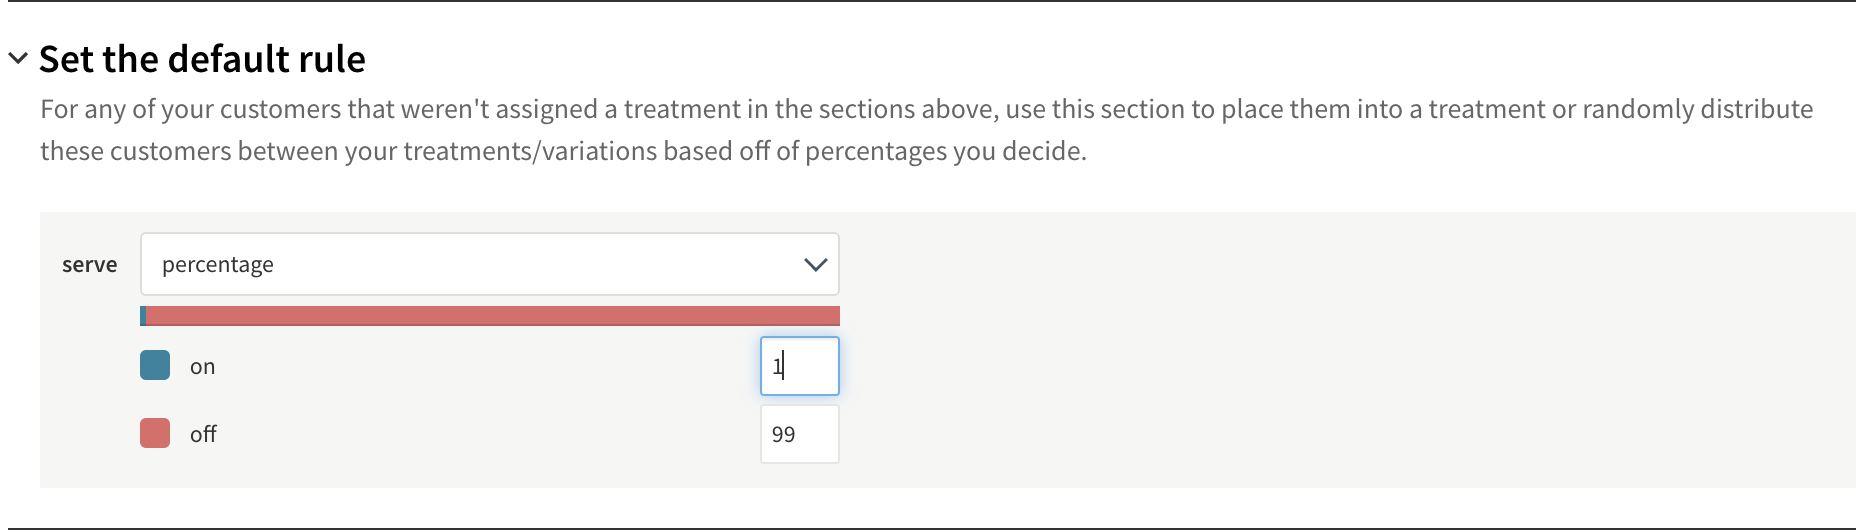
Once your treatments are defined, scroll down to Set the default rule and select percentage in the serve dropdown. Here you can assign the percentage of users to be randomly assigned to each treatment. These percentages are based on your risk tolerance. For example, if this is a high-risk feature, you may want to start with 1% “on” and 99% “off”. When you’ve finished allocating percentages to each treatment, click Save changes on the top right of the tab for the rule to take effect.
Now, if you view this feature flag next to Releases in Jira, you will see the status has updated to “ON”, signifying the flag has been configured with targeting rules. If you hover over the flag, you’ll see the treatment name and the percentage of your user base being randomly assigned to that treatment. In this example, you would see “1% on” on hover. This hover detail will automatically update as you modify your targeting rules in Split.
For example, if you decide to add a rule so your QA testers will always receive the “on” treatment rather than being randomly assigned to the 1% “on” or 99% “off” via the Default Rule, you can easily do so in Split by creating a segment comprised of your QA testers.
Once your segment is created in Split, navigate back to the Targeting rules tab and click Create Whitelists to add the QA testers segment to always receive the “on” treatment.
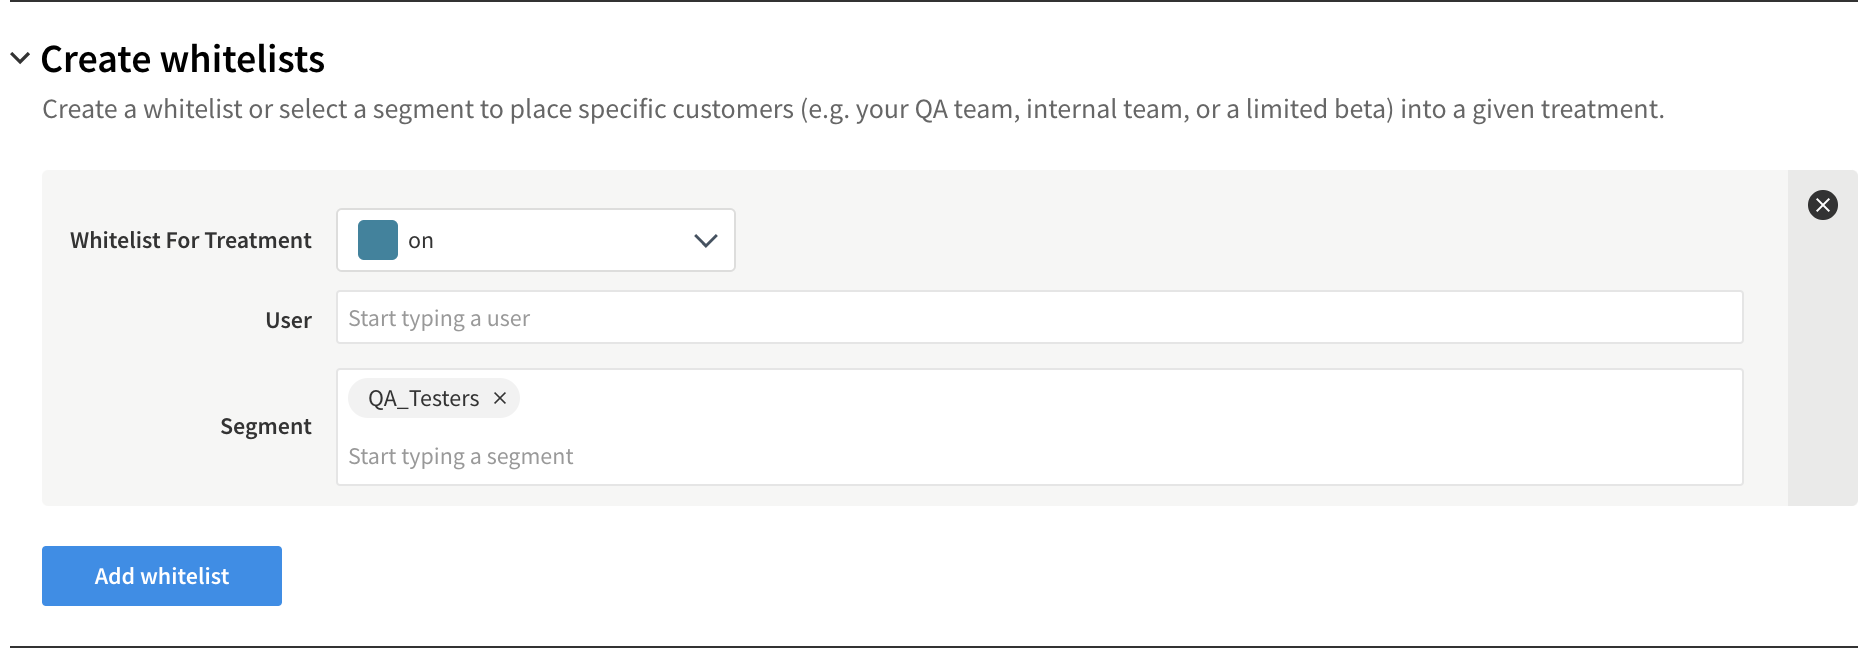
Now, if you view this feature flag next to Releases in Jira, you will see the number of targeting rules in effect when you hover over the flag. In this example, you would see “2 rules” on hover.
Step 3: Ramp up a feature flag to more users
Once you’re confident your feature is safe to expose to more users, you can update the Default Rule and increase the percentage of users randomly assigned to the “on” treatment.
Before doing so, it’s best practice to double-check whether there are any unfinished Jira issues tied to the feature flag. This can be quickly verified in Split under the Additional settings tab under External objects for the flag (split). Here you can see that the issue we connected in Step #1 is Done and there are no other outstanding issues. We are safe to dial up the split!
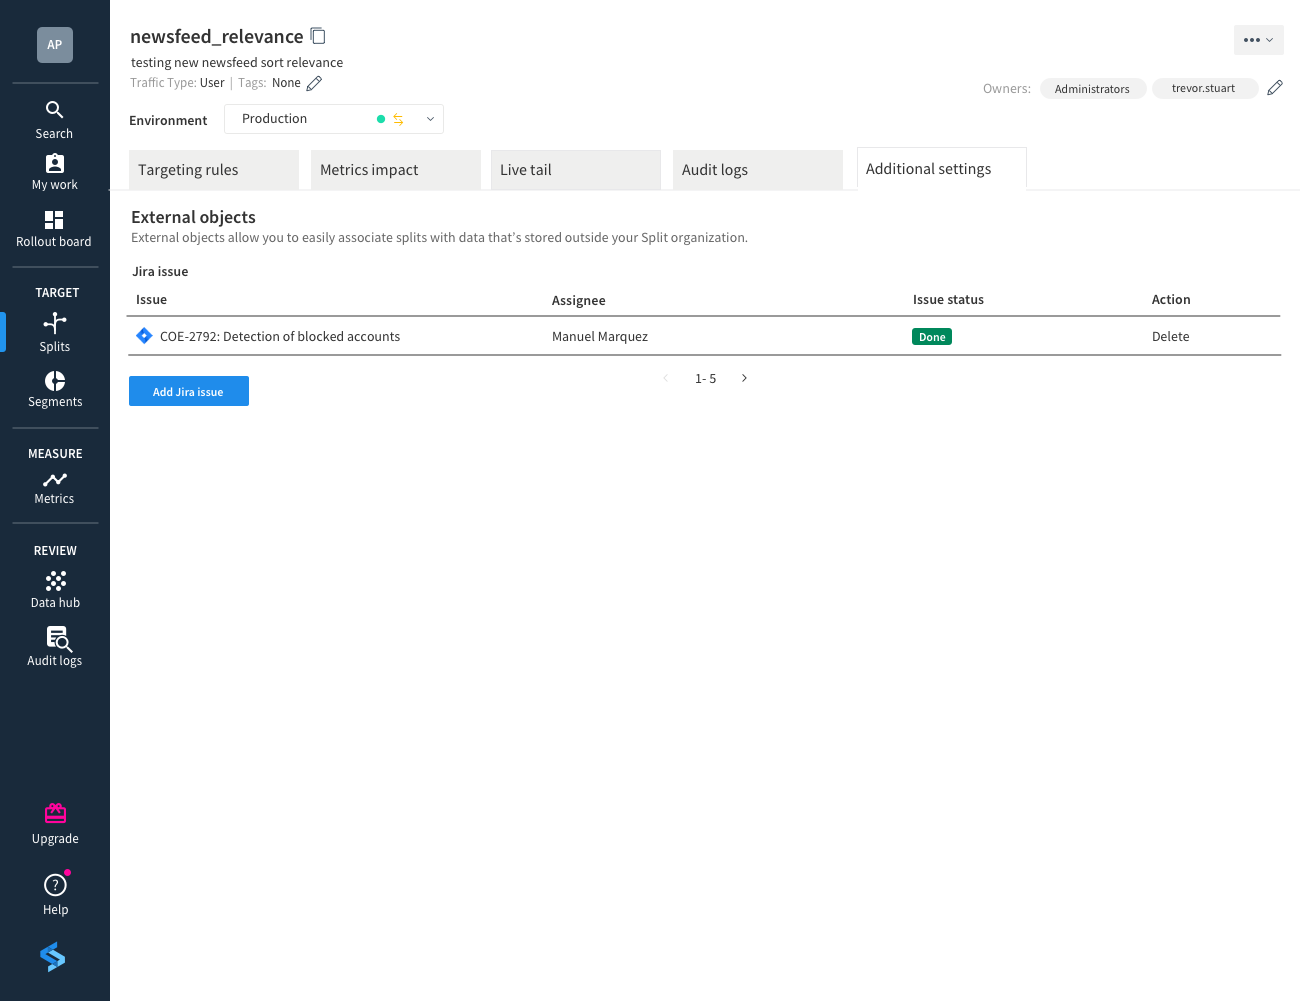
If you see an issue that is not Done, you can click the issue to view its details in Jira or reach out to the Assignee directly for an update. You also have the option to add more Jira issues here.
To ramp up the split to more users, navigate back to the Targeting rules tab for the split and update the percentages under the Default Rule to whatever allocations you are comfortable with. This step can be repeated until the feature has been rolled out to 100% of your users.
See more integrations for Atlassian Open DevOps.
Share this article
Next Topic
Recommended reading
Bookmark these resources to learn about types of DevOps teams, or for ongoing updates about DevOps at Atlassian.

DevOps community

DevOps learning path