- What is Agile?
- Agile Manifesto
- Value Stream Management
- DevOps
- Overview
- Jira and Confluence sprint refinement
- How to do scrum with Jira
- Learn kanban with Jira
- Learn how to use Epics in Jira
- Learn how to create an agile board in Jira
- Learn how to use sprints in Jira
- Learn Versions with Jira
- Learn Issues with Jira
- Learn burndown charts with Jira
- Auto-create sub-tasks and update fields in Jira
- How to automatically assign issues with Jira Automation
- How to sync epics stories with Jira Automation
- Automatically escalate overdue issues in Jira
- All articles
Comprehensive kanban tutorial with Jira
Step-by-step instructions on how to drive a kanban project with Jira

Get started for free with Jira’s kanban template
Kanban Tutorial
In this tutorial, we'll give you step-by-step instructions on how to drive a kanban project, prioritize your work, visualize your workflow, and minimize work-in-progress to prevent your team from being overloaded, all within Jira.
TIME
10 minute read. Complete over a few weeks
AUDIENCE
You are new to kanban software development and/or Jira
PREREQUISITE
You have created a Jira account
What is Kanban?
Kanban is similar to Scrum, in that it helps teams release software early and often. However, Kanban gives more flexibility in terms of planning and execution. Instead of working in time-based sprints, work is continuously delivered in Kanban, and your team pulls single pieces of work from the backlog, and then moves them to done.
Step 1: Create a kanban project
Once you login to Jira, you will have the option to create a project. When you get the project type selection, ensure you select Kanban software development project.
Your new Kanban software development project will also include a Kanban board. Once you've created your project, your team's Kanban board is the first thing you'll see. This is where your team will eventually keep track of their work.
Step 2: Configure your workflow
In Jira, the Kanban project gives you an out-of-the-box workflow with Backlog, Selected for Development, In Progress, and Done. This lets the product owner add tasks to the backlog, and move them to "ready for development" once the task or user story is fully baked. Team members can then select from that column and move to in-progress and to done. If your development workflow is different, it's easy to add or remove a workflow state. Many teams want to add a QA or reviewing stage in their workflow, for example.
To configure your columns and workflow, click Board in the top-right corner of the backlog, then select Configure.
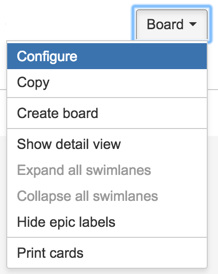
Once you're in the board configuration page, select Columns from the sidebar. You can either add a status or column with the buttons on the right, or hit the trash icon to remove a column. Once you have the workflow columns you want, hit Back to board in the top-right corner.
Step 3: Add tasks, bugs, or user stories to the backlog
Use the Create button to start adding tasks, bugs or user stories to your backlog. In Kanban, this is the first column of your board. If you don't have a project or feature in mind, try creating some sample tasks to get started and see how it works.
What are user stories?
In an agile framework, user stories are the smallest units of work. As a {type of user} , I want {goal} so that I {receive benefit}.
Let's use a website as a simple example to create a user story.
As a customer, I want to be able to create an account so that I can see the purchases I made in the last year to help me budget for next year.
User stories are sketched out by the product owner, and then the entire product team collectively determines detailed requirements.
Step 4: Prioritize the backlog
To rank or prioritize the items in the backlog, drag and drop cards up or down on the first column based on their priority.
Prioritization in Kanban:
A Kanban team is only focused on the work that's actively in progress. Once the team completes a work item, they pick up the next work item. The product owner is free to re-prioritize work in the backlog without disrupting the team, because any changes outside the current work items don't impact the team. As long as the product owner keeps the most important work items on top of the backlog, the development team is assured they are delivering maximum value back to the business. So there's no need for the fixed-length iterations you find in Scrum.
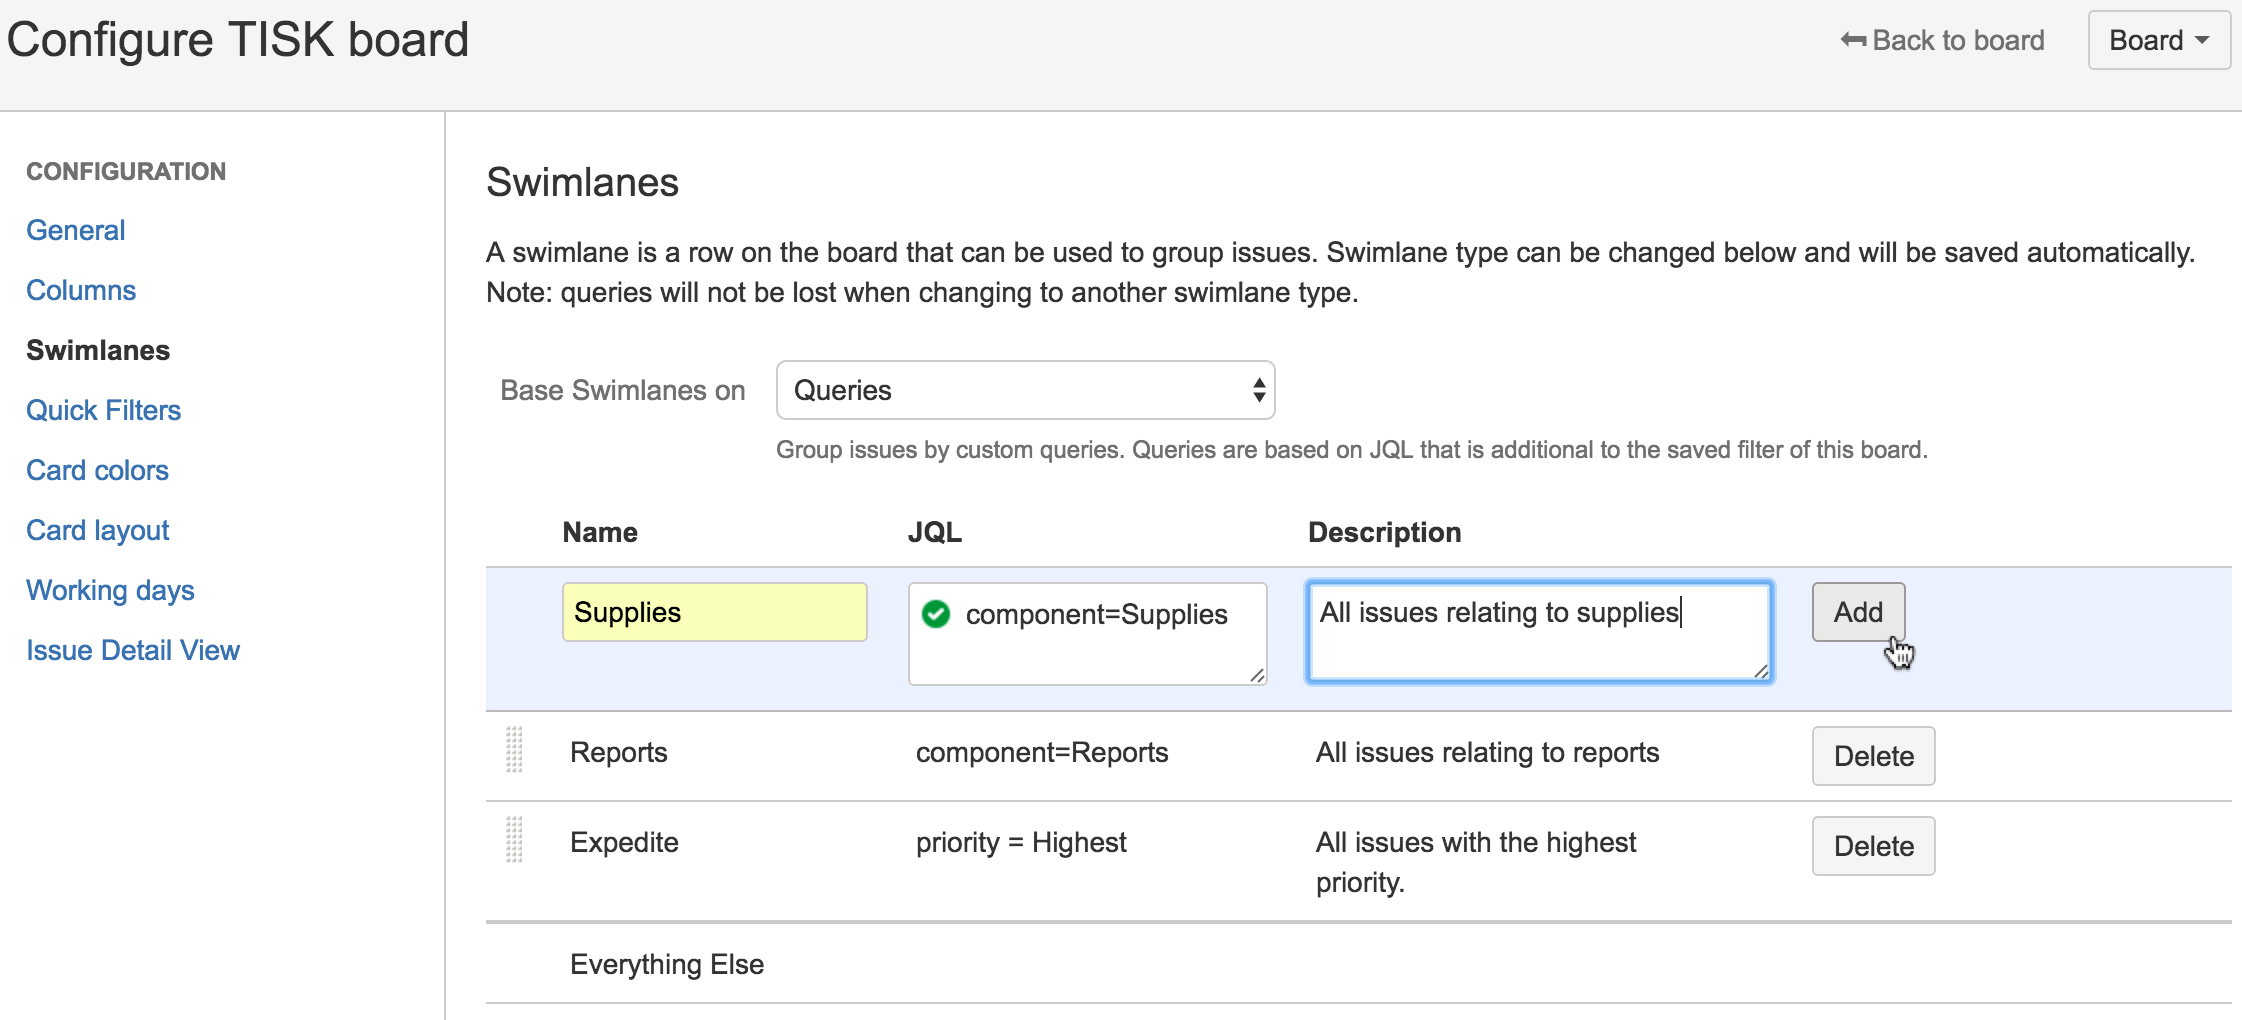
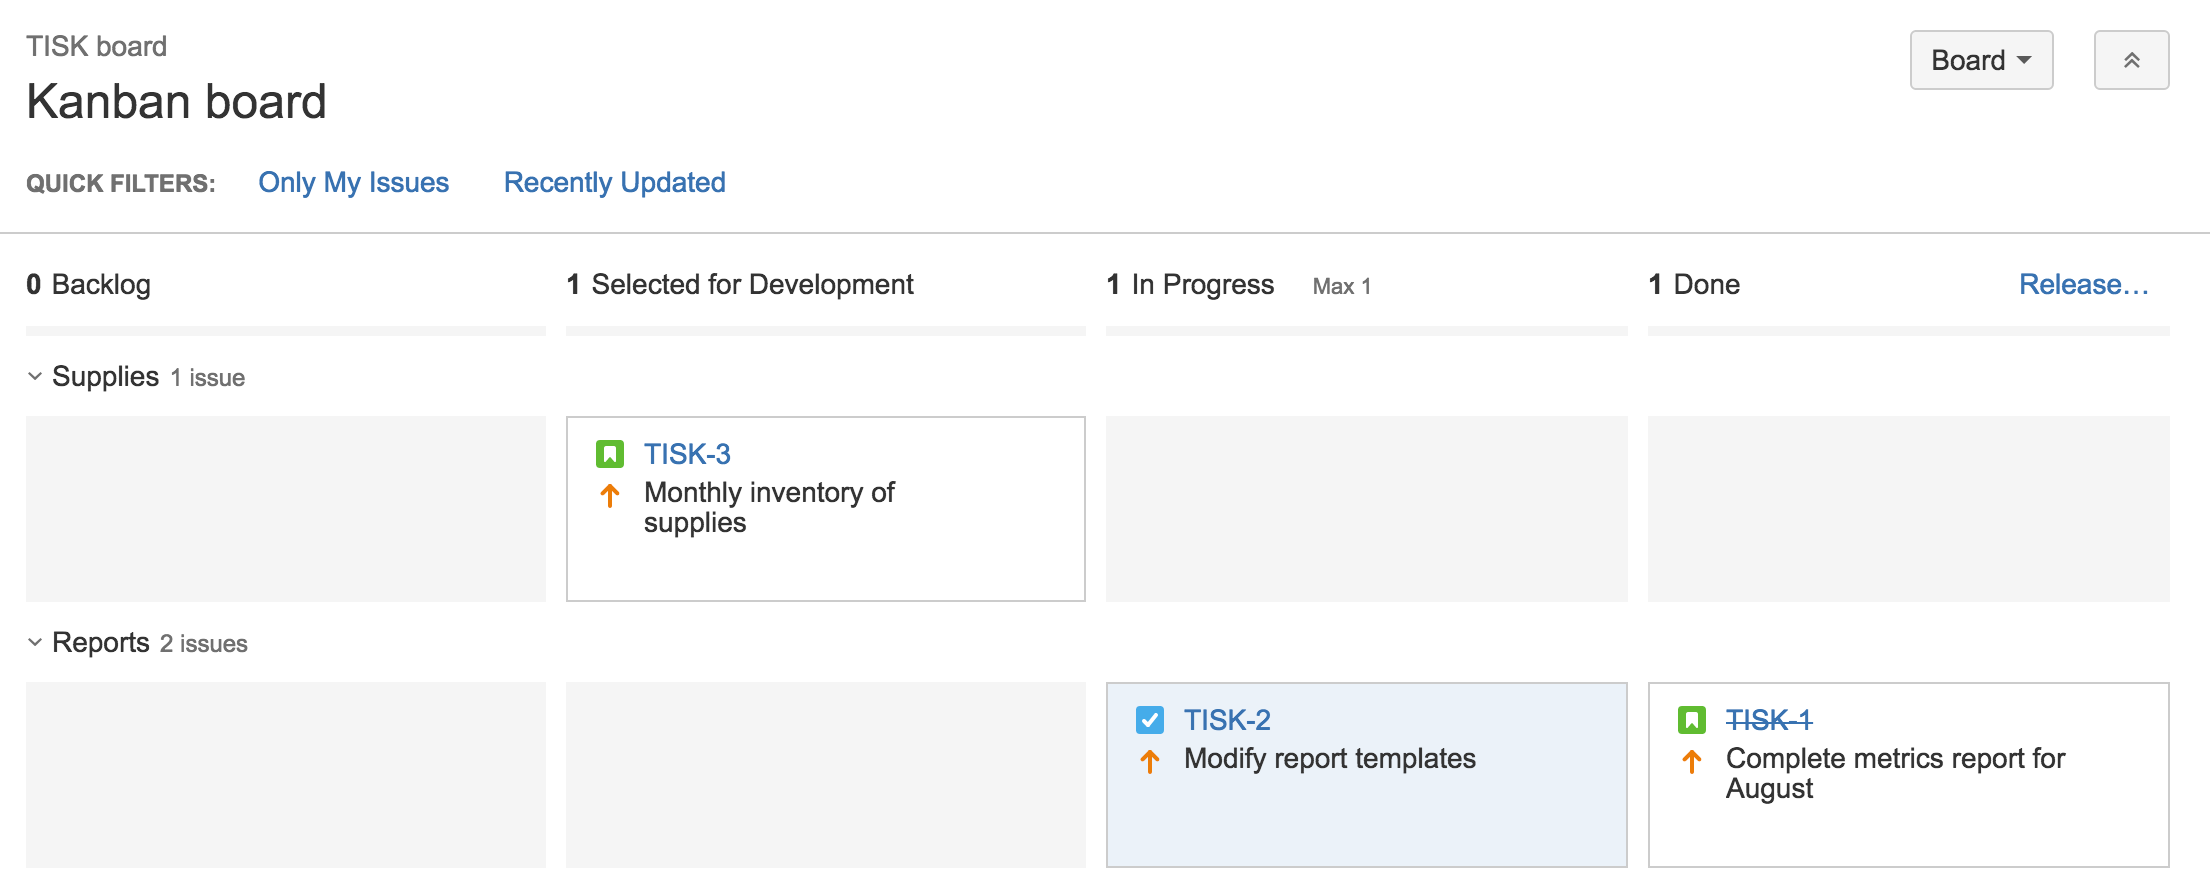
It may be helpful to use the priority key when adding issues to the board so that it's easy to visualize when prioritizing. The default settings in Kanban will add swimlanes to your board, one for high priority items, which is labeled "Expedite," and one for everything else. You can also use tools like labels or features within each issue to help you categorize pieces of work.
What are swimlanes?
A swimlane lets you categorize issues so that agile teams can see which issues they should work on next. To edit the default swimlanes, go to board configuration in the upper right corner of your backlog and select Swimlanes from the sidebar. You can add swimlanes on this screen by categorizing your issues with JQL.
Step 5: Select work from the backlog
In Kanban, team members take items from the Backlog or Selected for Development column and move them to In Progress.
We recommended limiting the work that is in-progress. To make this easier, you might consider adding limits to your columns. Doing this will cause a warning to show if your team moves too many tasks to a column.
Why limit work in progress?
You can set limits for your work in progress (WIP), which basically lets you set the minimum and maximum amount of work that lives in each column on the board. WIP limits reduce the amount of work nearly done by forcing the team to focus on a smaller set of tasks — essentially improving how your team works all throughout. WIP limits also highlight bottlenecks in a team's delivery pipeline before a situation becomes dire. These benefits guarantee increments of value to the customer sooner, making WIP limits a valuable tool in agile development. More here.
In Jira, you can add minimum or maximum limits for each column in the Columns section of the Board configuration.
Step 6: hold team meetings
In Kanban, daily stand-ups and retrospectives are optional. However, we recommend that you and your team decide on the cadence of meetings. A daily stand-up can still be beneficial for the team to highlight where there are blockers in their work. It may also be helpful for the product owner to share what he or she has prioritized and why. Figure out what works for your team and try it out — you can always adjust as you go.
What is the daily stand-up meeting?
Attendees Required: development team and product owner
Optional: team stakeholders
When: Once per day, typically in the morning
Duration: No more than 15 minutes. Don't book a conference room and conduct the stand-up sitting down. Standing up helps keep the meeting short!
Agile Framework: Scrum and Kanban.
Purpose: The daily stand-up is designed to inform everyone quickly of what's going on across the team. It's not a full status meeting. The tone should be light and fun, but informative. Have each team member answer the following questions:
What did I complete yesterday?
What will I work on today?
Am I blocked by anything?
There's an implicit accountability in reporting what work you completed yesterday in front of your peers. No one wants to be the team member who is constantly doing the same thing and not making progress.
ProTip: Some teams use timers to keep everyone on track. Others toss a ball across the team to make sure everyone's paying attention. Many distributed teams use video-conferencing or group chat to close the distance gap. Your team is unique — your stand-up should be, too!
Step 7: Using the Control Chart
At regular intervals, you might take a look at the Control Chart to monitor your team's progress.
What is the Control Chart?
The Control Chart shows the following information:
How long each issue sits in a particular status before moving on.
Your team's cycle time, which is the average length of time it takes to complete each issue. You can see the cycle time for your product, version.
A rolling average of your team's cycle time. As your team gets more efficient, you should see this number decrease.
The Control Chart is useful because it helps you analyze how your team works. Some questions you might ask are:
Are certain types of issues taking too long to complete? This may mean that the issues are too complex, or they keep getting bumped for higher-priority work.
Are issues taking too long to transition from a particular status? This may indicate a bottleneck in your team's process.
What's your team's rolling average? Is your team getting more efficient? Why or why not?
Step 8: Using Kanban backlog (optional)
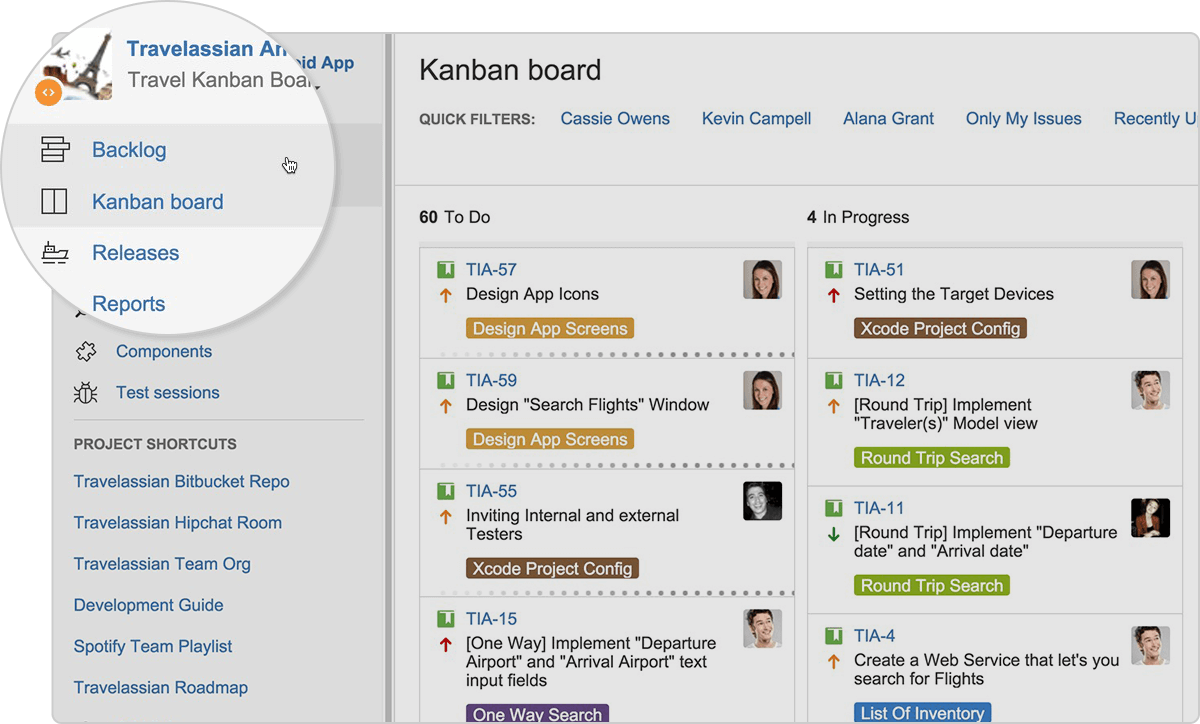
Many teams love the flexibility of Kanban, but they may start to feel that the first column of their board — the backlog — becomes long and unmanageable. That's why we've added a backlog in Kanban software development projects.
The Kanban backlog gives you a backlog for your board, which is on a different tab in your project. The Kanban backlog essentially gives product managers a bigger and dedicated space to freely build and prioritize the backlog, without distracting the team from their current work. The product manager can then move work from the backlog into "ready for dev" to let the team know the work that's upcoming.
Check out Using your Kanban backlog and Enabling the Kanban backlog for more details.
How to turn on Kanban backlog
Log in as a user with the 'Jira Administrators' global permission.
Select Jira Administration from the top bar > Applications, then scroll down the page to the Jira section.
Under Jira Labs, select the features that are of interest to you.
Burnup Chart
Kanban backlog
Advanced practices
By now, you may have already realized just how extremely customizable Jira can be. Read on for some advanced tips and tricks that your team can use, to unleash their potential, and finish off work-in-progress faster and more efficiently.
Step 9: Automate away the repetitive tasks
Once you have mastered the art of Kanban, you can start to automate away some of the more repetitive tasks. This is a great way to keep your board clean, your backlog up to date and generally keep your work up to date.
See some of the most commonly used automation rules for Kanban in the Jira Automation Template Library.
Step 10: Using column constraints
In step 5, we've already discussed the importance of limiting work in progress. In this section, we'll focus on that more, especially since limits actually highlight any bottlenecks that your team may be experiencing. By highlighting these early on, your team can reshuffle priorities and figure out a realistic plan of action.
You can configure the column constraints of your board by going to the Columns section of Board configuration. From there, set minimum and maximum constraints for each column.
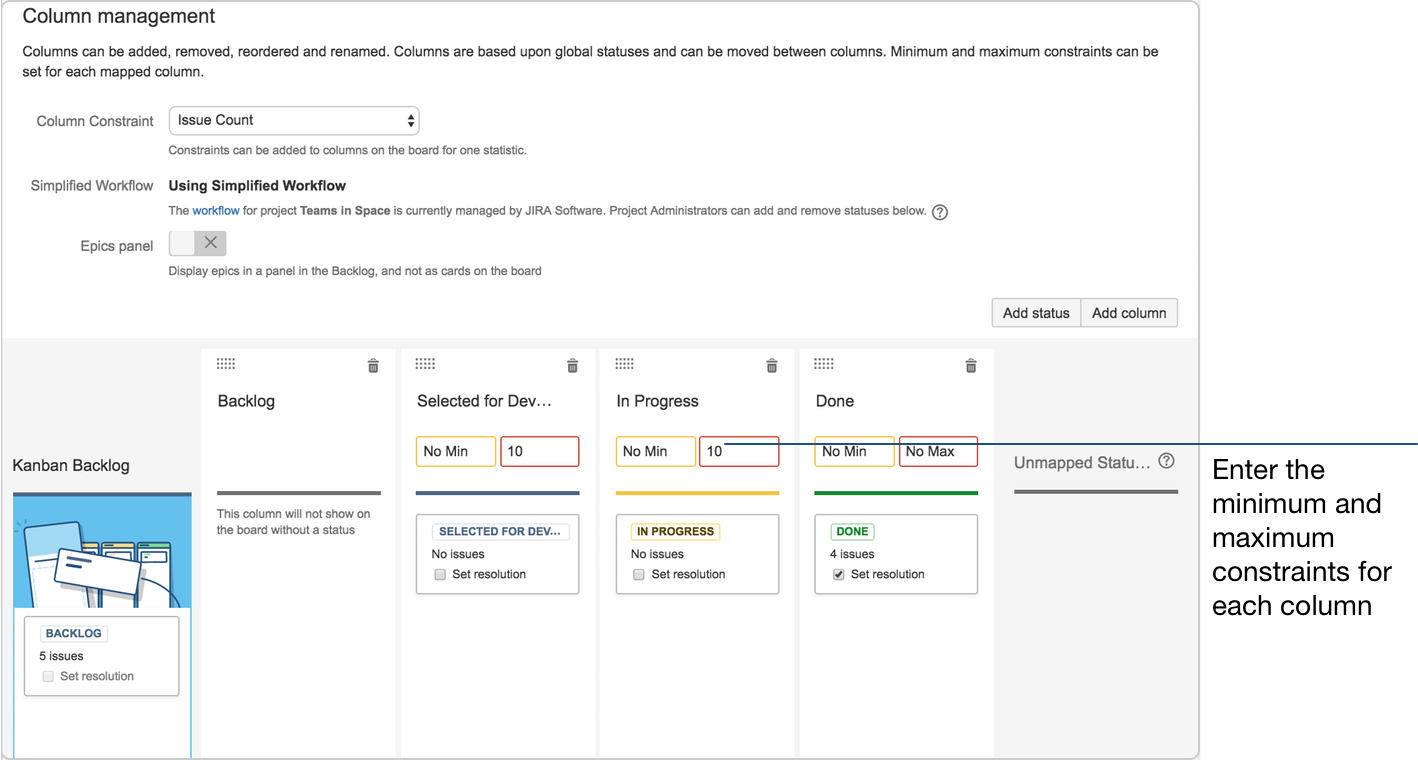
If you have more than 10 issues in either the Selected for Development or In Progress columns, the columns would be colored red at the top:
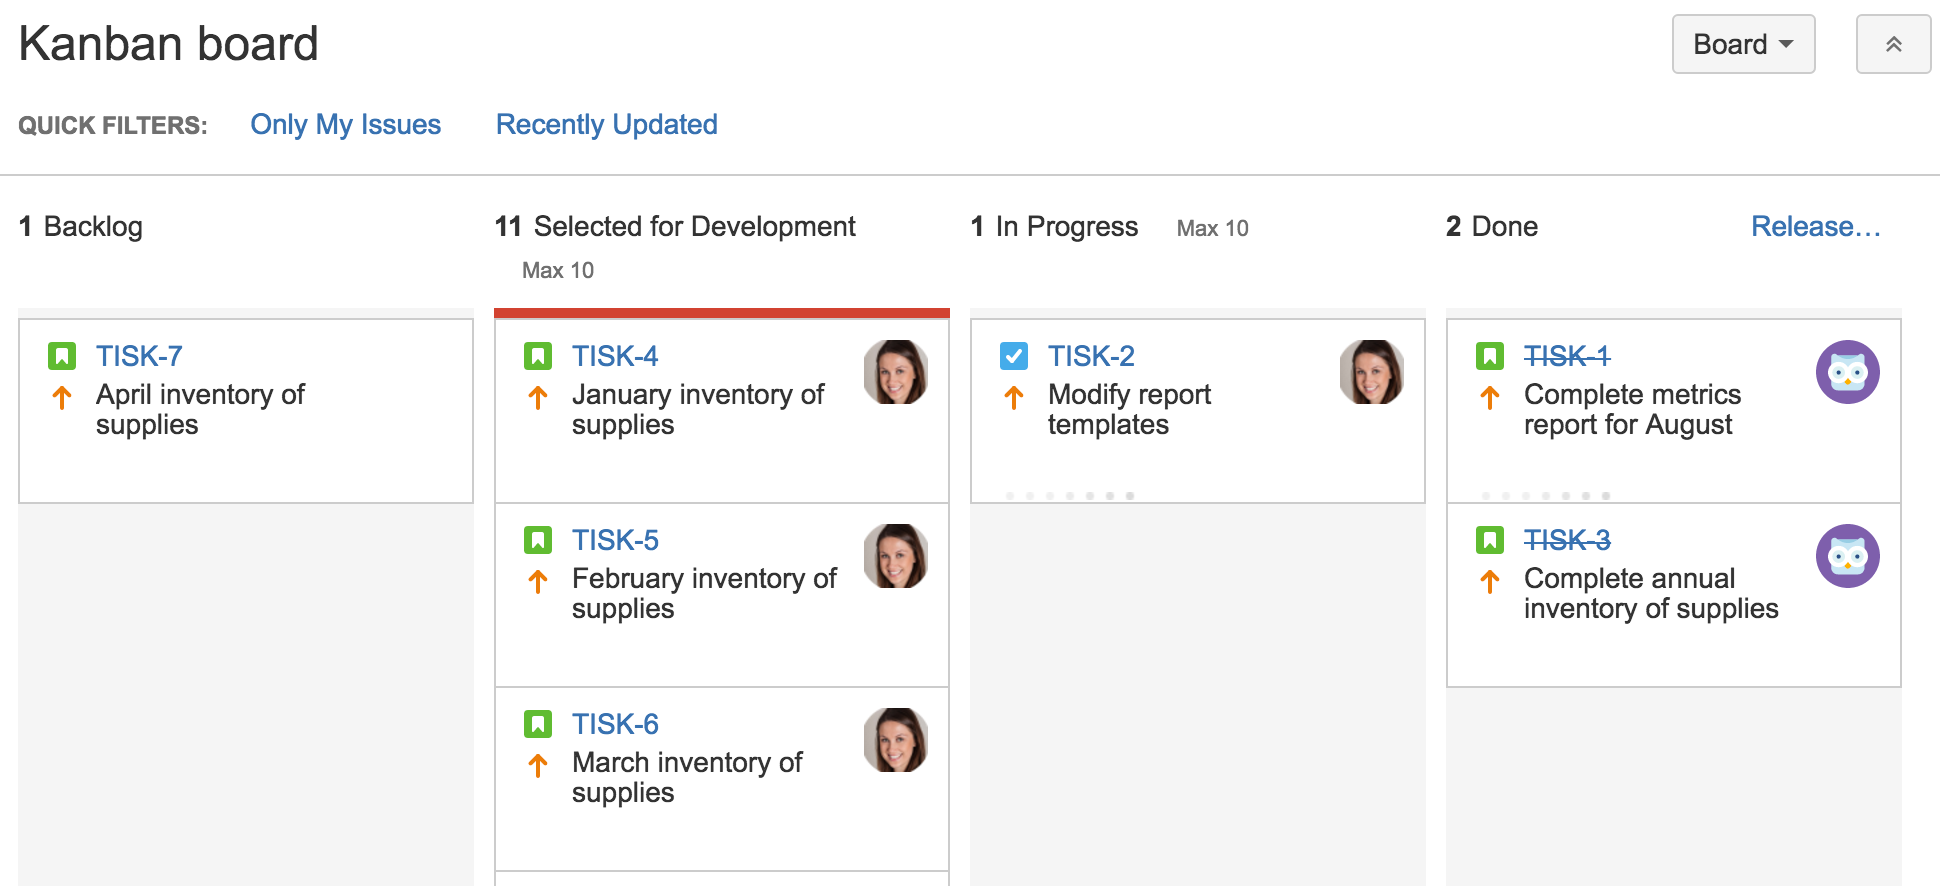
Note that your board may appear differently if you've enabled the Kanban backlog for your board.
Depending on your team's needs, you can go a step further and configure your column constraints to exclude sub-tasks from the count.
For more details on how to do this, go to Configuring columns.
Step 11: Using the Cumulative Flow Diagram
The Cumulative Flow Diagram is one of the important reports you can ever use when working in Kanban methodologies. The Cumulative Flow Diagram lets your team quickly visualize their effort, and match it against the overall progress of the project.
In Jira, the Cumulative Flow Diagram shows the statuses of your team's issues over a period of time:
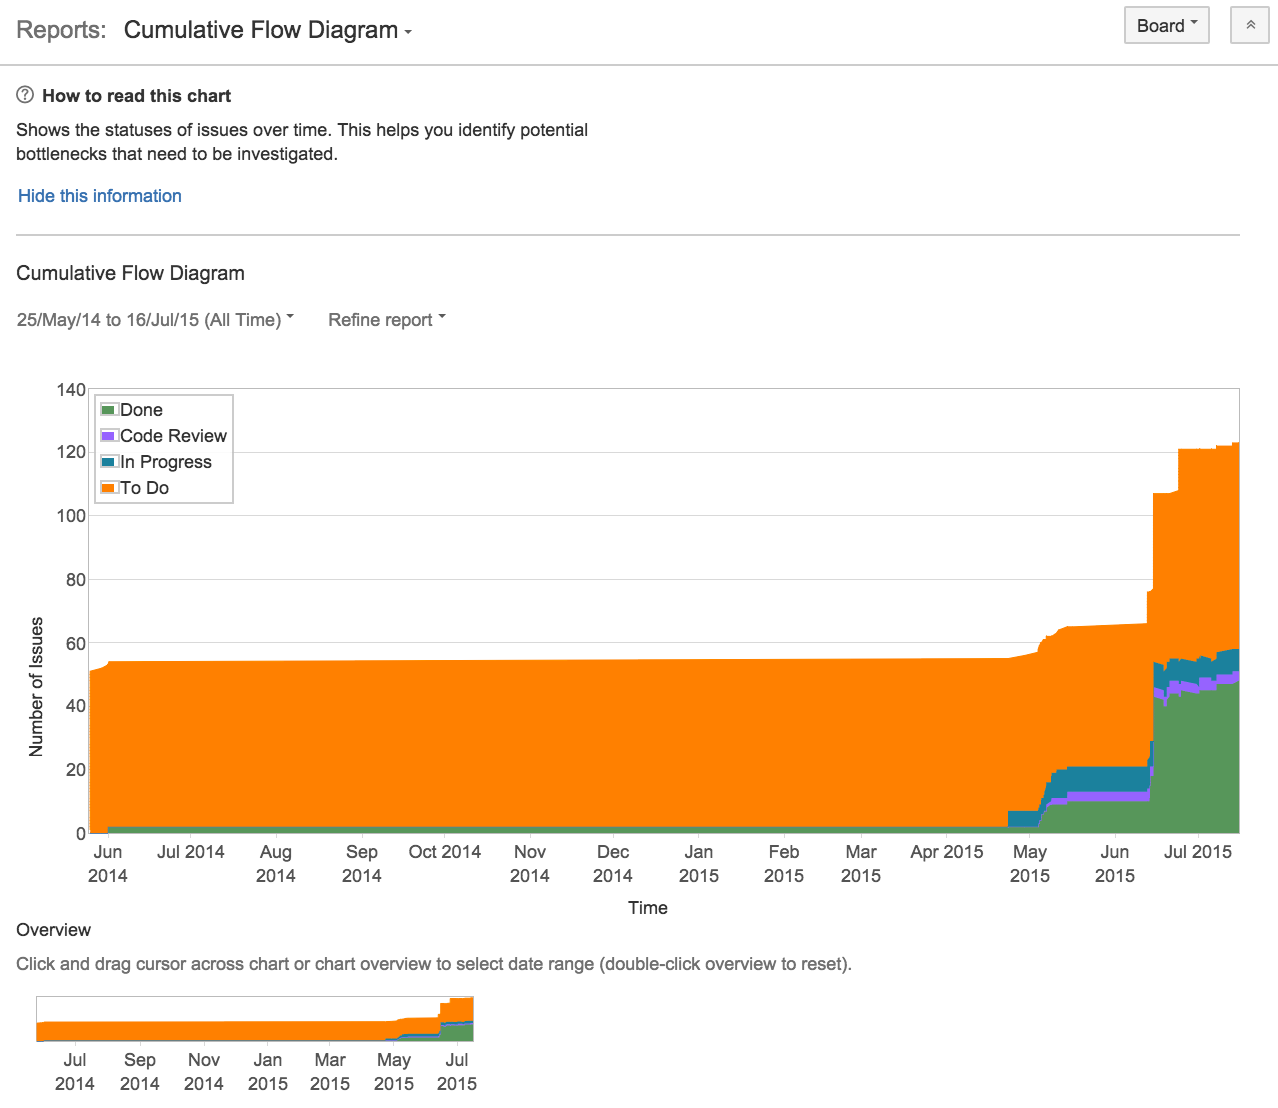
Any bottlenecks will appear as a sudden change of the issue statuses in the diagram — whether the change is a sudden rise or fall, it is definitely worth looking into the issues involved.
When predicting potential bottlenecks, the Cumulative Flow Diagram is indeed a tool your team should consider using.
- What is Agile?
- Agile Manifesto
- Value Stream Management
- DevOps
- Overview
- Jira and Confluence sprint refinement
- How to do scrum with Jira
- Learn kanban with Jira
- Learn how to use Epics in Jira
- Learn how to create an agile board in Jira
- Learn how to use sprints in Jira
- Learn Versions with Jira
- Learn Issues with Jira
- Learn burndown charts with Jira
- Auto-create sub-tasks and update fields in Jira
- How to automatically assign issues with Jira Automation
- How to sync epics stories with Jira Automation
- Automatically escalate overdue issues in Jira
- All articles
Learn kanban with Jira
Step-by-step instructions on how to drive a kanban project with Jira

Get started for free with Jira’s kanban template
Kanban Tutorial
In this tutorial, we'll give you step-by-step instructions on how to drive a kanban project, prioritize your work, visualize your workflow, and minimize work-in-progress to prevent your team from being overloaded, all within Jira.
TIME
10 minute read. Complete over a few weeks
AUDIENCE
You are new to kanban software development and/or Jira
PREREQUISITE
You have created a Jira account
What is Kanban?
Kanban is similar to Scrum, in that it helps teams release software early and often. However, Kanban gives more flexibility in terms of planning and execution. Instead of working in time-based sprints, work is continuously delivered in Kanban, and your team pulls single pieces of work from the backlog, and then moves them to done.
Step 1: Create a kanban project
Once you login to Jira, you will have the option to create a project. When you get the project type selection, ensure you select Kanban software development project.
Your new Kanban software development project will also include a Kanban board. Once you've created your project, your team's Kanban board is the first thing you'll see. This is where your team will eventually keep track of their work.
Step 2: Configure your workflow
In Jira, the Kanban project gives you an out-of-the-box workflow with Backlog, Selected for Development, In Progress, and Done. This lets the product owner add tasks to the backlog, and move them to "ready for development" once the task or user story is fully baked. Team members can then select from that column and move to in-progress and to done. If your development workflow is different, it's easy to add or remove a workflow state. Many teams want to add a QA or reviewing stage in their workflow, for example.
To configure your columns and workflow, click Board in the top-right corner of the backlog, then select Configure.

Once you're in the board configuration page, select Columns from the sidebar. You can either add a status or column with the buttons on the right, or hit the trash icon to remove a column. Once you have the workflow columns you want, hit Back to board in the top-right corner.
Step 3: Add tasks, bugs, or user stories to the backlog
Use the Create button to start adding tasks, bugs or user stories to your backlog. In Kanban, this is the first column of your board. If you don't have a project or feature in mind, try creating some sample tasks to get started and see how it works.
What are user stories?
In an agile framework, user stories are the smallest units of work. As a {type of user} , I want {goal} so that I {receive benefit}.
Let's use a website as a simple example to create a user story.
As a customer, I want to be able to create an account so that I can see the purchases I made in the last year to help me budget for next year.
User stories are sketched out by the product owner, and then the entire product team collectively determines detailed requirements.
Step 4: Prioritize the backlog
To rank or prioritize the items in the backlog, drag and drop cards up or down on the first column based on their priority.
Prioritization in Kanban:
A Kanban team is only focused on the work that's actively in progress. Once the team completes a work item, they pick up the next work item. The product owner is free to re-prioritize work in the backlog without disrupting the team, because any changes outside the current work items don't impact the team. As long as the product owner keeps the most important work items on top of the backlog, the development team is assured they are delivering maximum value back to the business. So there's no need for the fixed-length iterations you find in Scrum.
It may be helpful to use the priority key when adding issues to the board so that it's easy to visualize when prioritizing. The default settings in Kanban will add swimlanes to your board, one for high priority items, which is labeled "Expedite," and one for everything else. You can also use tools like labels or features within each issue to help you categorize pieces of work.
What are swimlanes?
A swimlane lets you categorize issues so that agile teams can see which issues they should work on next. To edit the default swimlanes, go to board configuration in the upper right corner of your backlog and select Swimlanes from the sidebar. You can add swimlanes on this screen by categorizing your issues with JQL.


Step 5: Select work from the backlog
In Kanban, team members take items from the Backlog or Selected for Development column and move them to In Progress.
We recommended limiting the work that is in-progress. To make this easier, you might consider adding limits to your columns. Doing this will cause a warning to show if your team moves too many tasks to a column.
Why limit work in progress?
You can set limits for your work in progress (WIP), which basically lets you set the minimum and maximum amount of work that lives in each column on the board. WIP limits reduce the amount of work nearly done by forcing the team to focus on a smaller set of tasks — essentially improving how your team works all throughout. WIP limits also highlight bottlenecks in a team's delivery pipeline before a situation becomes dire. These benefits guarantee increments of value to the customer sooner, making WIP limits a valuable tool in agile development. More here.
In Jira, you can add minimum or maximum limits for each column in the Columns section of the Board configuration.
Step 6: hold team meetings
In Kanban, daily stand-ups and retrospectives are optional. However, we recommend that you and your team decide on the cadence of meetings. A daily stand-up can still be beneficial for the team to highlight where there are blockers in their work. It may also be helpful for the product owner to share what he or she has prioritized and why. Figure out what works for your team and try it out — you can always adjust as you go.
What is the daily stand-up meeting?
Attendees Required: development team and product owner
Optional: team stakeholders
When: Once per day, typically in the morning
Duration: No more than 15 minutes. Don't book a conference room and conduct the stand-up sitting down. Standing up helps keep the meeting short!
Agile Framework: Scrum and Kanban.
Purpose: The daily stand-up is designed to inform everyone quickly of what's going on across the team. It's not a full status meeting. The tone should be light and fun, but informative. Have each team member answer the following questions:
What did I complete yesterday?
What will I work on today?
Am I blocked by anything?
There's an implicit accountability in reporting what work you completed yesterday in front of your peers. No one wants to be the team member who is constantly doing the same thing and not making progress.
ProTip: Some teams use timers to keep everyone on track. Others toss a ball across the team to make sure everyone's paying attention. Many distributed teams use video-conferencing or group chat to close the distance gap. Your team is unique — your stand-up should be, too!
Step 7: Using the Control Chart
At regular intervals, you might take a look at the Control Chart to monitor your team's progress.
What is the Control Chart?
The Control Chart shows the following information:
How long each issue sits in a particular status before moving on.
Your team's cycle time, which is the average length of time it takes to complete each issue. You can see the cycle time for your product, version.
A rolling average of your team's cycle time. As your team gets more efficient, you should see this number decrease.
The Control Chart is useful because it helps you analyze how your team works. Some questions you might ask are:
Are certain types of issues taking too long to complete? This may mean that the issues are too complex, or they keep getting bumped for higher-priority work.
Are issues taking too long to transition from a particular status? This may indicate a bottleneck in your team's process.
What's your team's rolling average? Is your team getting more efficient? Why or why not?
Step 8: Using Kanban backlog (optional)
Many teams love the flexibility of Kanban, but they may start to feel that the first column of their board — the backlog — becomes long and unmanageable. That's why we've added a backlog in Kanban software development projects.
The Kanban backlog gives you a backlog for your board, which is on a different tab in your project. The Kanban backlog essentially gives product managers a bigger and dedicated space to freely build and prioritize the backlog, without distracting the team from their current work. The product manager can then move work from the backlog into "ready for dev" to let the team know the work that's upcoming.
Check out Using your Kanban backlog and Enabling the Kanban backlog for more details.

How to turn on Kanban backlog
Log in as a user with the 'Jira Administrators' global permission.
Select Jira Administration from the top bar > Applications, then scroll down the page to the Jira section.
Under Jira Labs, select the features that are of interest to you.
Burnup Chart
Kanban backlog
Advanced practices
By now, you may have already realized just how extremely customizable Jira can be. Read on for some advanced tips and tricks that your team can use, to unleash their potential, and finish off work-in-progress faster and more efficiently.
Step 9: Automate away the repetitive tasks
Once you have mastered the art of Kanban, you can start to automate away some of the more repetitive tasks. This is a great way to keep your board clean, your backlog up to date and generally keep your work up to date.
See some of the most commonly used automation rules for Kanban in the Jira Automation Template Library.
Step 10: Using column constraints
In step 5, we've already discussed the importance of limiting work in progress. In this section, we'll focus on that more, especially since limits actually highlight any bottlenecks that your team may be experiencing. By highlighting these early on, your team can reshuffle priorities and figure out a realistic plan of action.
You can configure the column constraints of your board by going to the Columns section of Board configuration. From there, set minimum and maximum constraints for each column.

If you have more than 10 issues in either the Selected for Development or In Progress columns, the columns would be colored red at the top:

Note that your board may appear differently if you've enabled the Kanban backlog for your board.
Depending on your team's needs, you can go a step further and configure your column constraints to exclude sub-tasks from the count.
For more details on how to do this, go to Configuring columns.
Step 11: Using the Cumulative Flow Diagram
The Cumulative Flow Diagram is one of the important reports you can ever use when working in Kanban methodologies. The Cumulative Flow Diagram lets your team quickly visualize their effort, and match it against the overall progress of the project.
In Jira, the Cumulative Flow Diagram shows the statuses of your team's issues over a period of time:

Any bottlenecks will appear as a sudden change of the issue statuses in the diagram — whether the change is a sudden rise or fall, it is definitely worth looking into the issues involved.
When predicting potential bottlenecks, the Cumulative Flow Diagram is indeed a tool your team should consider using.
Recommended for you
Templates
Ready-made Jira templates
Browse our library of custom Jira templates for various teams, departments, and workflows.
Product guide
A comprehensive introduction to Jira
Use this step-by-step guide to discover essential features and the best practices to maximize your productivity.
Git Guide
Understanding the Basics of Git
From beginners to advanced experts, use this guide to Git to learn the basics with helpful tutorials and tips.