計画通りに進める:Confluence を使用したプロジェクト・ドキュメンテーション
優れたアイデアを生み出すために
プロジェクトはすぐに軌道から外れます。誰かが「全員に返信」を押したために大量のプロジェクト・メールに忙殺されるかもしれません。あるいは、誰かがプロジェクト・ブリーフを忘れて、6 人のリモート・ワーカーが指示を待っているかもしれません。また、プロジェクトの進捗状況をリアルタイムで可視化できなければ、進むべき方向を把握できません。
企業の失敗の 70% が不十分なコミュニケーションに起因する(Gartner の調査による)理由は、そのためかもしれません。プロジェクトのドキュメンテーションが直感的で理解しやすいものでなければ、誰もが必要な情報を受け取っていないように感じます。何の進展もないまま、いつの間にか最初のマイルストーンの締め切りを過ぎてしまいます。
だからこそ、チームのための一元的なプロジェクト・ドキュメンテーション・ハブを作る必要があります。Confluence をプロジェクト・ドキュメンテーション・プラットフォームとして使用すれば、こうした問題を解決できます。
Confluence のプロジェクト・ドキュメンテーションで複雑さを防ぎ、プロジェクトを計画通りに進める方法
効果的なプロジェクト・ドキュメントがないプロジェクトは混乱しやすく、プロジェクトが複雑になればなるほど、失敗する可能性が高くなります。ハーバード・ビジネス・レビューによると、「プロジェクトは厄介なもので、規模が大きく、長く、複雑になるにつれて成功率は急激に低下する」ということです。
プロジェクト・ドキュメントは複雑さを予防するためのもので、複雑さがイニシアチブのあらゆる側面に影響を及ぼす前に対処するためのツールとプラットフォームを提供します。
解決策として、プロジェクト・ドキュメントに最初から Confluence を使用すれば、複雑さを効果的に管理できます。
プロジェクトのたたき台となるテンプレート
最初の課題は、プロジェクトを開始することです。Confluence ページのテンプレートとスペースのテンプレートを使ってドキュメントの作成を開始すれば、作業をスムーズに進めることができます。

戦略計画について、特有の課題をお持ちですか?大丈夫です。Confluence には、プロジェクトのニーズが何であれ、たたき台にできるテンプレートが何百も用意されています。
まずは、プロジェクトの整理にかかせないスペース・テンプレートから始めるとよいでしょう。文書化しようとしているプロジェクトの種類に応じてスペースを選択することも、特定のチームに合わせてパラメーターをカスタマイズして独自のスペースを作成することもできます。
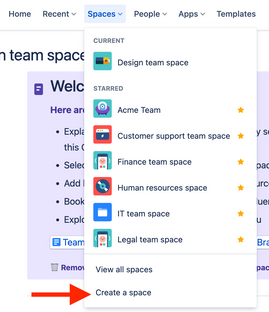
その後、それらのスペース内に個別のページを作成して、プロジェクトを分割できます。以下に、すぐに使えるテンプレートの例を示します。
- プロジェクト・ロードマップ:このテンプレートはツアーガイドの役割を果たし、チームのミッションを記述したり、重要なプロジェクト情報ファイルをアップロードしたりできます。また、第 1 四半期や第 2 四半期などのマイルストーンを使用して長期にわたる計画を作成し、どのマイルストーンをどの日付までに達成する必要があるかをすべてのプロジェクト・メンバーに知らせることができます。
- マスター・プロジェクト・ドキュメント:プロジェクトを実行する「理由」を記述します。このプロジェクトで取り組んでいる問題点は何ですか?達成すべき目標は何ですか?さらに、それらのマイルストーンの達成後にエンドユーザーに体験してもらいたいストーリーの概要を説明します。
- 役割と責任:「それは私の責任ではありませんでした」という言葉が出るようでは、プロジェクトは破綻します。しかし、役割と責任のテンプレートを使えば、チーム・メンバーに特定の役割を割り当てることができます。こうすることで、何を達成すべきかや、プロジェクトの成功に誰が責任を負うかなどについて、全員が同じ認識を持つことができます。
戦略計画:エグゼクティブ・サマリーを作成して、プロジェクトの概要を経営幹部に伝えます。「どうすればうまくいくか」や「どうやって実行するか」など、幹部が尋ねそうな質問にはっきりと答えられるようにします。
ページ要素を挿入して、チーム・メンバーや関係者にとって読みやすく、洗練された、堅牢なドキュメントを作成する
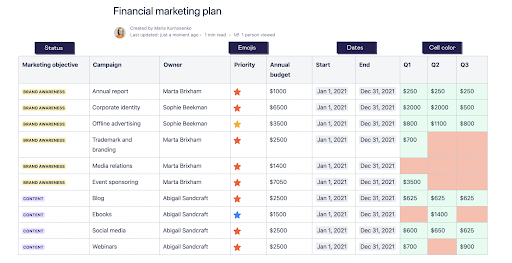
Confluence ページに独自の要素(チェックリスト内のアクション・アイテムや開発者向けのコード・スニペットなど)を挿入して、アイデアを効果的に整理できます。その結果、ドキュメントは単なる便利な参考文書ではなく、はるかに洗練された、堅牢で、すべての関係者にとって使いやすいものになります。
使用できるページ要素は、多数あります。
- アクション・アイテムはフォローアップしてもらえるように「@」メンションを使って特定のユーザーをタグ付けします。このメンションは、そのユーザーのプロフィールの下にチェックリスト項目として表示されます。これにより、毎日のタスクを簡単に監視できるだけでなく、コラボレーションも促進されます。
- コード・スニペットを使用すると、選択した言語に基づいて、番号付きの行と構文ハイライトでソース・コードを書式設定できます。
- 日付は、ユニークなハイライトを使用して周囲のコンテキストから目立たせることで、プロジェクトの重要なマイルストーンを強調するのに役立ちます。
- 分割線で水平線を挿入してセクションを区別すると、スキャンしやすくなります。
- 展開機能を使うと、さまざまなセクションを折りたたんだり展開したりできます。これは、ページにテキストを詰め込みすぎることなく、重要な情報を保持するのに最適です。
- 見出しはセクションを区切るだけでなく、ページ全体の動的な目次を構築できます。
- パネルは、重要なポイントを指摘する警告、ハイライト、注意など特定のセクション用に事前に構築された要素で、これらに簡単にアクセスできます。
引用は、通常のコンテンツと引用文とを区別します。
これらの要素は便利なだけでなく、組み込むのも簡単です。たとえば、「/quote」と入力するだけで、すぐに新しい引用を作成できます。これにより、読みやすく、理解しやすく、スキャンしやすい、きめ細かく洗練されたプロジェクト・ドキュメント・ページが出来上がり、チーム・メンバー全員が最新情報を把握できます。
編集、コメント、フィードバックのためのコラボレーティブ機能
よく、「キッチンに料理人が多すぎると料理が台無しになる」と言われます。しかし、プロジェクトにはさまざまな種類の料理人が必要なこともあります。
問題は料理人が何人いるかではなく、複雑なコミュニケーションです。メールや Slack の通知が来るたびに集中力が途切れ、23 分の作業時間が奪われると、プロジェクトの遅延につながる可能性があります。
解決策は、すべてを Confluence 内で行うことです。編集、コメント、フィードバック、質問はすべて同じ場所で行うべきです。Confluence 内でプロジェクトについて質問したのに回答をメールの受信トレイで受け取ることは、不必要に煩雑な作業です。また、それらのメール・スレッドでプロジェクトに関する重要な情報が交換された場合、それらの情報は失われることになります。プロジェクト管理プラットフォーム内で検索したときに、それらの情報は見つかりません。
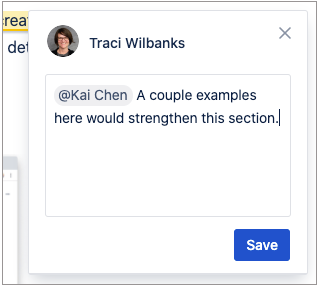
Confluence は、すべてのユーザーがリアルタイムで表示できるドキュメント・エディターを提供することで、この問題を解決します。リアルタイムでコラボレーションすることも、異なるタイムゾーンで対応することもできます。たとえば、ページやインライン・コメントを使用して、ページや社内ブログ投稿にコメントできます。信頼できる唯一の情報源を使用してチームの共通認識を維持することで、共同でプロジェクトに取り組むことができます。追加のアプリケーションや長いメール・スレッドは不要です。
Jira で進捗状況を追跡する
Confluence と Jira を統合すると、両方のツールのメリットを同時に享受できます。
プロジェクトの作業を追跡する上で Jira の機能は非常に貴重です。たとえば、エピックを使ってタイムラインを作成したり、強力なアジャイル スクラム ボードを使って進行中のタスクから To-Do タスクを分離したり、レポートやインサイトを生成して遅れている個所を確認したりできます。しかし、それらの機能を Confluence と組み合わせると、プロジェクト ドキュメントでさらに多くのことが可能になります。
たとえば、プロジェクトを離れることなく、埋め込みの Confluence ページを Jira 内に作成できます。繰り返しになりますが、これにより、チーム全体が同じ認識を持つことができます。また、同じ理由で、解決しなければならない課題が Jira 内にある場合には、Confluence ページを追加できます。
または、Confluence のタイムラインを Jira で使うこともできます。Jira タイムライン・マクロを挿入すれば、既存のプロジェクトのタイムラインを Confluence Cloud ページにシームレスにインポートできます。これらのタイムラインは読みやすく、マイルストーンを明確に定義できるので、プロジェクトの状況を全体的に把握できます。
また、Confluence Cloud 内で Jira レポートを作成すると、Jira 内で起こっているすべてのことを Confluence のプロジェクト・ドキュメントに反映できます。特定のマイルストーンが数日遅れている場合は、レポートで知らせてくれます。
失敗したらページ履歴を活用する
「ちょっと待って」
これは、プロジェクト管理で最も恐ろしい言葉です。すべてが順調に進んでいたのにプロジェクトの勢いが下り坂になり始め、誰かがバグに気づいたり、迅速な修正を要求したりします。
突然、スケジュールの雲行きが怪しくなります。
もちろん、綿密に計画されたプロジェクトでも、変更や修正は発生します。重要なのは、それらをそれぞれの特定のマイルストーン内に留めることです。そうしなければ、変更や修正は微調整以上のものになります。それらは複雑になり、プロジェクトの他の部分に影響を及ぼし、あらゆる種類の不必要な障害となる可能性があります。
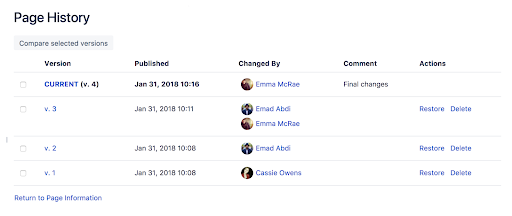
Confluence のページ履歴とページ比較ビューは、プロジェクトに対して行われたすべての変更を確認するのに最適です。特定のページにスライドして「その他のオプション」をクリックし、「ページ履歴」を見るだけです。以下のような、さまざまなプロジェクト管理機能が使えます。
- バージョン履歴:Google Docs や Dropbox のようなツールと同様に、もう一度見たいページがあれば「バージョン履歴」を確認できます。課題を編集し過ぎたことに気付いたら、バージョンをクリックして、それが求めている内容かどうかを確認できます。
- 公開日:公開日は、プロジェクト履歴内の特定の期間を参照するのに役立ちます。気に入ったバージョンがあれば、公開日を調べて、正しいバージョンを選択していることを確認します。
- 変更者:最新版の作成者を表示します。必要に応じて、どのような変更を加えたのか、そしてその理由を確認する必要があるかを変更者に尋ねてください。
- コメント:プロジェクト・ドキュメントを変更するとき、コメントを残して思考プロセスの文脈を説明することもできます。それは「最終変更」だったのでしょうか?それとも「校正」だったのでしょうか?特定のユーザーに変更をハンドオフしたのでしょうか?コメントを残すと、変更をレビューする人が文書の履歴を把握できます。
アクション:古いバージョンを復元するか、不要になったものを削除できます。これは基本的にはタイム・マシンです。プロジェクトのドキュメントを、すべてがすっきりと整理されていると考えていた時のページに変更できます。または、「削除」ツールを利用して、不要になったバージョンをトリミングできます。
プロジェクト・ドキュメントをわかりやすい状態に保つための主な習慣
「きれい好きは敬神に次ぐ美徳」ということわざをご存知でしょうか。同じ考え方がプロジェクト・ドキュメントにも当てはまります。わかりやすい状態になればなるほど良くなります。マイルストーンの特定、関連するプロジェクト・ファイルの検索、目標に対する進捗の追跡が簡単になるほど、プロセスは円滑になります。
しかし、Confluence のプロジェクト・ドキュメントはまだ単なるツールです。プロジェクト・ドキュメントをきちんと整理するには、すべてのプロジェクト・ドキュメントで良い習慣を実行する必要があります。
- 命名規則を標準化する。Confluence のプロジェクト・ドキュメントにより、多くのことを達成できます。ただし、あるファイルに「プロジェクト・ビデオ #1」、別のファイルに「Web セミナー v02.B」という名前を付けると、Confluence 内のすべてを監視するメリットの一部を失ってしまいます。すべての関連ファイルには、記述的で一貫した命名規則を使用して、より簡単に検索できるようにします。
- ラベルと説明をフル活用する。古いプロジェクト・ドキュメントの段階をくまなく調べ、進捗を監視するには、Confluence のページ履歴が最適です。しかし、プロジェクト・ドキュメントに正確にラベルを付けなければ、古いドキュメントを見直す際に余計な選別作業をするだけになってしまいます。
ページ・ツリーを整理して、プロジェクトとチーム・スペースをわかりやすい状態に保つ。チームが協働すると、すべての変更の状況を見失いがちです。Confluence では、整理されたページ・ツリーでプロジェクト・スペースとチーム・スペースの両方をわかりやすい状態に保ち、すべての変更とフィードバックを簡単に見つけられます。
Confluence のプロジェクト・ドキュメントを使用して、プロジェクトを軌道に乗せたまま維持する
地図は実際の写真ほど完全には正確ではないというのは事実です。しかし、プロジェクトを進める予定であれば、あらゆる段階を適切に把握しておくと、勢いを持続できます。Confluence のプロジェクト・ドキュメントの機能を最大限に活用すれば、仕事を成し遂げるという 1 つのビジョンの下でチームを統合するために必要なものすべてを得られます。

