Articles
Tutorials
Interactive Guides
Using Split feature flags with Bitbucket pipelines
.png?cdnVersion=3145)
Warren Marusiak
Senior Technical Evangelist
Deploying new code to a production environment is risky. Bugs can make it into production even after the code is unit tested, integration tested, and system tested in test and staging environments. Traditionally, developers have two choices once a bug makes it to production, and users are impacted. They can roll back the buggy code, or roll a fix forward. Both of these solutions take time. Now, developers can turn a feature on or off in an environment at the click of a button by wrapping the related code changes in a feature flag. The impact of buggy code on users can be mitigated immediately, and a fix can be developed and rolled forward safely. This article demonstrates this using Bitbucket Pipelines and Split feature flags in the ImageLabeller demo application.
Prerequisites
An ImageLabeller feature flag demo
ImageLabeller is a small application that uses machine learning to label images. ImageLabeller is deployed to five environments. Test, Staging, Production-us-west-2, Production-us-east-1, and Production-ca-central-1. This article demonstrates how to use feature flags to manage changes to the SubmitImage component of ImageLabeller. SubmitImage is an AWS Lambda written in Go. This demo uses Split to manage feature flags. Bitbucket for source control, and Bitbucket pipelines for CI/CD functionality.
How to use Split feature flags with Bitbucket pipelines
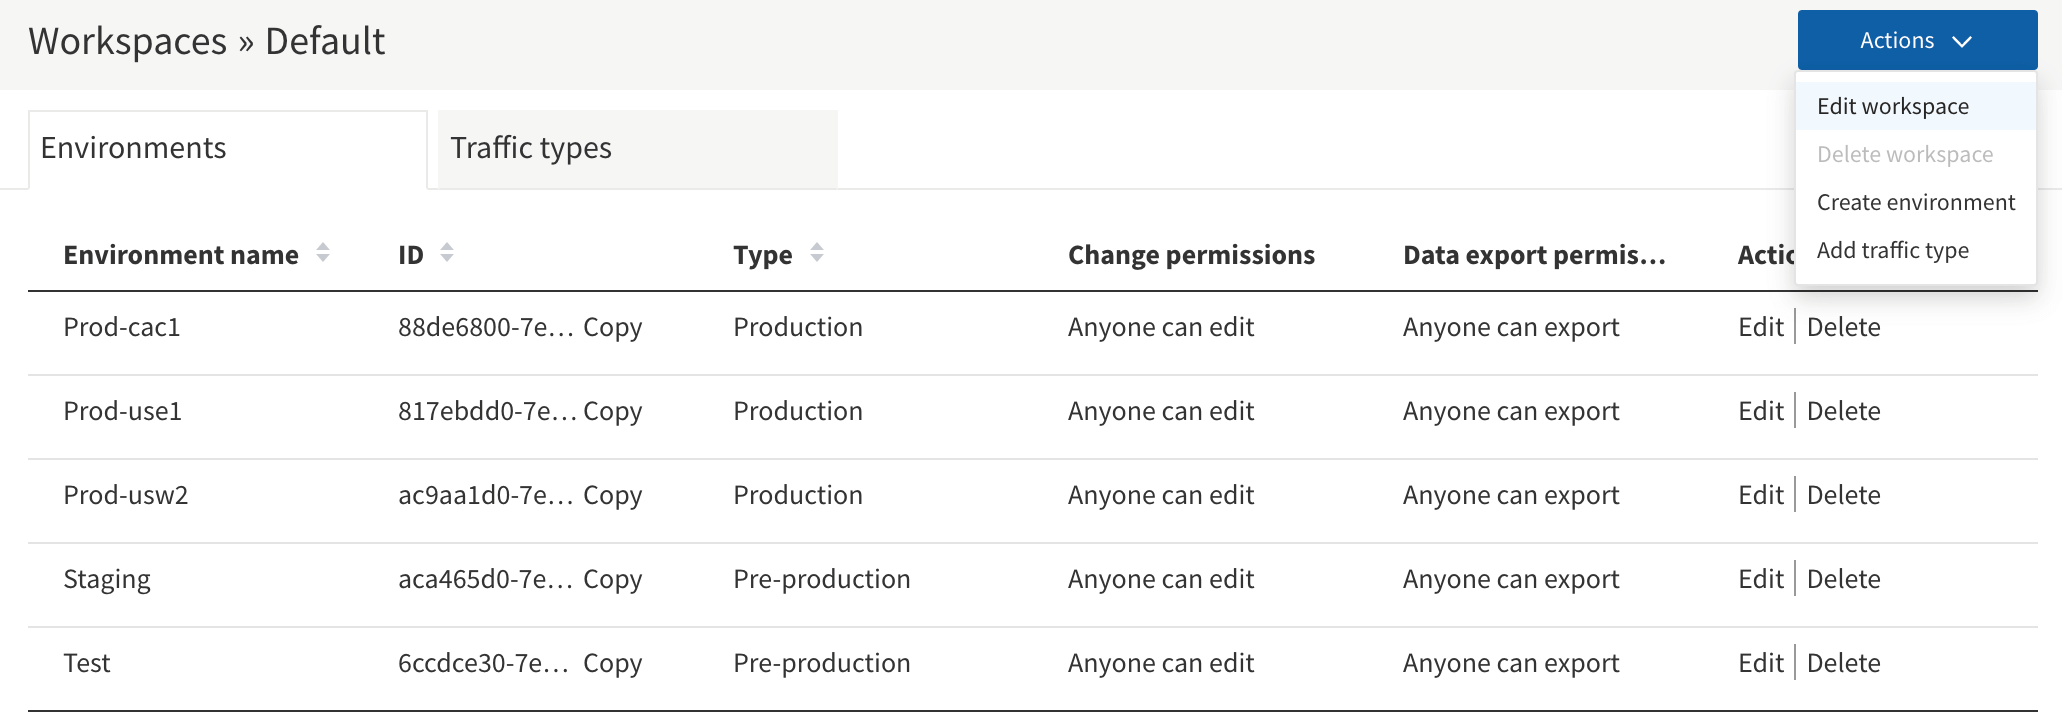
Create a Split account, go to Admin settings, then Workspaces. Click View on the default workspace to see the available environments.

Rename the default environments, and add new environments to fit your use case. ImageLabeller is deployed across five environments. Test, Staging, and three production environments corresponding to three AWS regions. US-WEST-2, US-EAST-1, and CA-CENTRAL-1.
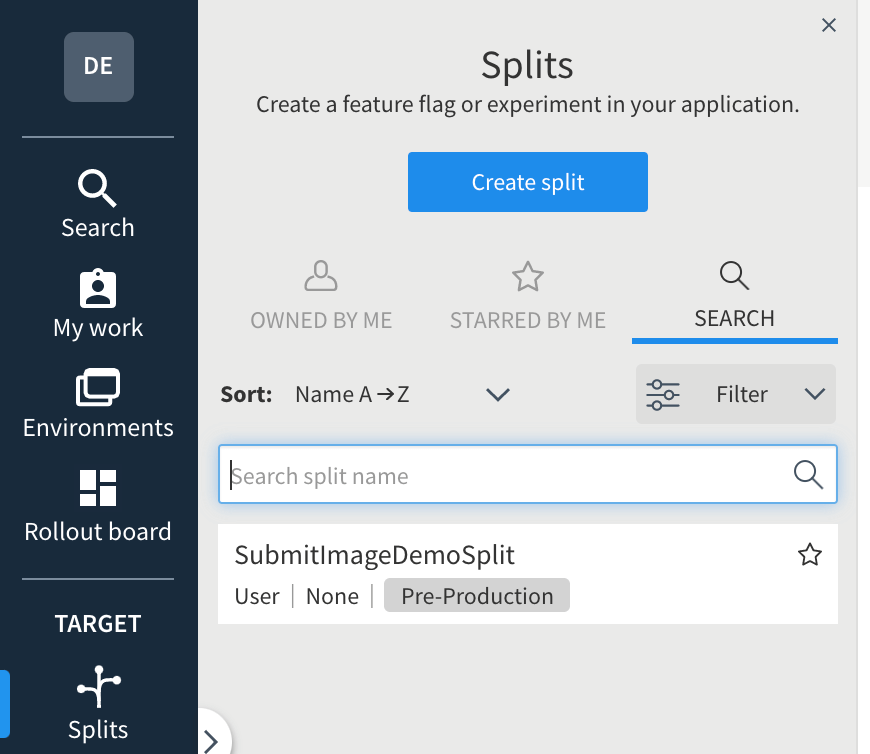
Click Splits, then Create split in the left nav panel to create a new split, which is a feature flag.
Give the split a name, and change Traffic Type to user.

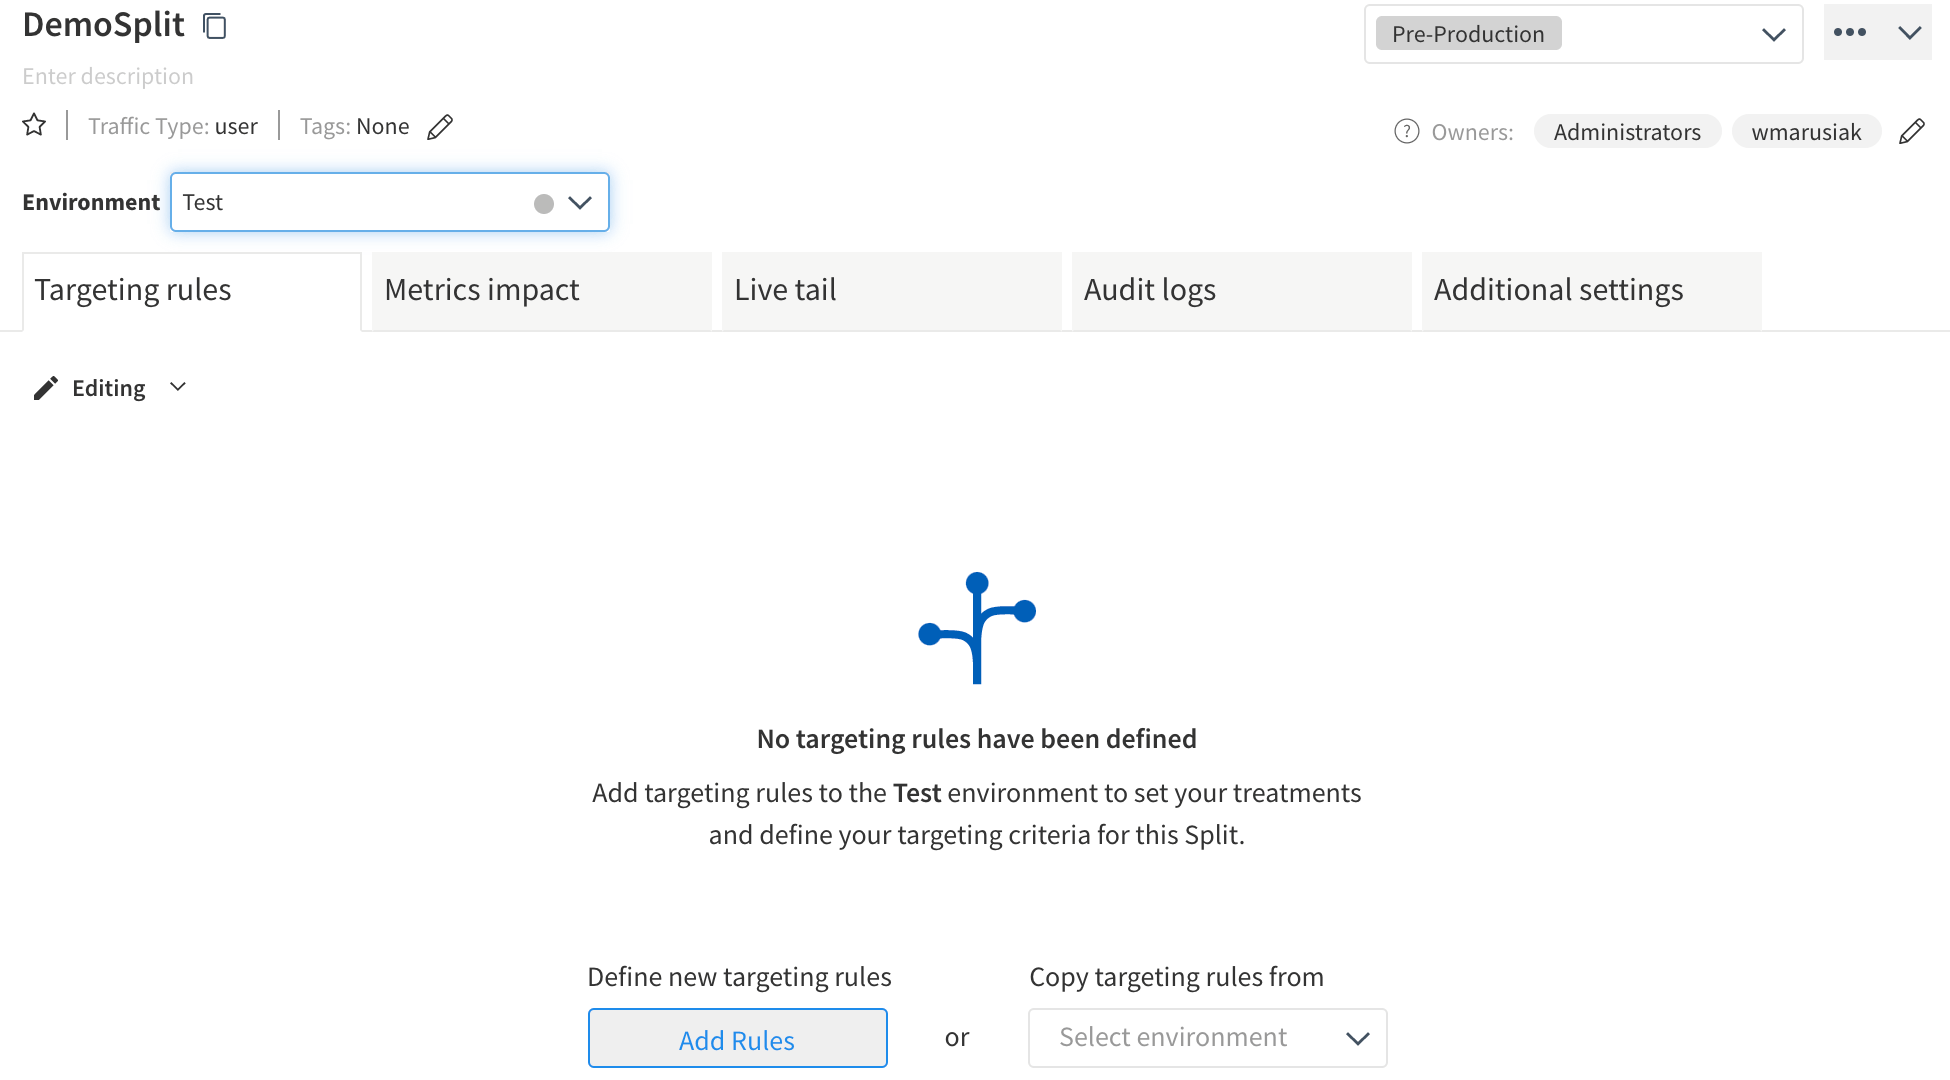
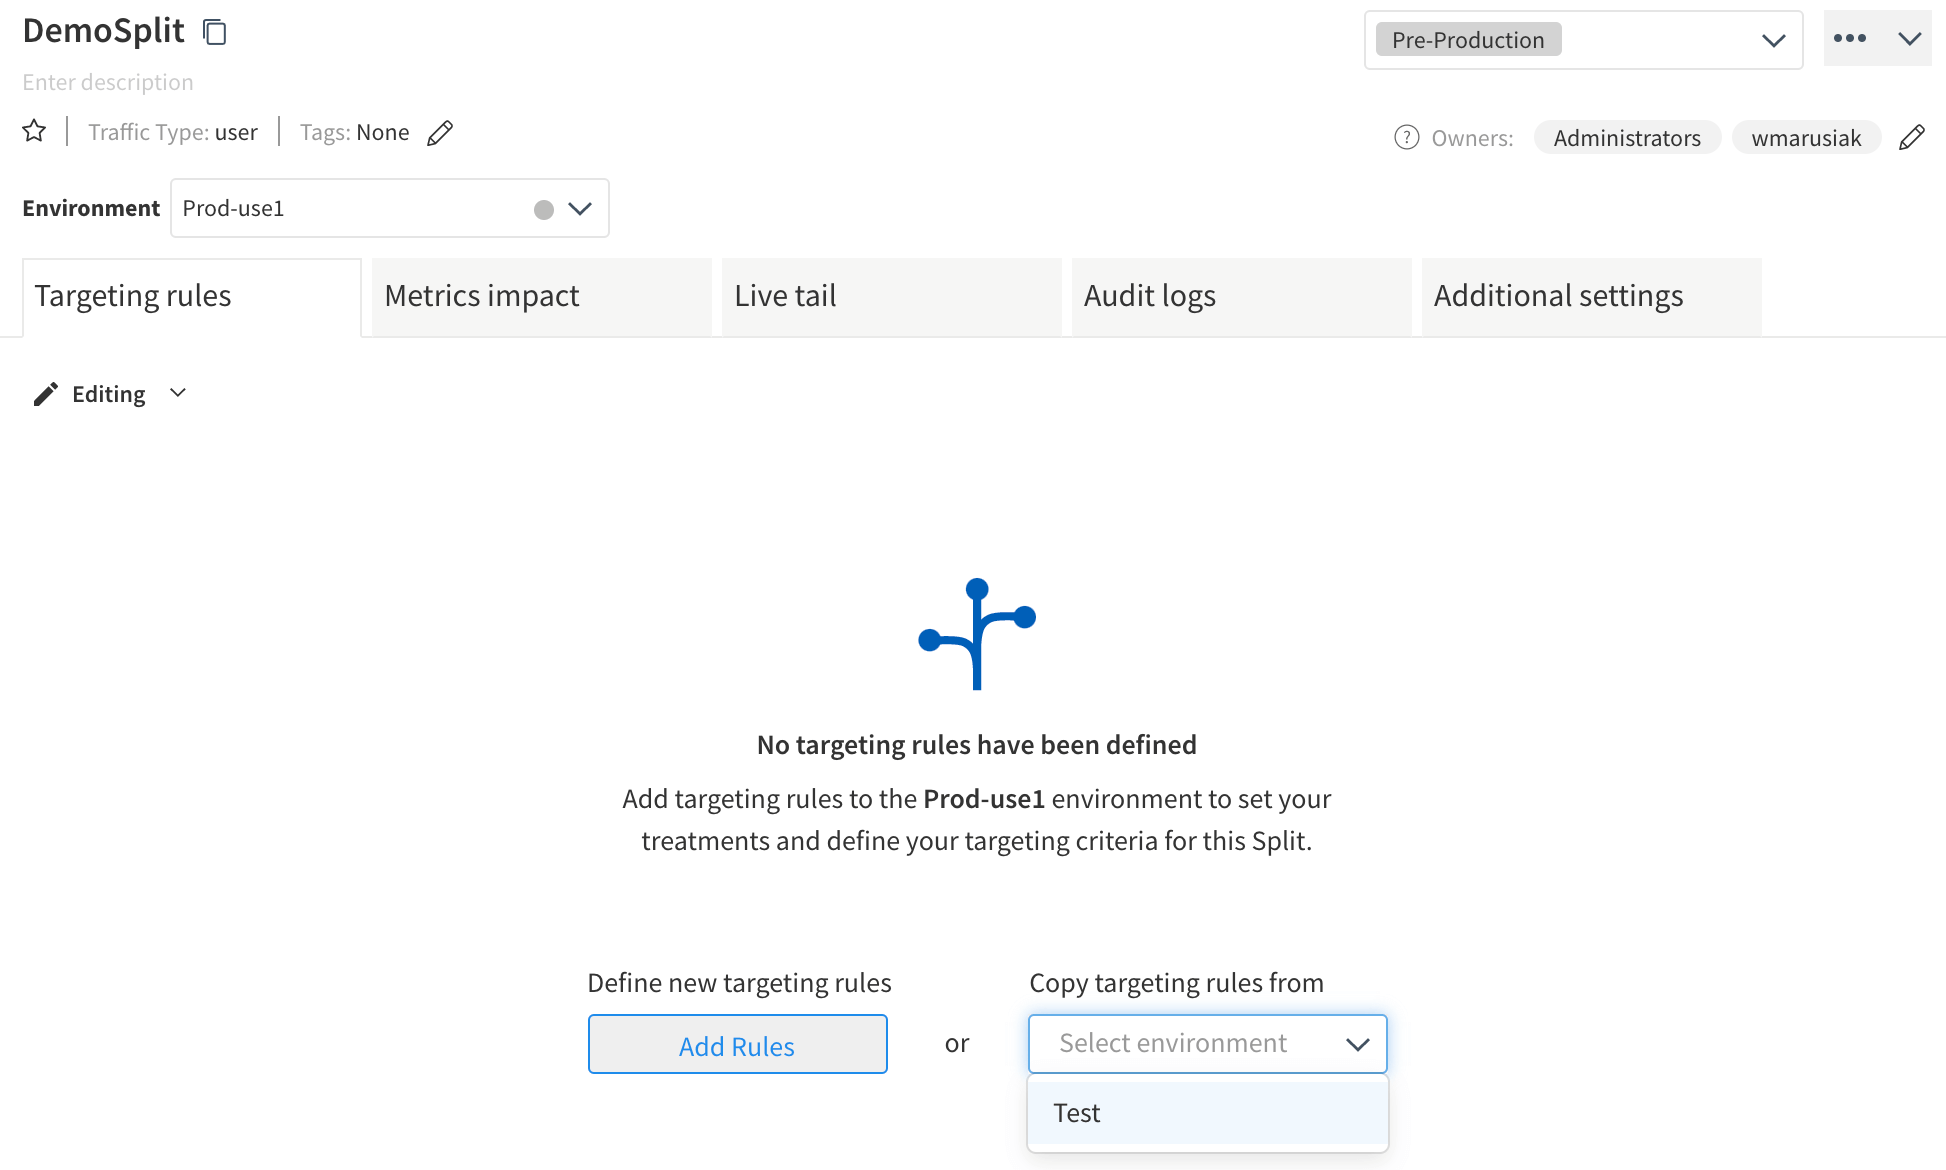
Click Add Rules to add targeting rules to the split after it is created. Create targeting rules for the Test environment. Each environment can have separate targeting rules. Targeting rules define the data returned by the split when it is accessed in code. This guide sets the split to return off by default, and on when a specific user is accessing the split.
Expand Set the default rule, and set it to off.

Expand Set individual targets, click Add Target then set Serve to on, and set To Users to some user that is part of the QA process. This guide uses AtlassianDemoUser@atlassian.com as the test user.

Save the changes. The split now has targeting rules for the Test environment. Click the Environment drop down another region. Staging for example.
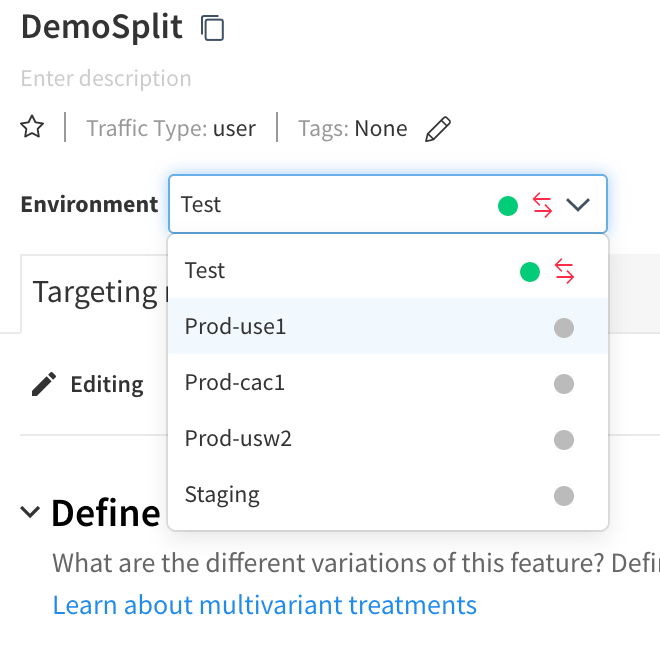
Click Copy targeting rules from, and choose Test to copy the targeting rules that were created earlier. Repeat this process for each environment. It is possible to have very different targeting rules per environment. This guide keeps targeting rules the same across environments.
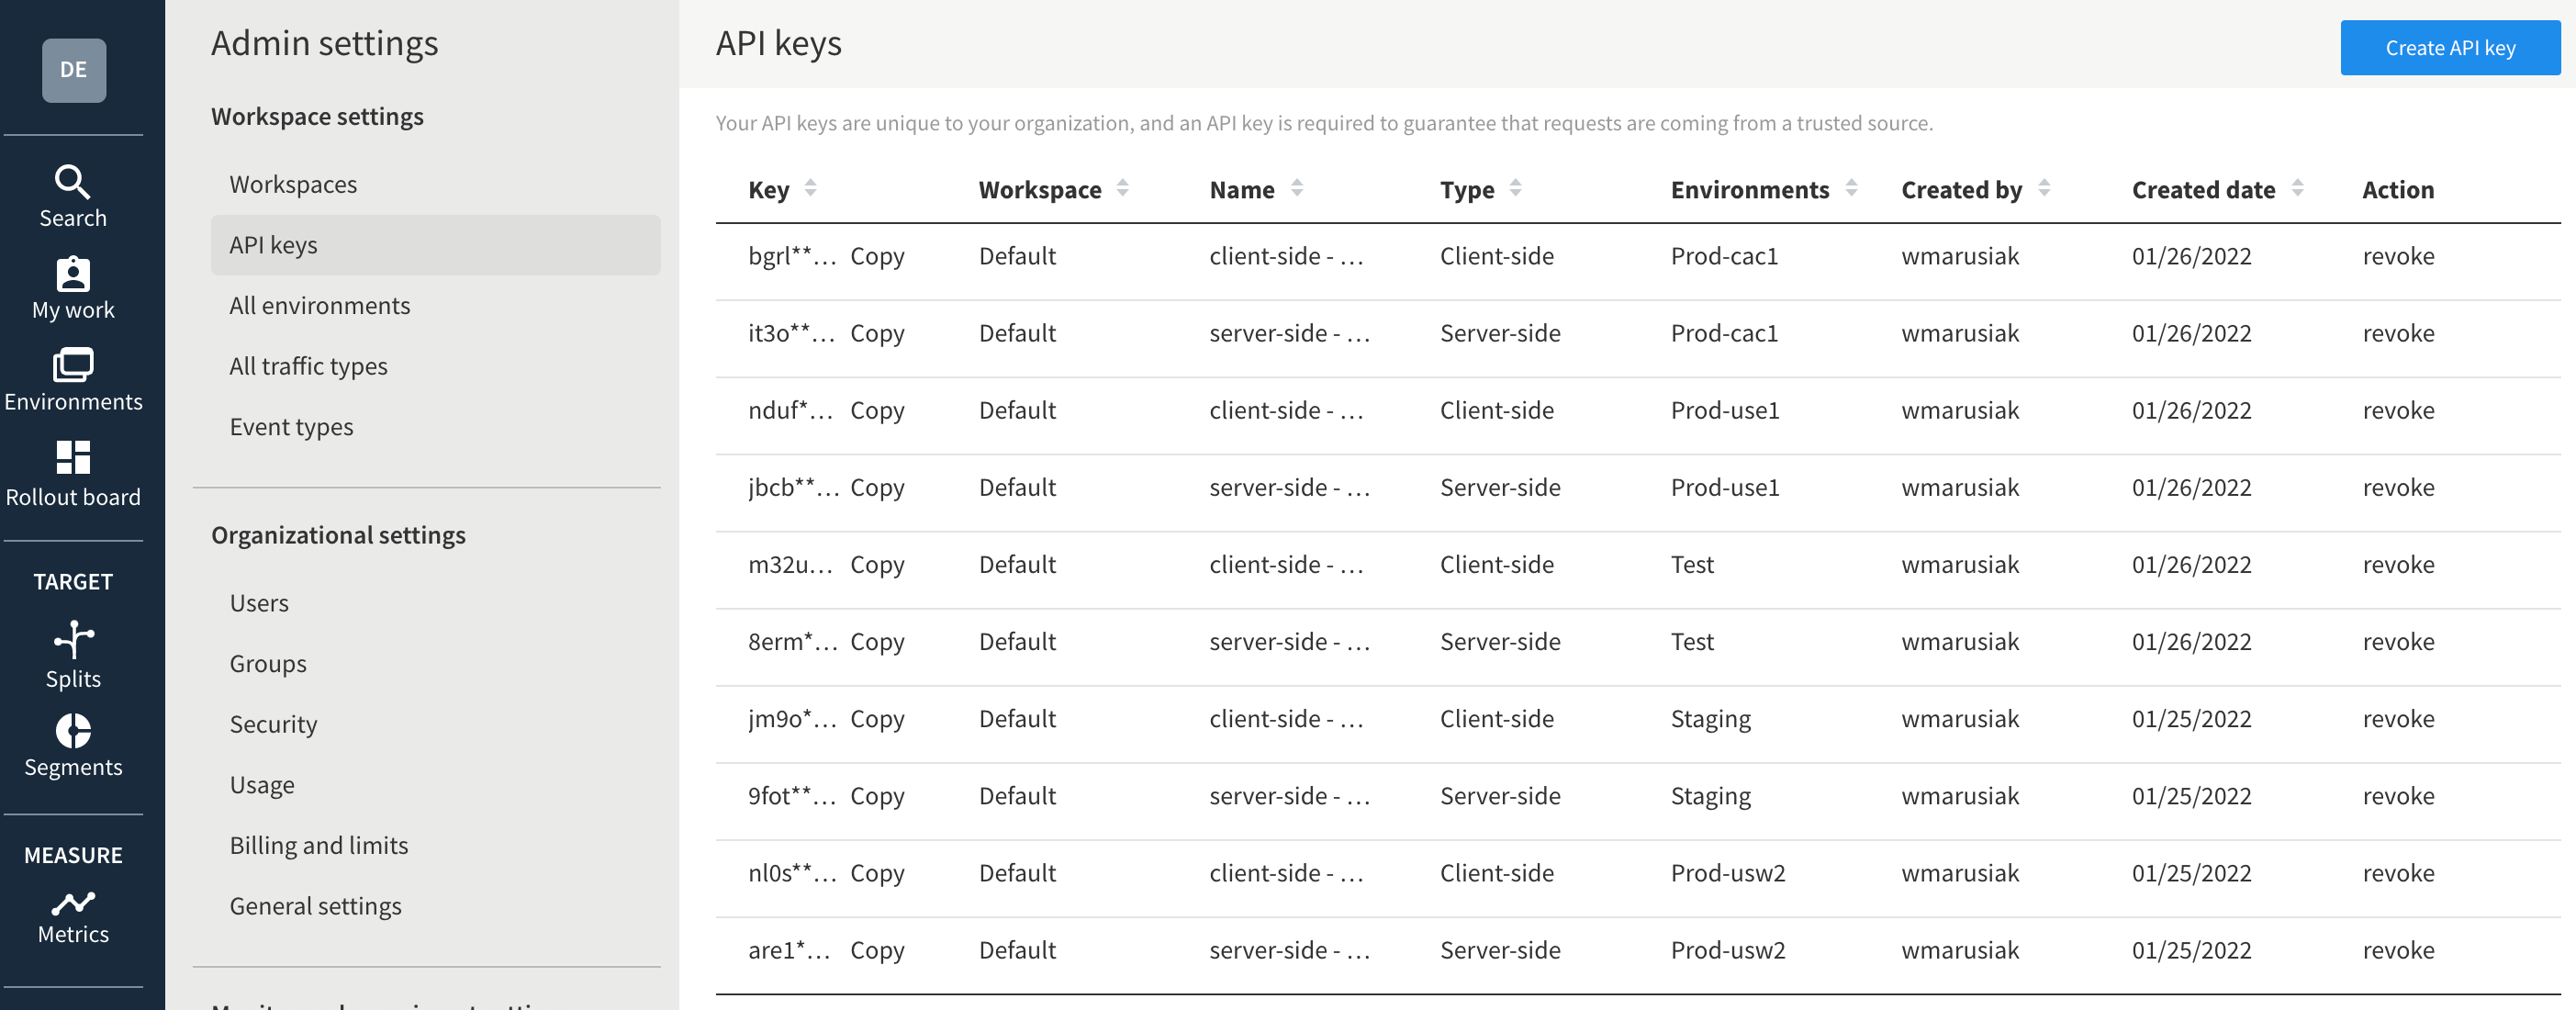
Go to Admin settings, then API keys to get a list of the API keys for each environment. These api keys are sent back to split during API calls in code to get the correct version of a split. This guide uses the Server-side keys for each environment.
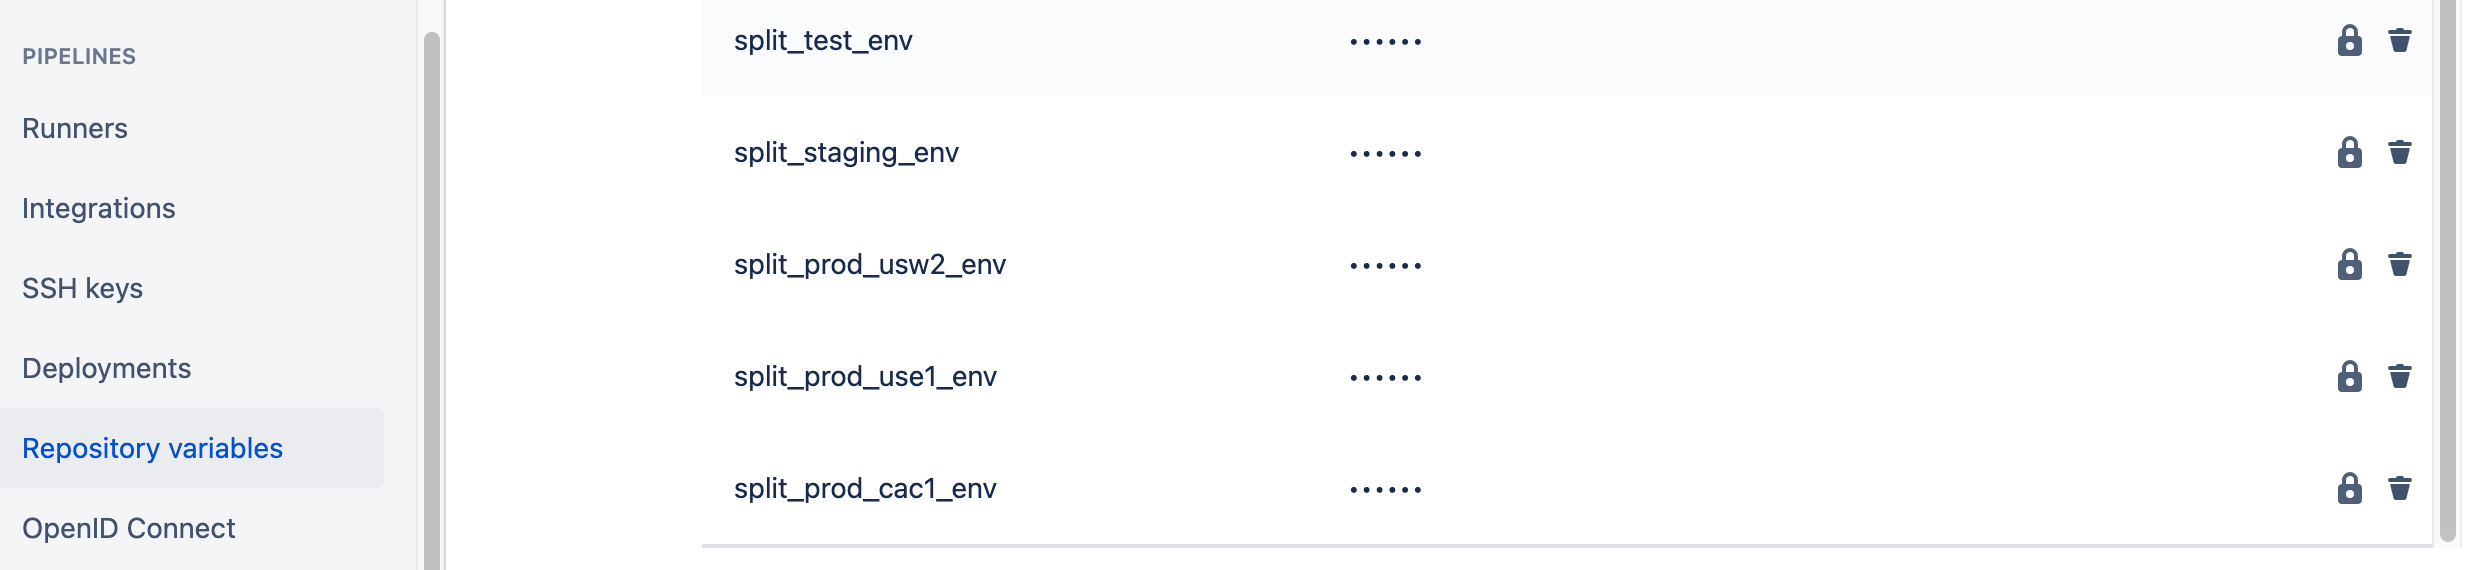
Go to your Bitbucket repository, then Repository settings, then Repository variables, and add variables for each API key.
Edit the bitbucket-pipelines.yml file, and add STACK_PARAMETERS to the AWS SAM deployment step. This is done on a per-environment basis. The YAML snippet below shows the deployment step for the TEST region which is in AWS US-WEST-1. Hence, the step references the split_test_env repository variable setup above. Use the appropriate repository variable for each environment.
- pipe: atlassian/aws-sam-deploy:1.2.0
  variables:
    AWS_ACCESS_KEY_ID: ${AWS_ACCESS_KEY_ID}
    AWS_SECRET_ACCESS_KEY: ${AWS_SECRET_ACCESS_KEY}
    AWS_DEFAULT_REGION: 'us-west-1'
    STACK_NAME: 'OpenDevOpsSubmitImage'
    CAPABILITIES: [ 'CAPABILITY_IAM', 'CAPABILITY_NAMED_IAM', 'CAPABILITY_AUTO_EXPAND' ]
    TEMPLATE: 'https://s3.amazonaws.com/open-devops-code-us-west-1-${AWS_ACCOUNT_ID}/submit-image-packaged.yml'
    WAIT: 'true'
    DEBUG: 'true'
    S3_BUCKET: 'open-devops-code-us-west-1-${AWS_ACCOUNT_ID}'
    SAM_TEMPLATE: 'build/template.yaml'
    STACK_PARAMETERS: '[{
      "ParameterKey": "SplitIOSDKKey",
      "ParameterValue": "${split_test_env}"
    }]'
Edit the AWS CloudFormation template.yml file and add a Parameters section referencing the Split SDK key.
Parameters:
  SplitIOSDKKey:
    Type: String
In the template.yml file add an Environment section to each AWS Lambda resource that needs to access Split. This guide demonstrates
Environment:
  Variables:
    SplitIOSDKKey:
      Ref: SplitIOSDKKey
Import the following dependencies into the Go file that will use the Split SDK.
"github.com/splitio/go-client/v6/splitio/client"
"github.com/splitio/go-client/v6/splitio/conf"
This function creates a client, and retrieves the feature flag value for the “SubmitImageDemoSplit” created in the Split UI. It takes a single parameter, username.
func getSplitIOFlag(username string) (string, error) {
  splitIOSDKKey := os.Getenv("SplitIOSDKKey")

  cfg := conf.Default()
  factory, err := client.NewSplitFactory(splitIOSDKKey, cfg)
  if err != nil {
    fmt.Printf("SDK init error: %s\n", err)
    return "", err
  }

  splitClient := factory.Client()
  err = splitClient.BlockUntilReady(10)
  if err != nil {
    fmt.Printf("SDK timeout: %s\n", err)
    return "", err
  }

  treatment := splitClient.Treatment(username, "SubmitImageDemoSplit", nil)
  fmt.Printf("SPLIT_DEMO treatment is %s, username is %s\n", treatment, username)

  return treatment, nil
}
Call the function with an email address. In this case, someRandomUser@atlassian.com will pull the default value of the feature flag since it is not a member of an allow list associated with the feature flag. AtlassianTestUser@atlassian.com will pull the value of the feature flag associated with the allowlist to which it is a member.
foo, err := getSplitIOFlag("someRandomUser@atlassian.com")
  _ = foo

  bar, err := getSplitIOFlag("AtlassianDemoUser@atlassian.com")
  _ = bar
Look at the output in AWS CloudWatch logs after the code has been executed. Observe that the feature flag returns off when it is accessed by someRandomUser@atlassian.com, and the feature flag returns on when accessed by AtlassianTestUser@atlassian.com.

In this way, developers can control the execution of their code without having to do another deployment. If bugs are found in an environment the feature flag in that environment can be turned off, and the old code can run.
Conclusion
Split feature flags integrate easily into an application deployed via Bitbucket pipelines. Feature flags enable developers to control the execution of deployed code. This can make responding to buggy deployments faster, reducing impacts on users. Take the time to spin up an instance of Bitbucket, and Split, and test the capabilities for your team.

Share this article
Next Topic
Recommended reading
Bookmark these resources to learn about types of DevOps teams, or for ongoing updates about DevOps at Atlassian.
DevOps community

DevOps learning path