Articles
Tutorials
Interactive Guides
Learn Continuous Delivery with Bitbucket Pipelines

Sten Pittet
Contributing Writer
In this guide, we'll see how you can use Bitbucket Pipelines to adopt a continuous delivery workflow. Read on!
Time
30 minutes
Audience
You are new to continuous deployment and/or Bitbucket Pipelines
Releasing a new feature is always an exciting moment as you're about to give new capabilities to your customers. But it can also be a risky exercise requiring a lot of preparation, making your team reluctant to do often. And the more you wait, the harder it becomes to deploy to production. Changes are piling up, it's difficult to understand the scope of the change, and it will be hard to identify root causes if problems occur in production.
A simple way to take away the fear and the cost of deploying software is to automate it and release smaller changes more often. First of all, you'll save countless hours that are normally spent preparing the release. But you'll also reduce the risk of deploying software by having a much smaller scope for each release, making it easier to monitor environments and troubleshoot issues.
This deployment automation is something that you can do easily with Bitbucket Cloud today. For each of your repositories, you can configure a pipeline that will automatically build, test, and deploy your code to your environments on every push. We'll see in this guide how you can use Bitbucket Pipelines to adopt a continuous delivery workflow.
Continuous delivery vs. continuous deployment
Continuous delivery is the practice of making sure that your code is always ready to release even if you are not deploying every change to production. It is recommended to update your production as often as possible to make sure that you keep the scope of the changes small, but ultimately you're in control the rhythm of your releases.
In continuous deployment, new changes pushed to the repository are automatically deployed to production if they pass the tests. This puts more emphasis (read: pressure) on your testing culture, but it's a great way to accelerate the feedback loop with your customers.
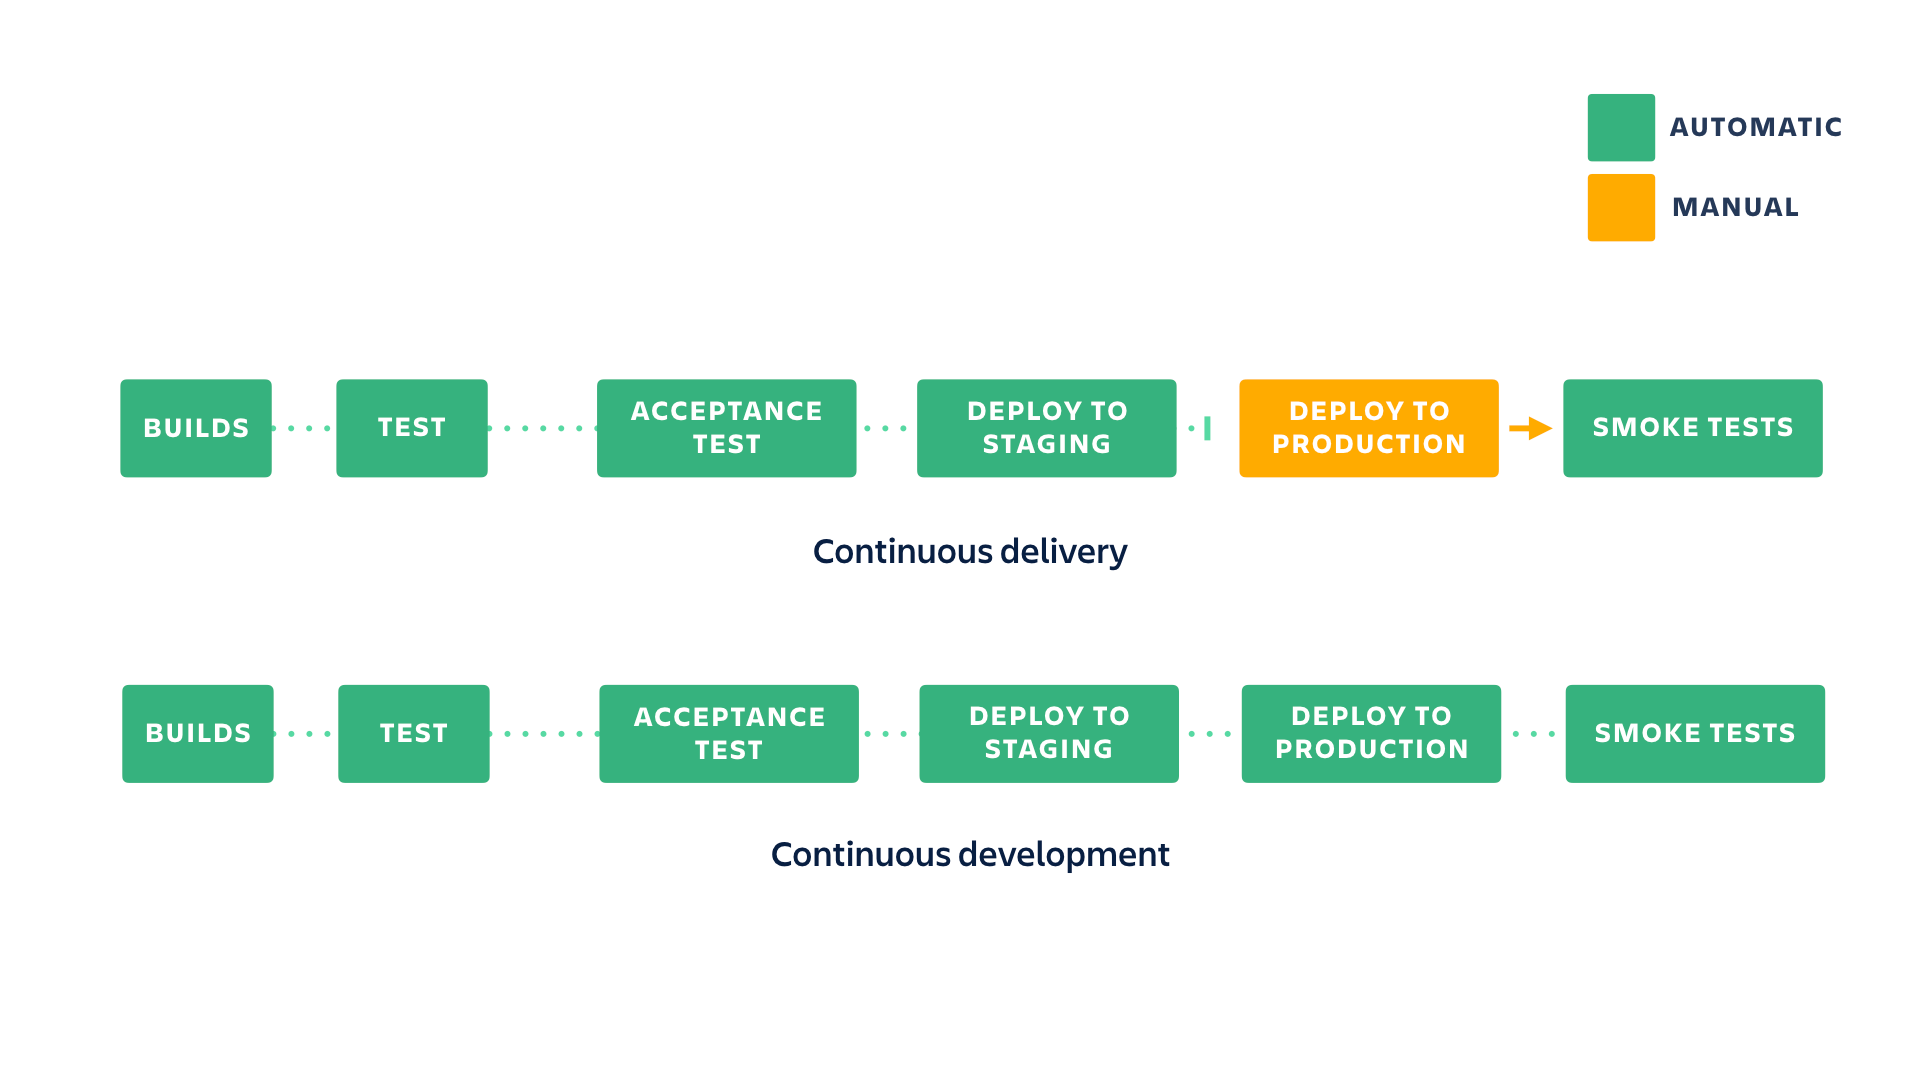
Adopting a continuous delivery pipeline
In this example, we will extend the simple node.js app we built in the continuous integration tutorial by adding a continuous delivery pipeline that automatically deploys to staging when the build passes the test. We'll see two different strategies for the production deployment: one using branches and pull requests, and the other using custom pipelines and manual triggers.
In both examples, we'll use a simple Node.js application that displays a "Hello World" message in your browser. We will deploy this application to staging and production environments hosted on Heroku using both methods.
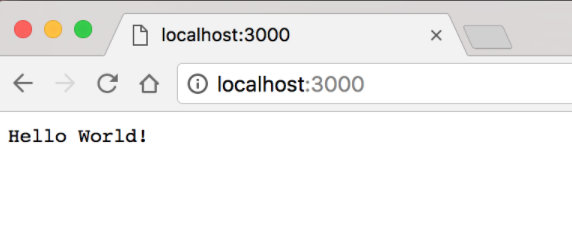
Our very basic Hello World application
Preparing the deployment to Heroku
To start, sign up for Heroku.
Then install the Heroku cli.
Update package.json to look something like this:
{
  "name": "cdtutorial",
  "version": "1.0.0",
  "description": "",
  "main": "server.js",
  "scripts": {
    "start": "node server.js",
    "test": "mocha --exit"
  },
  "repository": {
    "type": "git",
    "url": "git+ssh://git@bitbucket.org/pmmquickstartguides01/cdtutorial.git"
  },
  "author": "",
  "license": "ISC",
  "bugs": {
    "url": "https://bitbucket.org/pmmquickstartguides01/cdtutorial/issues"
  },
  "homepage": "https://bitbucket.org/pmmquickstartguides01/cdtutorial#readme",
  "dependencies": {
    "express": "^4.17.3"
  },
  "devDependencies": {
    "mocha": "^9.2.2",
    "supertest": "^6.2.2"
  }
}
Update server.js file to look something like this:
var express = require("express");
var app = express();

app.get("/", function (req, res) {
  res.send("Hello World!");
});

app.listen(process.env.PORT || 3000, function () {
  console.log("Example app listening on port 3000!");
});

module.exports = app;
Note the change to app.listen(). This now includes process.env.PORT which is set by Heroku.
Add a Procfile to the root directory of the example repository by running:
touch ProcfileThen, add the following text to the Procfile:
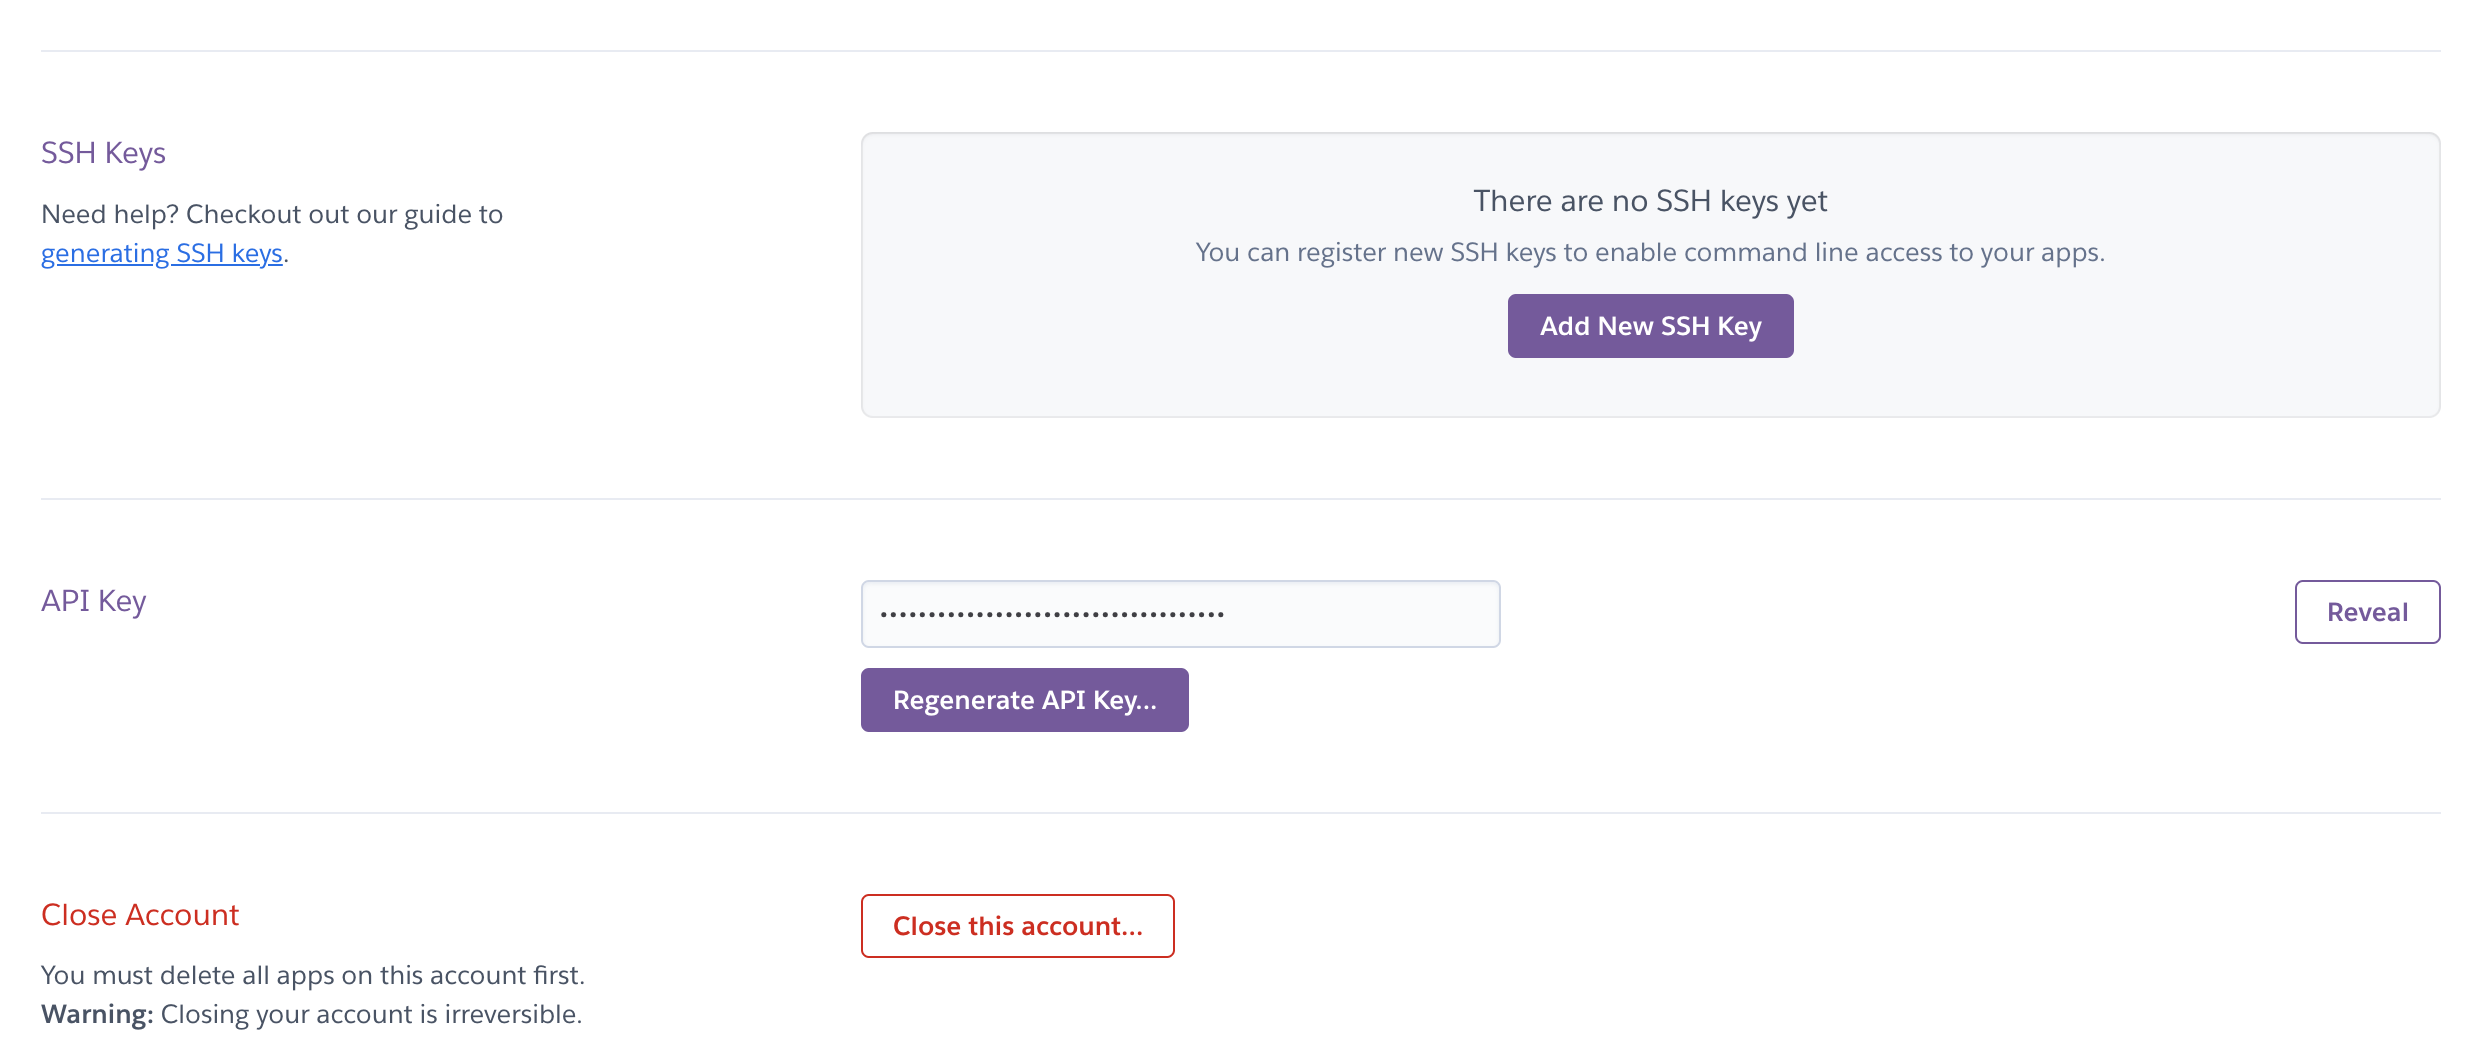
web: npm startLog into Heroku, click on the user icon in the tip right corner, click Account Setting, and scroll down to find the API key.
Next, add an environment variable to Bitbucket Pipelines so that we can deploy to Heroku:
- HEROKU_API_KEY: You can find your API key in your Heroku account
Go to Pipelines > Environment variables in your repository settings to add this variable.
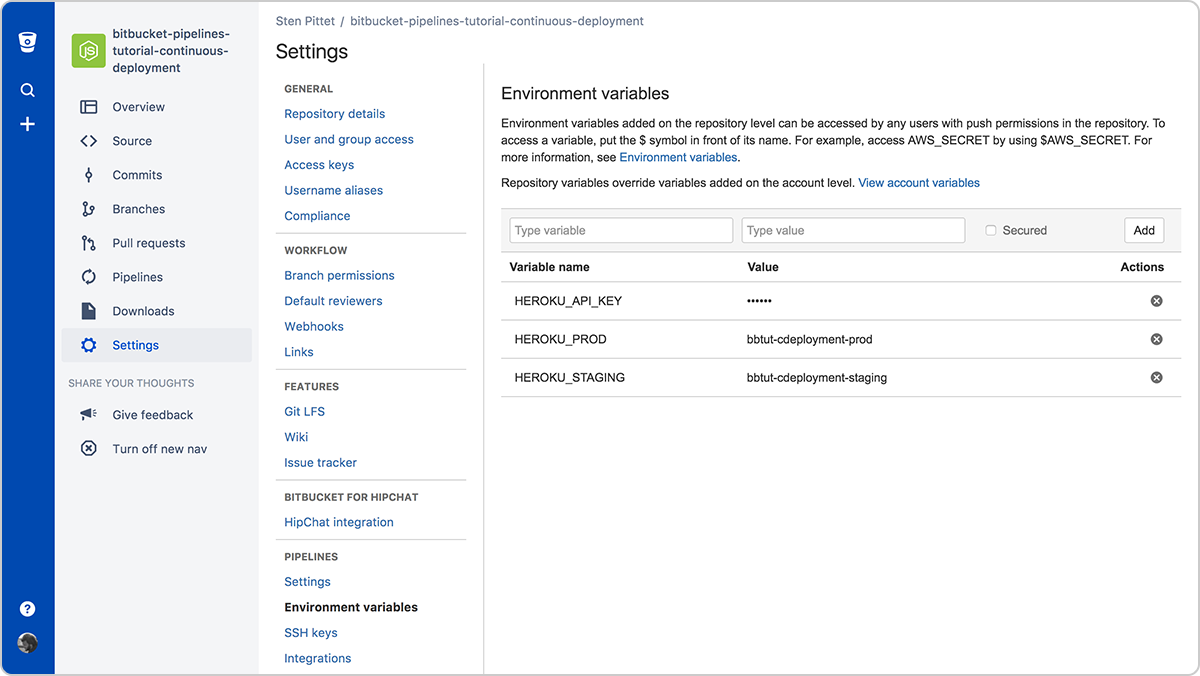
Setting up environment variables to deploy to Heroku
We're using Heroku in this guide, it is certainly possible to adapt this example to other hosting services. Use this guide as a Heroku reference.
Continuous delivery with branches as a gate to production
This configuration is suited for teams that have special release branches that can be mapped to a deployment. It also allows you to review changes in a pull request before they are deployed to production.
In this setup we will use 2 different branches to trigger deployments:
- main: any push to main will deploy the code to a staging environment after running the tests.
- production: code merged to the production branch will be automatically released to the production environment.
Create the production branch in Bitbucket cloud by clicking Branches
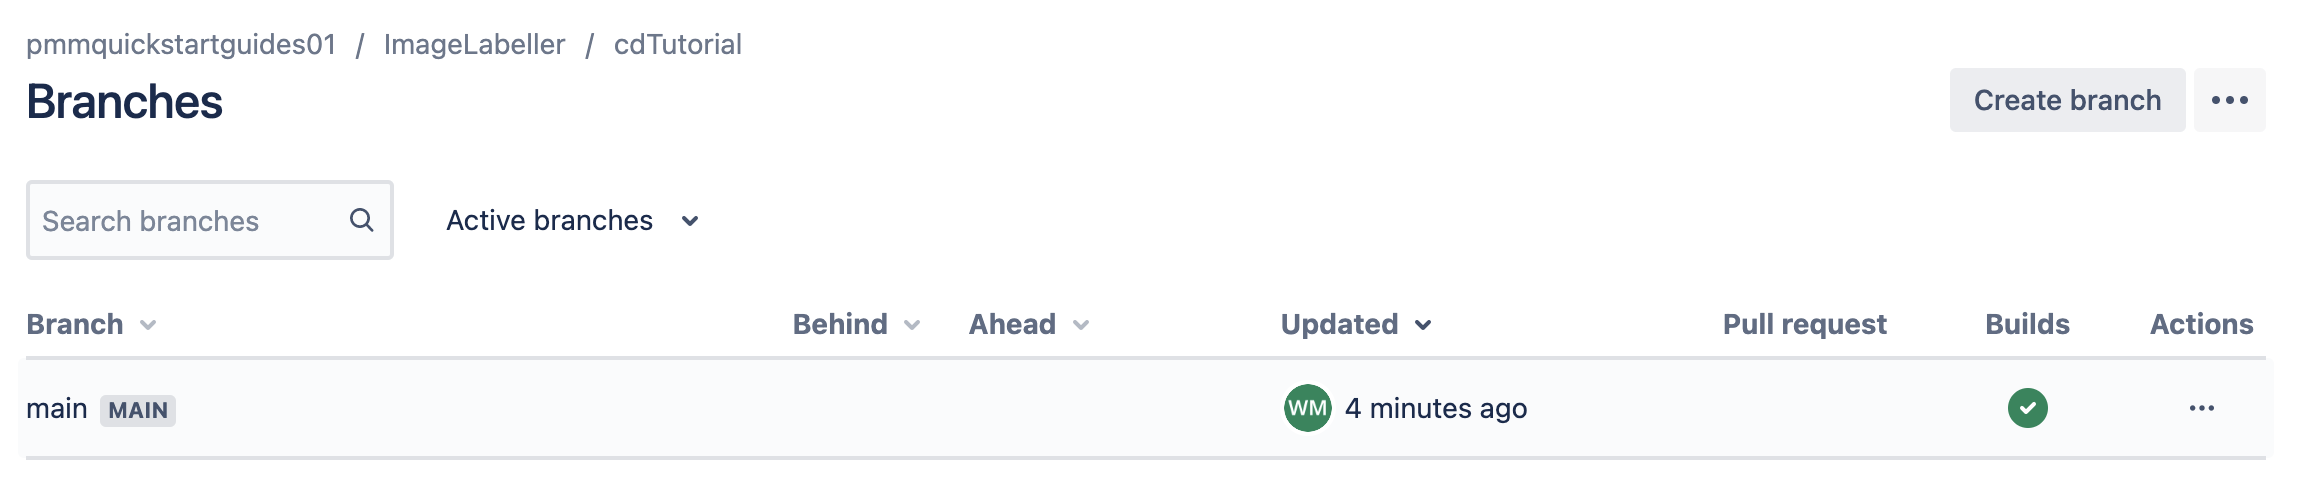
Then click Create branch
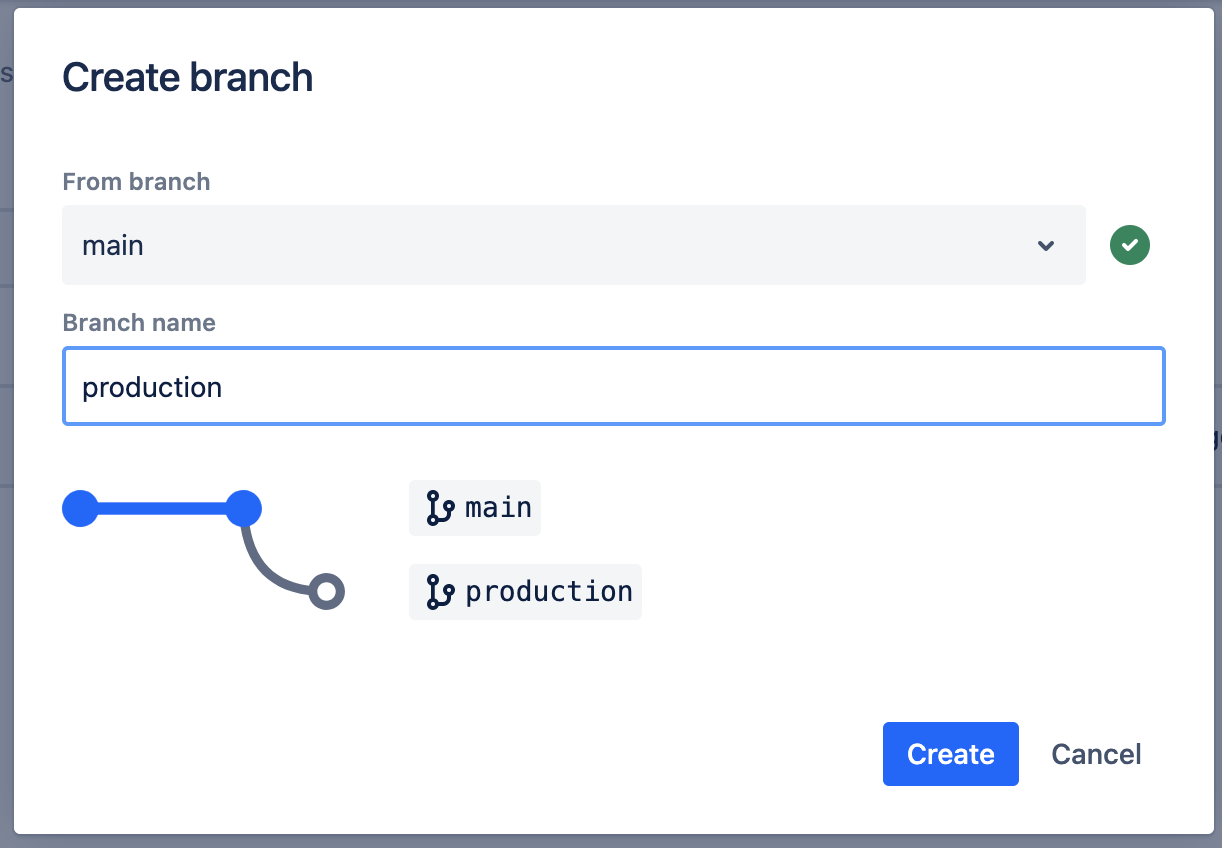
Type production, and click Create.
From the root directory of the example repository run:
heroku create --remote staging
git push staging main
heroku create --remote production
git push production main
To see if this worked correctly, go to Heroku in a browser, and see if there are two apps listed.
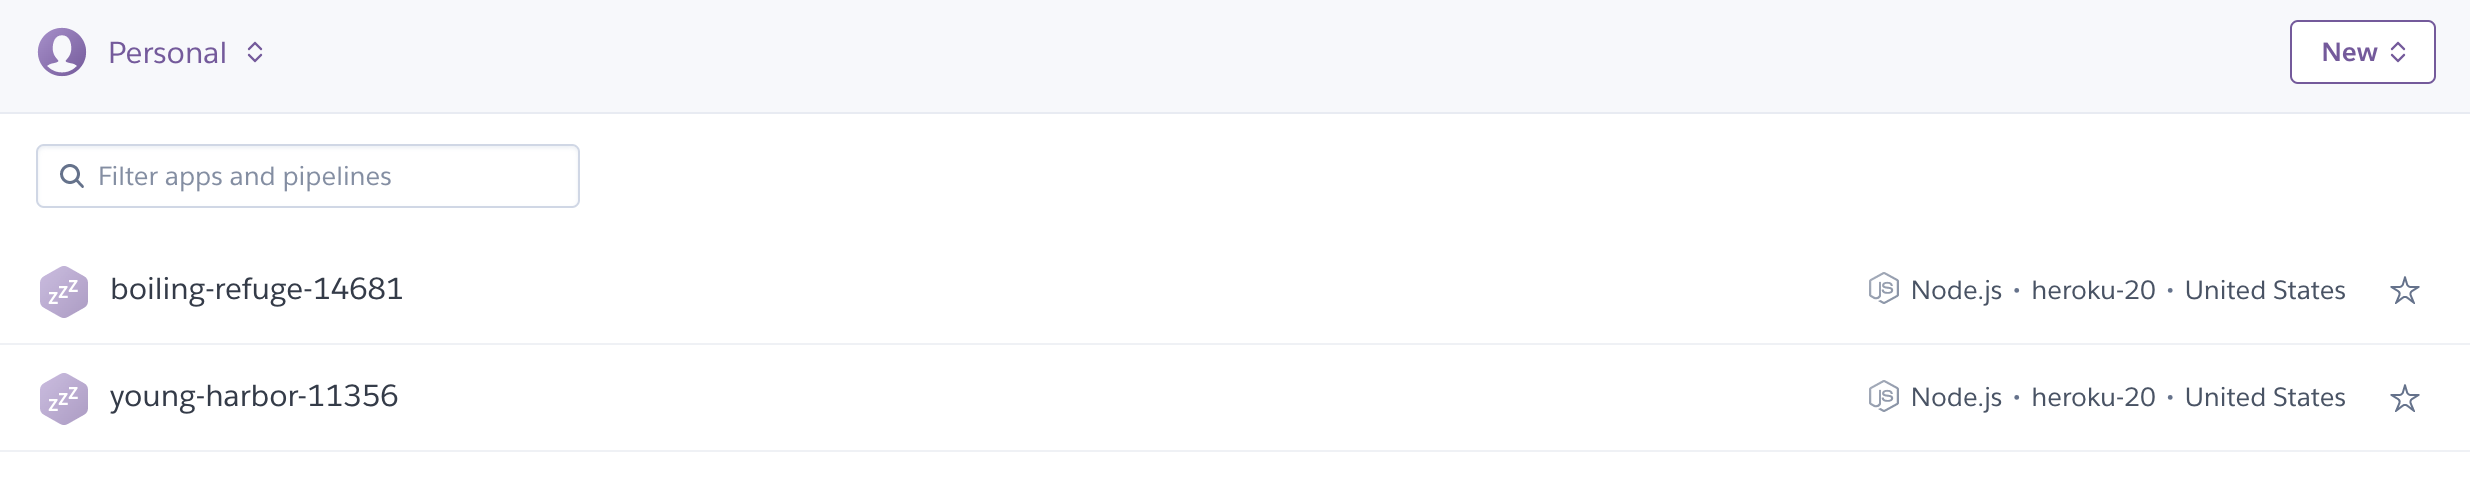
Also run:
git remote -vvThe expected results will have three remotes. One for Bitbucket, and two for Heroku. One will be a staging remote, and the other will be a production remote.
wmarusiak@C02F207NML7L cdTutorial % git remote -vv
origin git@bitbucket.org:pmmquickstartguides01/cdtutorial.git (fetch)
origin git@bitbucket.org:pmmquickstartguides01/cdtutorial.git (push)
production https://git.heroku.com/young-harbor-11356.git (fetch)
production https://git.heroku.com/young-harbor-11356.git (push)
staging https://git.heroku.com/boiling-refuge-14681.git (fetch)
staging https://git.heroku.com/boiling-refuge-14681.git (push)
Then, configure the deployment to staging. To do that, we use the branch-specific pipelines and create a pipeline that gets executed for every push on the main branch. Make this change in your terminal, and push to origin main.
bitbucket-pipelines.yml
image: node:16

clone:
  depth: full

pipelines:
  branches:
    main:
      - step:
          name: deploy_to_staging
          script:
            - npm install
            - npm test
            - git push https://heroku:$HEROKU_API_KEY@git.heroku.com/boiling-refuge-1468.git main
Make sure to replace the git push URL for main with the staging URL from git remote -vv above.
We have now created a pipeline that will deploy every push from main to Heroku after building and testing our application. The clone section at the beginning of the configuration ensures we do a full clone (otherwise Heroku might reject the git push). Just push this configuration to Bitbucket to see your first automated deployment to staging happening.
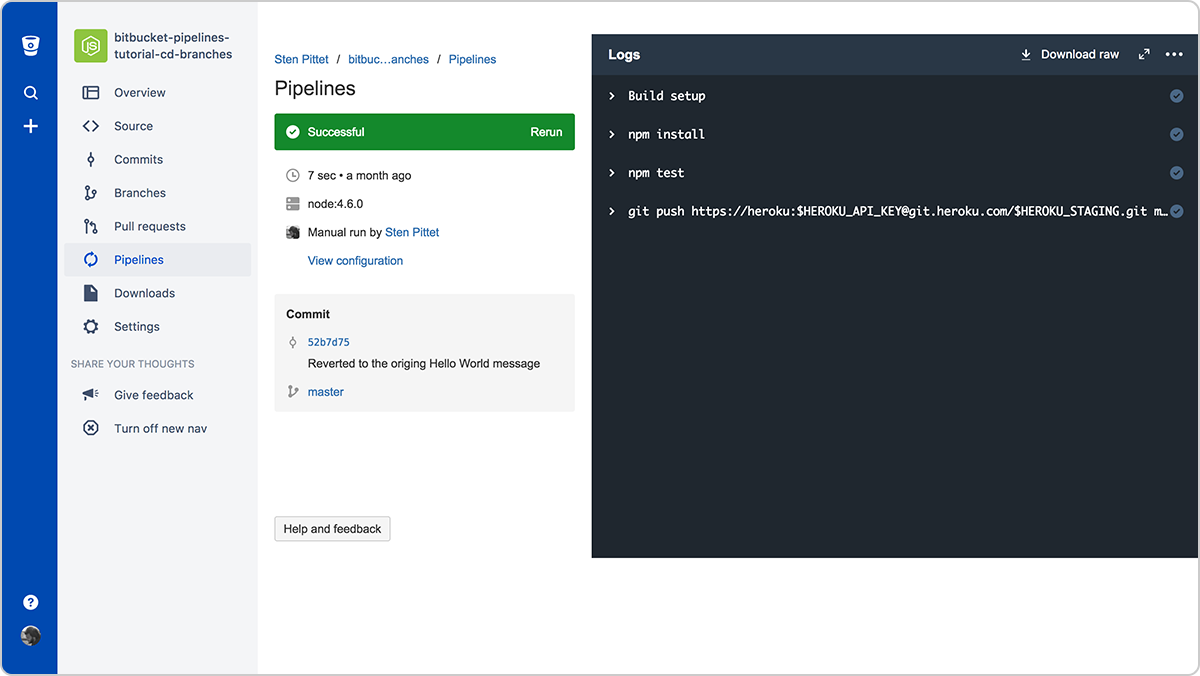
A successful pipeline that deploys our application to staging
As you may have guessed, we just need to add another branch pipeline for the production branch to automatically release the production environment when changes get merged to the production branch. Make this change in your terminal, and push to origin main.
bitbucket-pipelines.yml
image: node:16

clone:
  depth: full

pipelines:
  branches:
    main:
      - step:
          name: deploy_to_staging
          script:
            - npm install
            - npm test
            - git push https://heroku:$HEROKU_API_KEY@git.heroku.com/thawing-river-12585.git main
    production:
      - step:
          name: deploy_to_production
          script:
            - npm install
            - npm test
            - git push https://heroku:$HEROKU_API_KEY@git.heroku.com/fierce-basin-45507.git production:main
Make sure to replace the git push url for main with the staging url from git remote -vv, and the git push url for production with the production url from git remote -vv.
We run the tests again on the production branch to make sure that nothing affected the build prior to releasing the application.
Our pipelines are now configured and we can restrict the production branch to only accept merges via pull requests. Just go to Workflow > Branch permissions under your repository settings to restrict the production branch. This is an important step as we want to prevent people from pushing straight to production from their local machine.
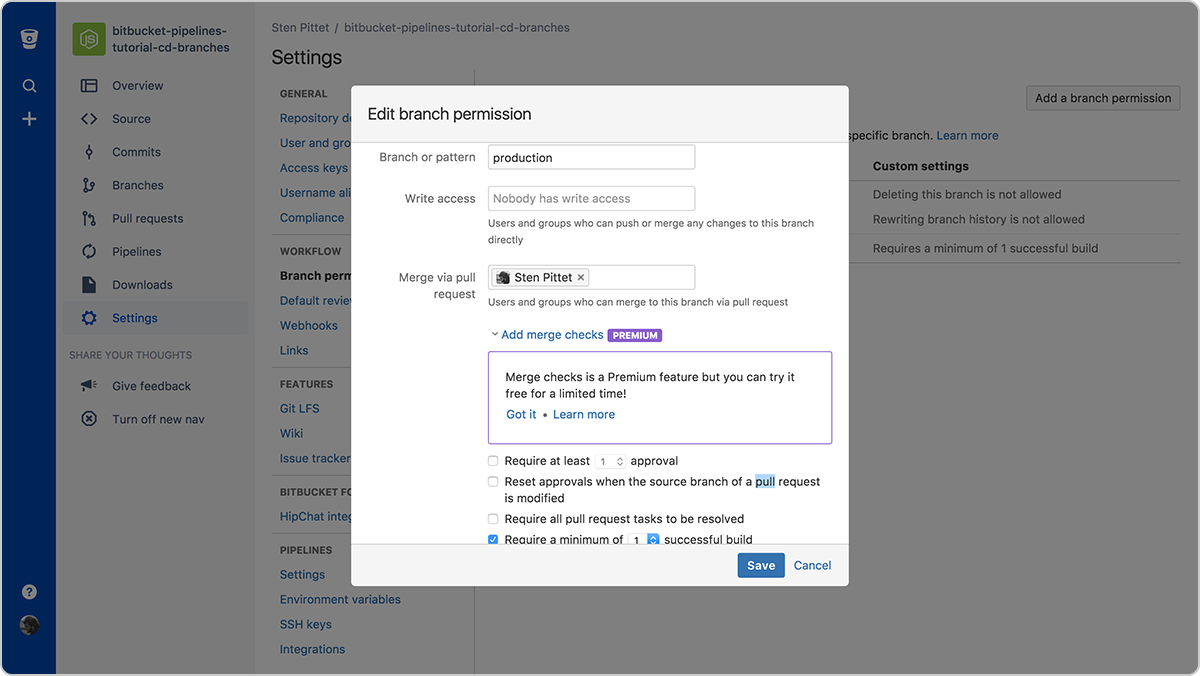
Configuring the permissions of the production branch
In the screenshot above you can see the permissions:
- Nobody has write access
- Only one developer can merge to the branch
We've also added a merge check to make sure the source branch has at least one green build prior to merging the code. It will allow us to save build time and prevent developers from merging bad code to our production branch.
When that's done, you can create a pull request to merge the code from main to production and subsequently release the new changes to your production environment.
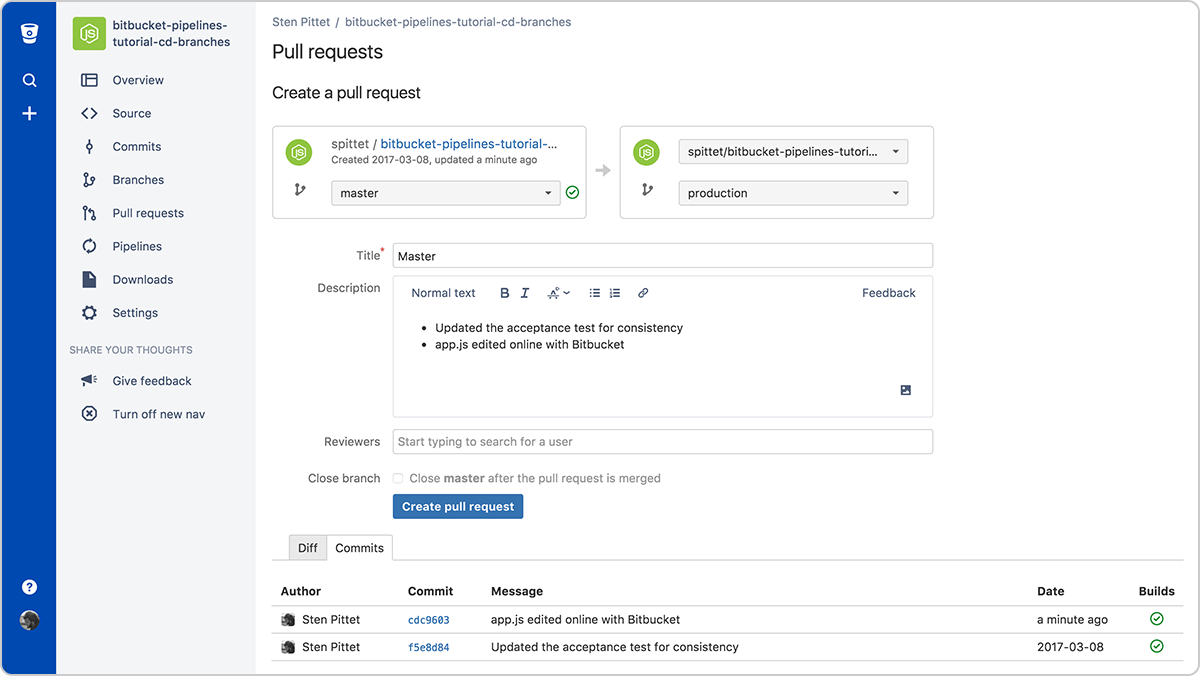
Create a pull request to merge changes to production
As soon as you merge the pull request, you'll be able to see a new pipeline being triggered for the production branch.
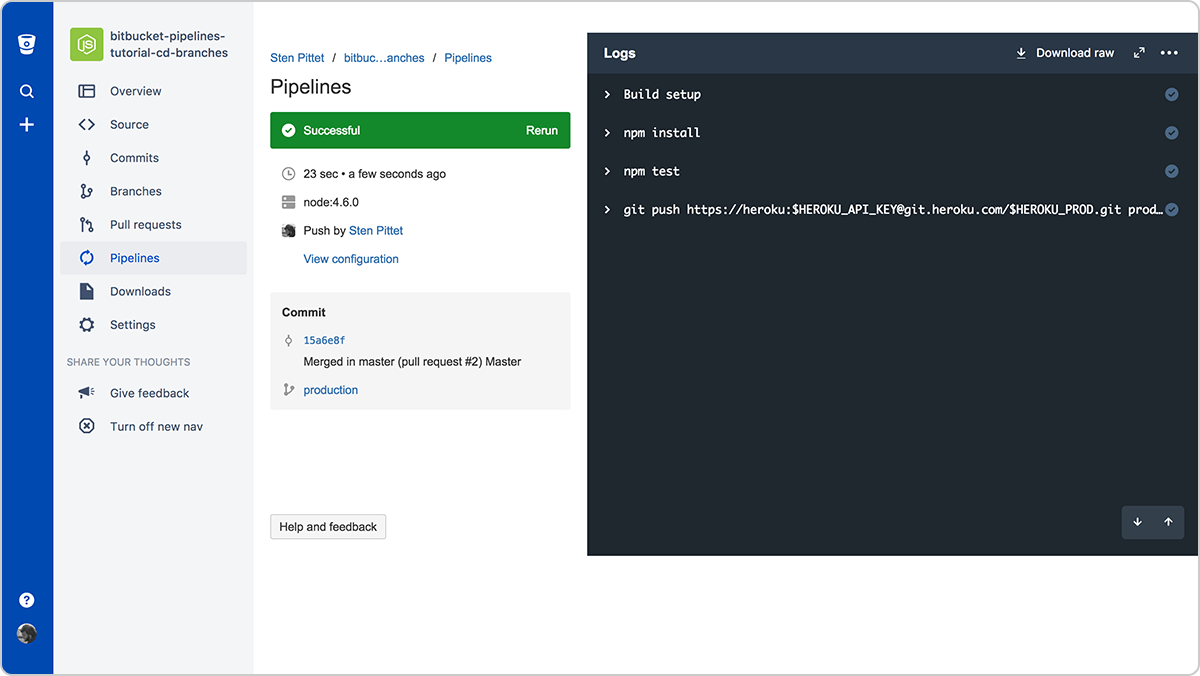
When it completes your new changes will have been successfully deployed to the production environment.
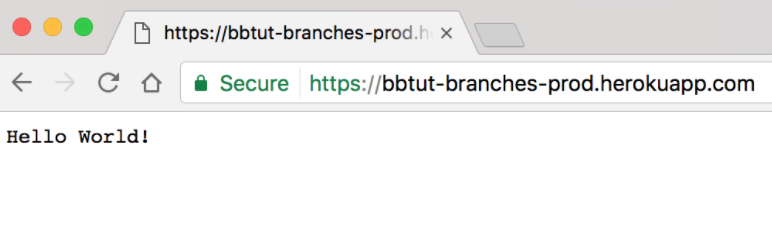
The prod environment is up-to-date!
You have now set up a continuous delivery workflow with Bitbucket Pipelines, and you can safely use pull requests to release code to your customers.
You can find the final source of this example in the repository linked below.
Continuous delivery with manual trigger for the release
This configuration is great for teams that are practicing trunk-based development.
With Bitbucket Pipelines it is possible to configure custom pipelines that can be triggered manually. They can be used for various purposes: long-running tests that you do not want to run on every push, or specific actions that you want to control yourself. We will use a custom pipeline to set up a continuous delivery workflow where pushes to the main branch get automatically deployed to a staging environment, and commits can be manually deployed to production.
Now that we have our staging deployment set up, we can simply add a custom pipeline to our bitbucket-pipelines.yml configuration that we will use to trigger the release to production manually.
bitbucket-pipelines.yml
image: node:16

clone:
  depth: full

pipelines:
  branches:
    main:
      - step:
          name: deploy_to_staging
          script:
            - npm install
            - npm test
            - git push https://heroku:$HEROKU_API_KEY@git.heroku.com/thawing-river-12585.git main
  custom:
    prod-deployment:
      - step:
          name: deploy_to_production
          script:
            - npm install
            - npm test
            - git push https://heroku:$HEROKU_API_KEY@git.heroku.com/fierce-basin-45507.git production:main
Make sure to replace the git push URL for main with the staging URL from git remote -vv, and the Git push URL for production with the production URL from git remote -vv.
After pushing the new configuration to your Bitbucket repository you can go to the commit and click on the Run pipeline link under the commit information to trigger the deployment to production.
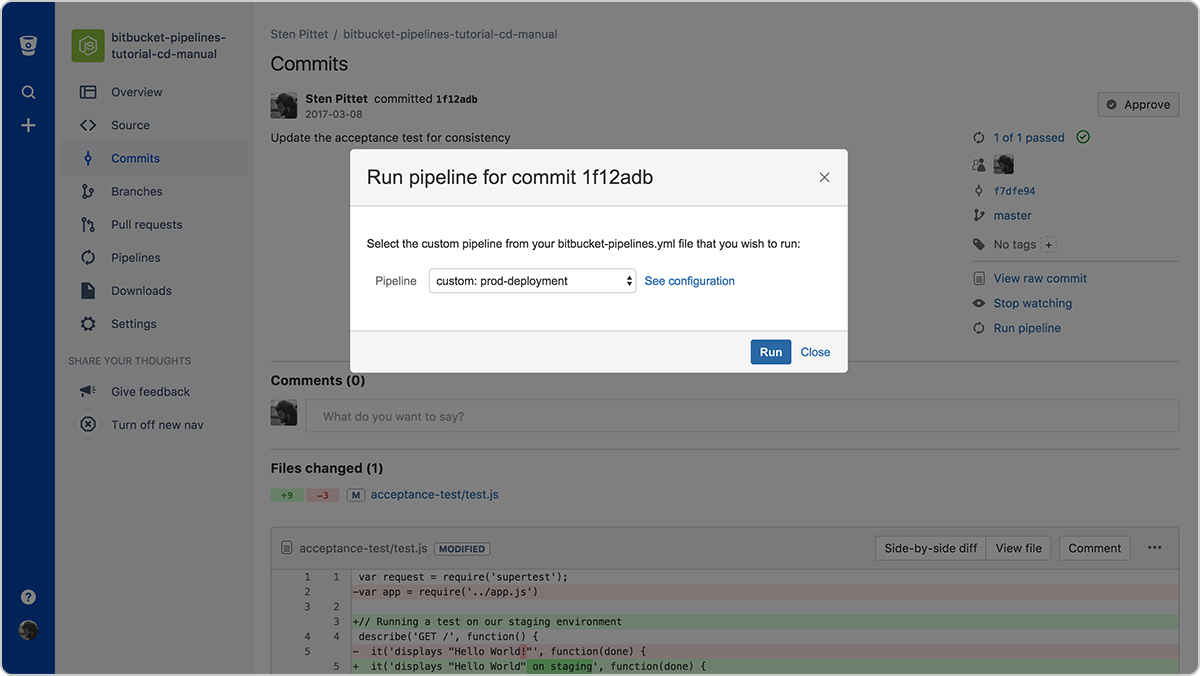
The Run pipeline action will list the custom pipelines available
Just hit the Run button and you will be redirected to the production deployment pipeline where you can monitor the logs.
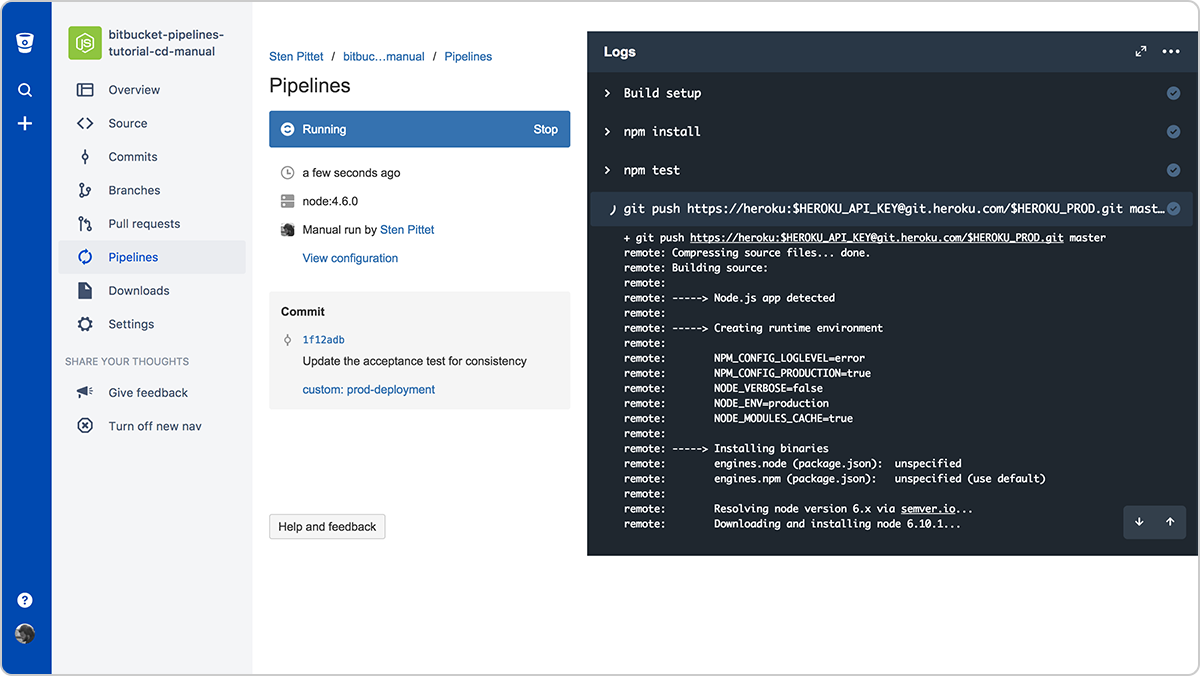
In the commit information section of the pipeline, you can see the name of the custom pipeline that has been used. You're now ready to use your new Bitbucket Pipelines configuration for continuous delivery and you can check your Hello World in production to make sure that everything went fine!
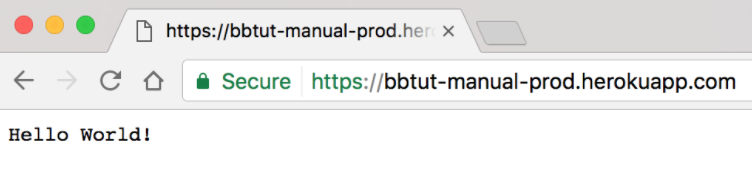
Our Hello World has been deployed to production using a manual trigger
You can find the final source of this example in the repository linked below.
Share this article
Next Topic
Recommended reading
Bookmark these resources to learn about types of DevOps teams, or for ongoing updates about DevOps at Atlassian.
DevOps community
DevOps learning path