Git merge
Merging is Git's way of putting a forked history back together again. The git merge command lets you take the independent lines of development created by git branch and integrate them into a single branch.
Note that all of the commands presented below merge into the current branch. The current branch will be updated to reflect the merge, but the target branch will be completely unaffected. Again, this means that git merge is often used in conjunction with git checkout for selecting the current branch and git branch -d for deleting the obsolete target branch.
How it works
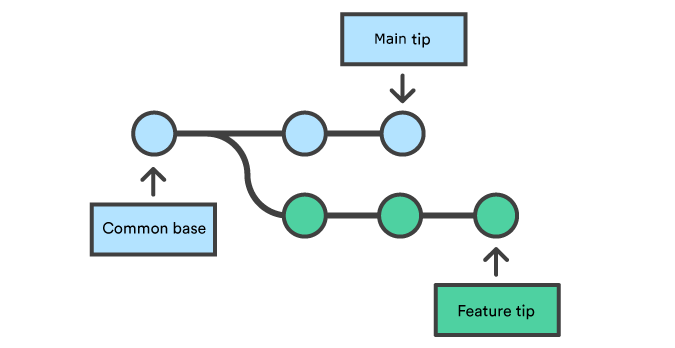
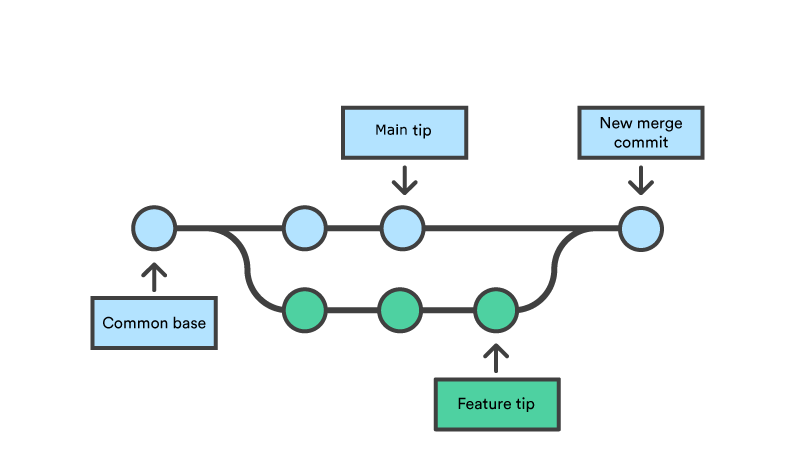
Git merge will combine multiple sequences of commits into one unified history. In the most frequent use cases, git merge is used to combine two branches. The following examples in this document will focus on this branch merging pattern. In these scenarios, git merge takes two commit pointers, usually the branch tips, and will find a common base commit between them. Once Git finds a common base commit it will create a new "merge commit" that combines the changes of each queued merge commit sequence.
Say we have a new branch feature that is based off the main branch. We now want to merge this feature branch into main.


related material
Advanced Git log
SEE SOLUTION
Learn Git with Bitbucket Cloud
Invoking this command will merge the specified branch feature into the current branch, we'll assume main. Git will determine the merge algorithm automatically (discussed below).

Merge commits are unique against other commits in the fact that they have two parent commits. When creating a merge commit Git will attempt to auto magically merge the separate histories for you. If Git encounters a piece of data that is changed in both histories it will be unable to automatically combine them. This scenario is a version control conflict and Git will need user intervention to continue.
Preparing to merge
Before performing a merge there are a couple of preparation steps to take to ensure the merge goes smoothly.
Confirm the receiving branch
Execute git status to ensure that HEAD is pointing to the correct merge-receiving branch. If needed, execute git checkout to switch to the receiving branch. In our case we will execute git checkout main.
Fetch latest remote commits
Make sure the receiving branch and the merging branch are up-to-date with the latest remote changes. Execute git fetch to pull the latest remote commits. Once the fetch is completed ensure the main branch has the latest updates by executing git pull.
Merging
Once the previously discussed "preparing to merge" steps have been taken a merge can be initiated by executing git merge where
Fast forward merge
A fast-forward merge can occur when there is a linear path from the current branch tip to the target branch. Instead of “actually” merging the branches, all Git has to do to integrate the histories is move (i.e., “fast forward”) the current branch tip up to the target branch tip. This effectively combines the histories, since all of the commits reachable from the target branch are now available through the current one. For example, a fast forward merge of some-feature into main would look something like the following:
However, a fast-forward merge is not possible if the branches have diverged. When there is not a linear path to the target branch, Git has no choice but to combine them via a 3-way merge. 3-way merges use a dedicated commit to tie together the two histories. The nomenclature comes from the fact that Git uses three commits to generate the merge commit: the two branch tips and their common ancestor.
While you can use either of these merge strategies, many developers like to use fast-forward merges (facilitated through rebasing) for small features or bug fixes, while reserving 3-way merges for the integration of longer-running features. In the latter case, the resulting merge commit serves as a symbolic joining of the two branches.
Our first example demonstrates a fast-forward merge. The code below creates a new branch, adds two commits to it, then integrates it into the main line with a fast-forward merge.
# Start a new feature
git checkout -b new-feature main
# Edit some files
git add <file>
git commit -m "Start a feature"
# Edit some files
git add <file>
git commit -m "Finish a feature"
# Merge in the new-feature branch
git checkout main
git merge new-feature
git branch -d new-feature
This is a common workflow for short-lived topic branches that are used more as an isolated development than an organizational tool for longer-running features.
Also note that Git should not complain about the git branch -d, since new-feature is now accessible from the main branch.
In the event that you require a merge commit during a fast forward merge for record keeping purposes you can execute git merge with the --no-ff option.
git merge --no-ff <branch>This command merges the specified branch into the current branch, but always generates a merge commit (even if it was a fast-forward merge). This is useful for documenting all merges that occur in your repository.
3-way merge
The next example is very similar, but requires a 3-way merge because main progresses while the feature is in-progress. This is a common scenario for large features or when several developers are working on a project simultaneously.
Start a new feature
git checkout -b new-feature main
# Edit some files
git add <file>
git commit -m "Start a feature"
# Edit some files
git add <file>
git commit -m "Finish a feature"
# Develop the main branch
git checkout main
# Edit some files
git add <file>
git commit -m "Make some super-stable changes to main"
# Merge in the new-feature branch
git merge new-feature
git branch -d new-feature
Note that it’s impossible for Git to perform a fast-forward merge, as there is no way to move main up to new-feature without backtracking.
For most workflows, new-feature would be a much larger feature that took a long time to develop, which would be why new commits would appear on main in the meantime. If your feature branch was actually as small as the one in the above example, you would probably be better off rebasing it onto main and doing a fast-forward merge. This prevents superfluous merge commits from cluttering up the project history.
Resolving conflict
If the two branches you're trying to merge both changed the same part of the same file, Git won't be able to figure out which version to use. When such a situation occurs, it stops right before the merge commit so that you can resolve the conflicts manually.
The great part of Git's merging process is that it uses the familiar edit/stage/commit workflow to resolve merge conflicts. When you encounter a merge conflict, running the git status command shows you which files need to be resolved. For example, if both branches modified the same section of hello.py, you would see something like the following:
On branch main
Unmerged paths:
(use "git add/rm ..." as appropriate to mark resolution)
both modified: hello.py
How conflicts are presented
When Git encounters a conflict during a merge, It will edit the content of the affected files with visual indicators that mark both sides of the conflicted content. These visual markers are: <<<<<<<, =======, and >>>>>>>. It's helpful to search a project for these indicators during a merge to find where conflicts need to be resolved.
here is some content not affected by the conflict
<<<<<<< main
this is conflicted text from main
=======
this is conflicted text from feature branch
>>>>>>> feature branch;
Generally the content before the ======= marker is the receiving branch and the part after is the merging branch.
Once you've identified conflicting sections, you can go in and fix up the merge to your liking. When you're ready to finish the merge, all you have to do is run git add on the conflicted file(s) to tell Git they're resolved. Then, you run a normal git commit to generate the merge commit. It’s the exact same process as committing an ordinary snapshot, which means it’s easy for normal developers to manage their own merges.
Note that merge conflicts will only occur in the event of a 3-way merge. It’s not possible to have conflicting changes in a fast-forward merge.
Summary
This document is an overview of the git merge command. Merging is an essential process when working with Git. We discussed the internal mechanics behind a merge and the differences between a fast forward merge and a three way, true merge. Some key take-aways are:
1. Git merging combines sequences of commits into one unified history of commits.
2. There are two main ways Git will merge: Fast Forward and Three way
3. Git can automatically merge commits unless there are changes that conflict in both commit sequences.
This document integrated and referenced other Git commands like: git branch, git pull, and git fetch. Visit their corresponding stand-alone pages for more information.
Share this article
Next Topic
Recommended reading
Bookmark these resources to learn about types of DevOps teams, or for ongoing updates about DevOps at Atlassian.

Bitbucket blog

DevOps learning path
