Tutorial: Using Confluence Cloud and Jira together

Confluence and Jira offer a complete solution for all team types to deliver their best work. Teams can use Jira to manage their projects and embed relevant context for their tasks using Confluence so everyone stays in sync and can deliver results, faster. When teams integrate Confluence and Jira, they work together to provide robust project management and document collaboration.

If you’re a Confluence Data Center user, check out this documentation on how to use Jira applications and Confluence together.
Link Confluence and Jira
Jira is great at helping your team plan and track project work. Adding Confluence gives you the power to organize all of the ideas, content, and files that you and your team create as you bring your vision to life.
When you link a Jira space to the Confluence space where all your project documentation lives, you eliminate the need for shared drives and file folders. Finding what you need has never been easier. Let’s get down to business!
Connect a Confluence space to a Jira space
This is the first step to integrating Confluence and Jira.
- Navigate to Pages in the Jira space navigation bar
- Click Connect to Confluence
- Search for the Confluence space you want to connect
Great! You are now ready to view, create, and edit pages and whiteboards from within Jira.
Add a Jira shortcut to a Confluence page
Adding shortcuts will make it easy to switch between products when needed.
- Copy the URL of your Jira space
- Navigate to the Confluence space you’d like to connect it to
- Tap + (Add shortcut) option in the Confluence left-hand sidebar
- Paste your Jira space URL in the Edit space shortcuts dialog box, and name your shortcut for easy reference
Now you can smoothly navigate to your Jira space by clicking on the shortcut in the left sidebar. Anyone can add a shortcut to the side navigation in any space, and admins can create keyboard shortcut links.
Add a Confluence shortcut to a Jira space
Admins are able to add a Confluence shortcut to a Jira space.
- Navigate to the Confluence page you’d like to link to Jira—this is probably your space overview page
- Copy the page URL by selecting Share
- In your Jira space of choice, select Add Shortcut in the space navigation bar, and select Shortcut
- Paste the Confluence page URL and name your shortcut, just as you did in Confluence
Jump to the related Confluence space and back again in a snap. Once you’ve linked your Jira space and Confluence page, you’ll see important Jira notifications, such as shares, mentions, and comments, in your Confluence notifications. You’ll never miss an important Jira notification, even when you’re deep in Confluence work.
See step-by-step instructions in this video:
Use Confluence in Jira
When your Jira space is connected to a Confluence space, you’re able to view, edit, and create Confluence pages, live docs, and whiteboards without ever having to leave Jira. This eliminates context-switching by creating a more integrated experience.
View, create, and edit pages from Jira space pages
Managing Confluence pages and whiteboards is seamless within Jira. From the space's Pages section, you can view a page by selecting it, which opens in an embedded window—no need to switch tools.
Creating new content is just as simple: start with a blank Confluence page or use a template, all accessible directly within Jira. Editing is intuitive too—hover over any embedded page, click the pencil icon, and make your changes without leaving Jira.
This streamlined integration ensures you can view, create, and edit content efficiently, all in one place.

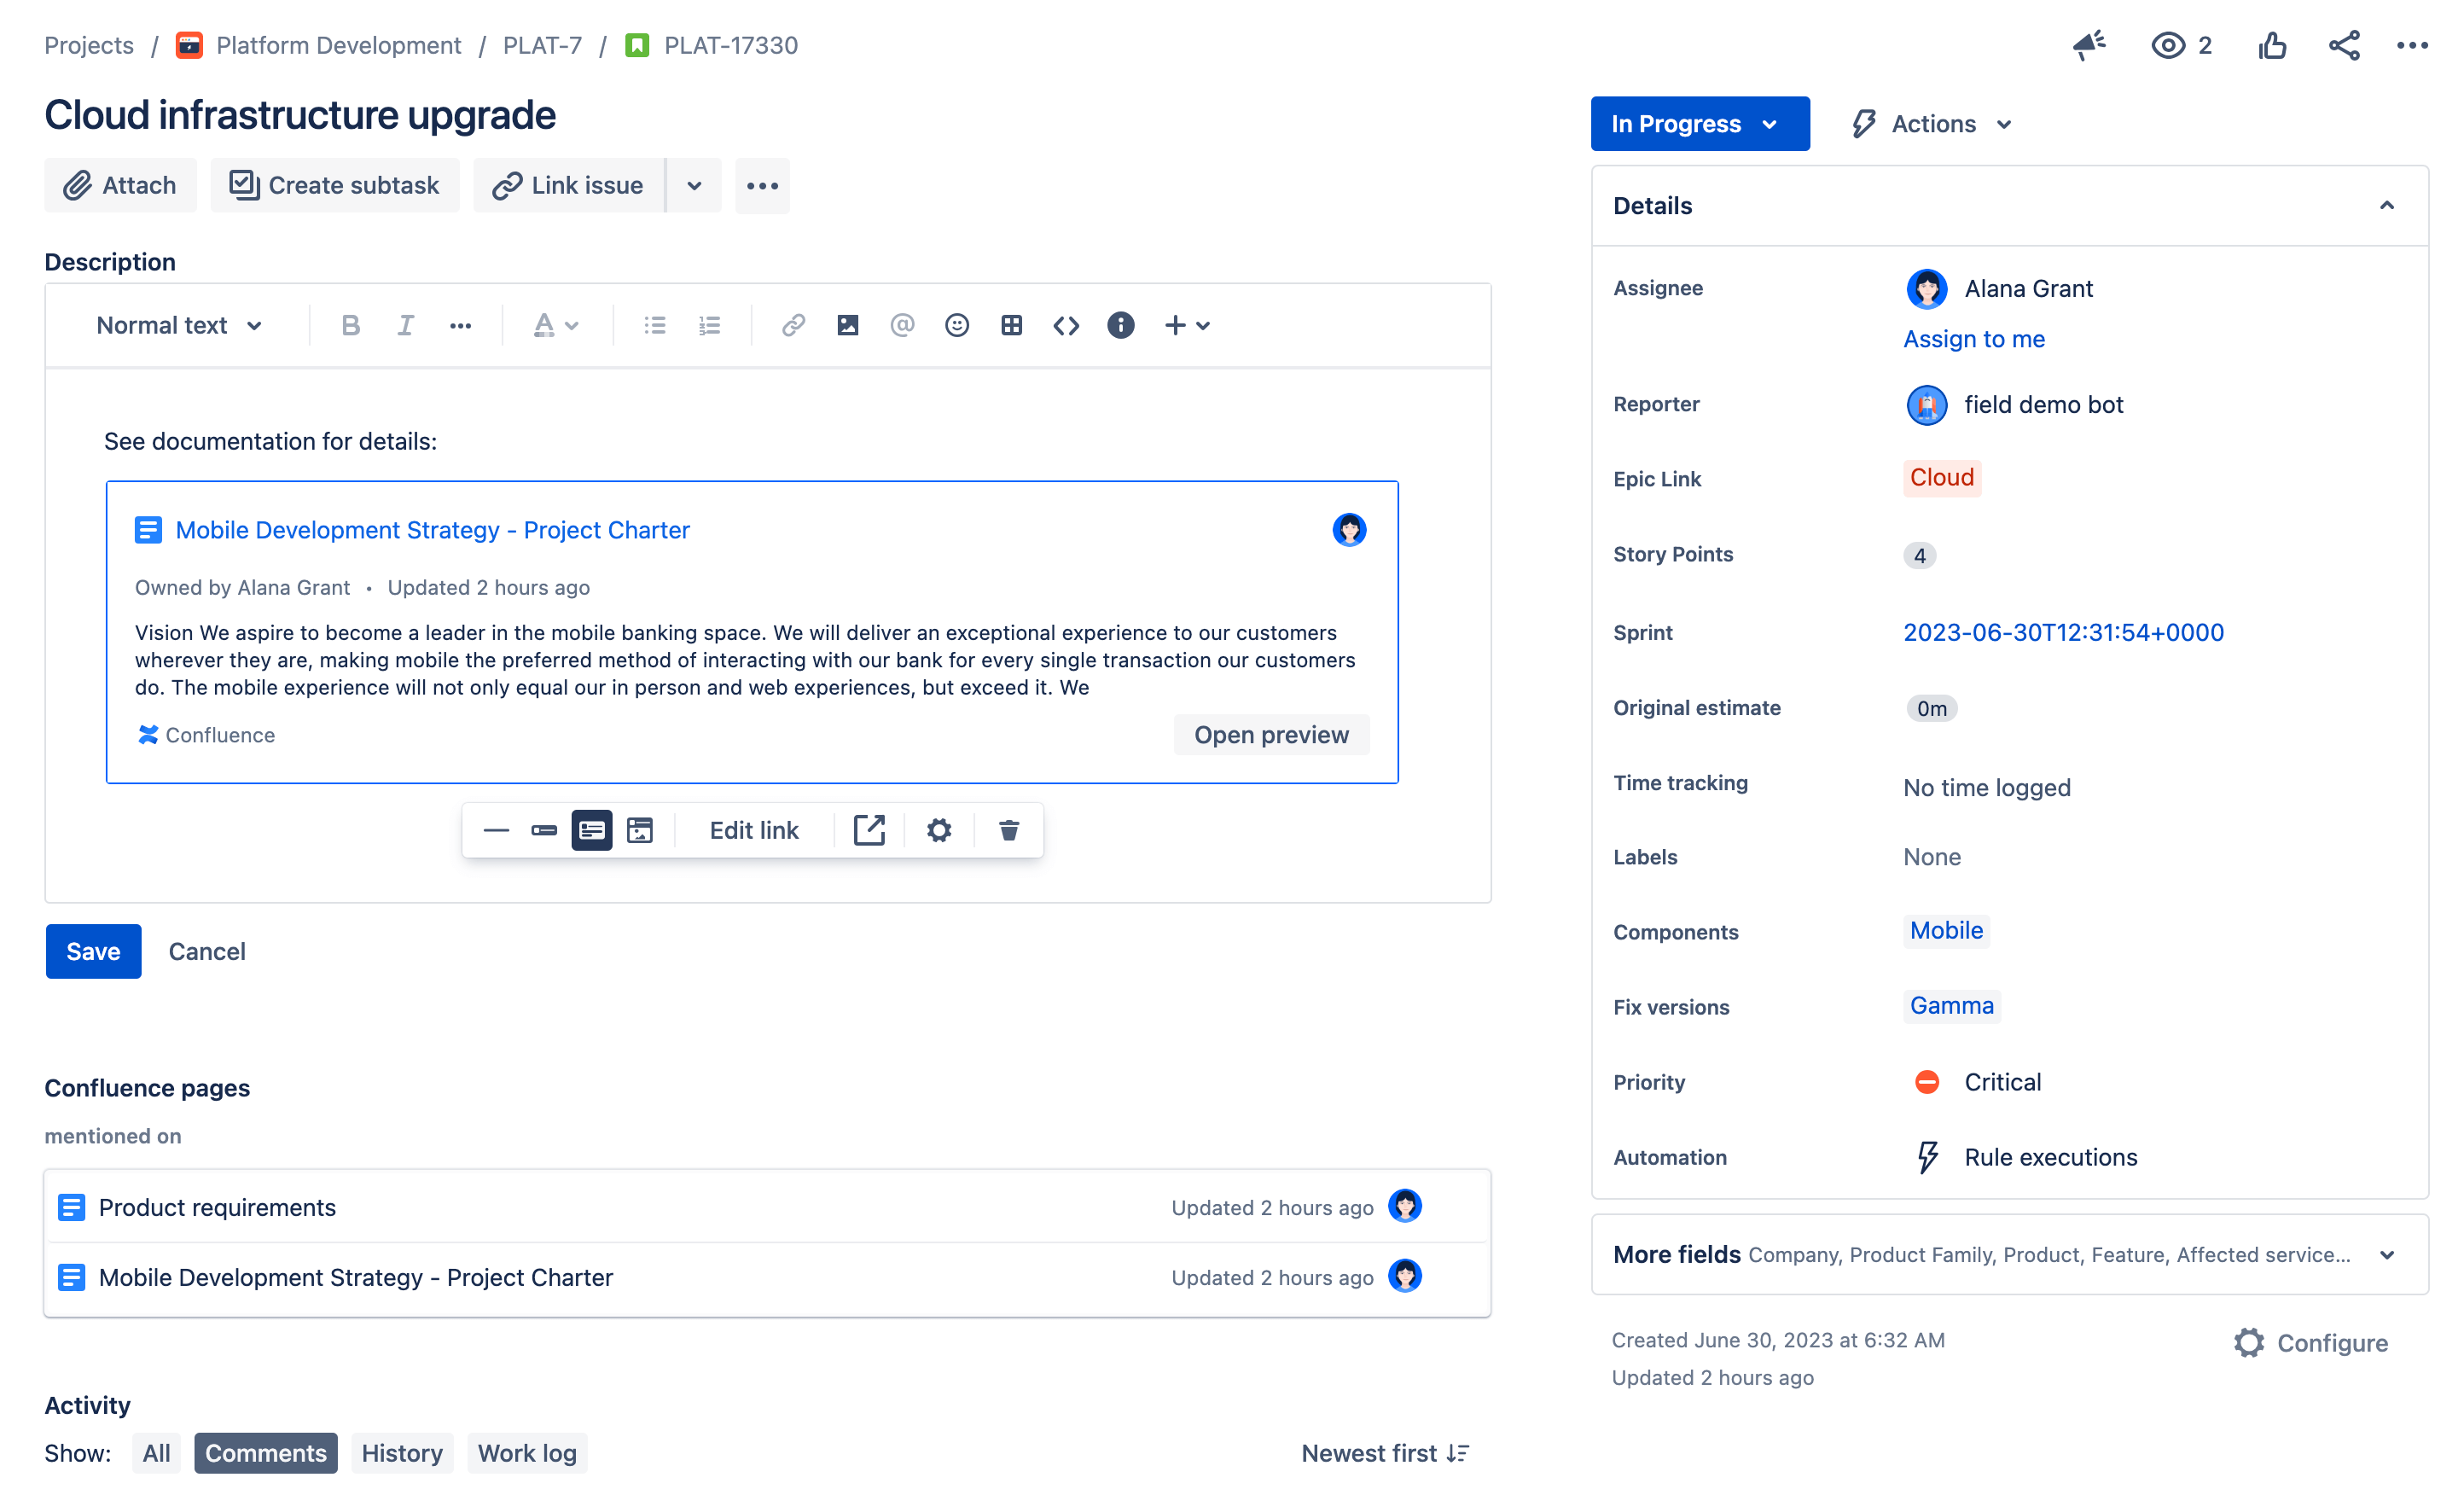
Add Confluence pages, live docs, and whiteboards directly to Jira work items
Give important context to tasks by adding documentation or information directly in Jira work items. You can do so by adding links to pages and whiteboards to your Jira work items or add links to your Jira work items to Confluence pages.
Add Confluence content directly to Jira work items
Create a Confluence page
Sometimes you may need to create a new Confluence page directly from Jira to document a task or share additional resources.
- Open the Jira work item where you want to create a new Confluence page.
- Open the dropdown menu next to the + (Add or create related work) button, select Page, then select Create page.
- A new Confluence page will be created and automatically linked to the Jira work item.
- You can now edit the new Confluence page within Jira and add relevant information.
- The link to your new Confluence page will appear under Confluence Content in your Jira work item.
Create a Confluence live doc
Sometimes you may need to create a new Confluence live doc directly from Jira to document a task or share additional resources.
- Open the Jira work item where you want to create a new Confluence live doc.
- Open the dropdown menu next to the + (Add or create related work) button, select Live Doc, then select Create live doc.
- A new Confluence live doc will be created and automatically linked to the Jira work item.
- You can now edit the new Confluence live doc within Jira and add relevant information.
- The link to your new Confluence live doc will appear under Confluence Content in your Jira work item.
Create a Confluence whiteboard
Confluence whiteboards offer a space for brainstorming and collaboration directly linked to Jira work items.
- Open the Jira work item where you want to create a new Confluence whiteboard.
- Open the dropdown menu next to the + (Add or create related work), select Whiteboard, then select Create whiteboard.
- A new Confluence whiteboard will be created and automatically linked to the Jira work item.
- You can now edit the new Confluence whiteboard within Jira and add relevant information.
- The link to your new Confluence whiteboard will appear under Confluence Content in your Jira work item.
Smart Links
When you copy and paste Confluence content URLs into a Jira work item description, a Smart Link will appear. Confluence Smart Links reveal important context about the page directly in the Jira work item. To add a Smart Link:
- Copy the page URL in the browser address bar or by selecting Share and Copy link.
- Paste the URL in the Jira work item view description.
- A Confluence Smart Link will appear. To change the level of viewable context, click into the description, hover over the Smart Link and select Configure. Then select URL, Inline, Card, or Embed.
- Select Save to save your Jira work item description.
Also, Jira work item URLs that are pasted into Confluence pages, live docs, and whiteboards will appear in the Confluence content section of a Jira work item, so you can easily find relevant documents where the work item is mentioned.
Add Jira work items to Confluence
Most people would rather not spend their time jumping between applications. Luckily, the Jira and Confluence integration makes it easy to track Jira work directly in Confluence. Whether you spend most of your day in Confluence or in Jira, you have the context and traceability you need, which means greater efficiency for your team, day in and day out.
Track Jira work directly in Confluence
Just paste your Jira link on a Confluence page and it will automatically drop a dynamic Jira work item link on your Confluence page. Once you publish the page, the link will display the work item ID and title, work type category (epic, task, etc.), and work item status in the workflow (to do, in progress, done, etc.).
On the Jira work item page, a link to the Confluence page will appear in the ‘Confluence Pages’ section.
Import Jira work items onto a whiteboard
Importing Jira work items onto a Confluence whiteboard allows you to visualize and manage your tasks and projects in a collaborative space. Follow these steps to import Jira work items manually:
- Open your Confluence whiteboard where you want to add a Jira work item.
- In the bottom toolbar, select Import from Jira.
- A menu will appear where you can filter and search for the Jira work item you’d like to import.
- Select one or multiple work items, then click Import.
- The Jira work item will now appear on your whiteboard. You can click the work item to open it in a new tab in Jira.
Embed your entire whiteboard into a Jira work item
Embedding a Confluence whiteboard into a Jira work item allows you to provide visual context and collaborative details directly within Jira. Follow these steps to embed your Confluence whiteboard:
- Copy the URL of the Confluence whiteboard you’d like to embed into Jira. Or, select Share and Copy Link.
- Open the Jira work item where you’d like to import your Confluence whiteboard.
- Paste the whiteboard link into the description of the Jira work item. To change the level of viewable content, hover over the link, and select Configure. Then, select URL, Inline, Card, or Embed. Selecting Embed will give you the most visibility of the whiteboard on your Jira work item.
- You can now view and interact with your whiteboard directly from your Jira work item.
Display a dynamic list of Jira work items on a Confluence page
To display a list of Jira work items on a Confluence page:
- Type /jira while editing a page or tap + and select Jira.
- Enter or search for Jira work items in the search bar.
- Select only the work items that you would like to display.
- (Optional) Select Display options to customize how they’ll appear.
- Select Insert.
When choosing which Jira work items you’d like to add to your page, you can choose to search for existing work items, create a new work item, or choose from recently viewed work items. The search function is very comprehensive – you can search by work type key, search URL, JIRA link, JQL, plain text, or a filter. Filters are a pro-move for saving time – create a new filter for a group of work items or even search saved filters from Jira.
From there, you can choose how you’d like to display the Jira work items on your page: list the Jira work items in a table, or simply display the count of work items that are associated with your search. The table that you create is dynamic and will update every time you refresh your Confluence page.
See step-by-step instructions in this video:
Embed the Jira work item collector
You can streamline the task creation process in Confluence even further by creating a Jira work item collector.
The work item collector allows you to easily embed a Jira form on your Confluence page or website. Once configured and placed on your Confluence page, the collector will appear as a button that, when selected, generates a Jira work item creation form. Anyone who can view your Confluence page can select the button, fill out your customized form, and create a new Jira ticket for the Jira space you’ve linked to your Confluence space or page.
The Jira work item collector is great for gathering feedback from customers, allowing those in your organization to log bugs or work items when dogfooding, or maybe just making it faster and simpler for those that work in Confluence to create tickets in Jira without breaking their workflow.
Learn how to set up and embed a Jira Work Item Collector in this guide.
Include your Jira roadmap in Confluence
There are two simple ways to easily embed a real-time roadmap into your Confluence page. This allows you to keep your team on the same page by sharing context for your planned work, providing status updates, and more. You’ll be able to find everything in one place without having to switch apps or manually copy and paste content. Advanced Roadmaps can also be embedded using these methods, providing additional planning and visualization capabilities.
Add a Jira Roadmap using Smart Links
- Open the Confluence page where you want to add the Jira Roadmap.
- Click on the Edit button to enter the page editing mode.
- In the editor toolbar, click on the + (Insert) button.
- Select Jira Road Map from the dropdown menu. This will open a Jira integration dialog.
- Select from your available roadmaps or plans in Jira.
- Click Insert to add the selected roadmap to your Confluence page.
- Adjust the size and placement of the embedded roadmap as needed.
- Click Save or Publish to finalize the changes to your Confluence page.
Add a Jira Roadmap using Macros
- Type /jira roadmap while editing a page or tap + and select Jira Road Map
- Paste a Jira instance URL, select your space and board, and select Save

Reporting on Jira data in Confluence
Capturing progress, results, and decisions is not always cut and dry. When lots of stakeholders and teams are involved, having good ways to share information is vital. Jira Reports give stakeholders a bird’s-eye view of your team’s progress with just a few clicks. Improved visibility across all stakeholders enables your team to focus on tasks and complete work faster.
Use Smart Links to Embed Jira Content into Confluence
Smart Links offer a straightforward way to integrate and view Jira content within Confluence with minimal setup. This feature supports embedding the following Jira content types:
- Jira board
- Jira backlog
- Jira dashboards and gadgets
- Jira releases
Steps to Embed Jira Content Using Smart Links
- Open the specific Jira content (e.g., board, backlog, dashboard, gadget, or release) that you want to embed.
- Copy the URL from your browser’s address bar.
- Navigate to the Confluence page where you want to embed the Jira content.
- Click the Edit button to enter page editing mode.
- Place your cursor at the desired location on the page.
- Paste the copied URL directly into the Confluence page. Confluence will automatically recognize the URL and display it as a Smart Link.
- The Smart Link will render a preview of the Jira content. You can click on the preview to adjust settings or display options if needed.
- Click Save or Publish to finalize the addition of the Jira content to your Confluence page.
Use the Jira Reports Template to Create Reports
The Jira Reports template simplifies reporting on work happening in your Jira spaces. It’s an easy way to share progress on current releases or display a static change log of what’s changed between your latest releases.
Steps to use the Jira Reports Template:
- Create a Confluence page using the Jira Report template.
- Select the Jira space you’d like to report on. The template will automatically generate a preconfigured status report page.
- The report will display pie charts based on your Jira space’s fields, such as priority, work item type, and more.
- Customize your report by choosing different fields to report on, ensuring it highlights the information most relevant to your team and stakeholders.
See step-by-step instructions in this video:
Additional Resources
5 reasons to add Confluence if you’re a Jira team
Jira and Confluence Training from Atlassian University
Use Jira and Confluence together
Related Resources
Get started with Jira free today
CONFLUENCE APPS AND INTEGRATIONS
Learn how to integrate Confluence with your favorite business tools.
Using Confluence and Jira Service Management together
Learn how to use Confluence as a knowledge base for your Jira Service Management projects.