Assets onboarding guide
Step 1 - Access Assets
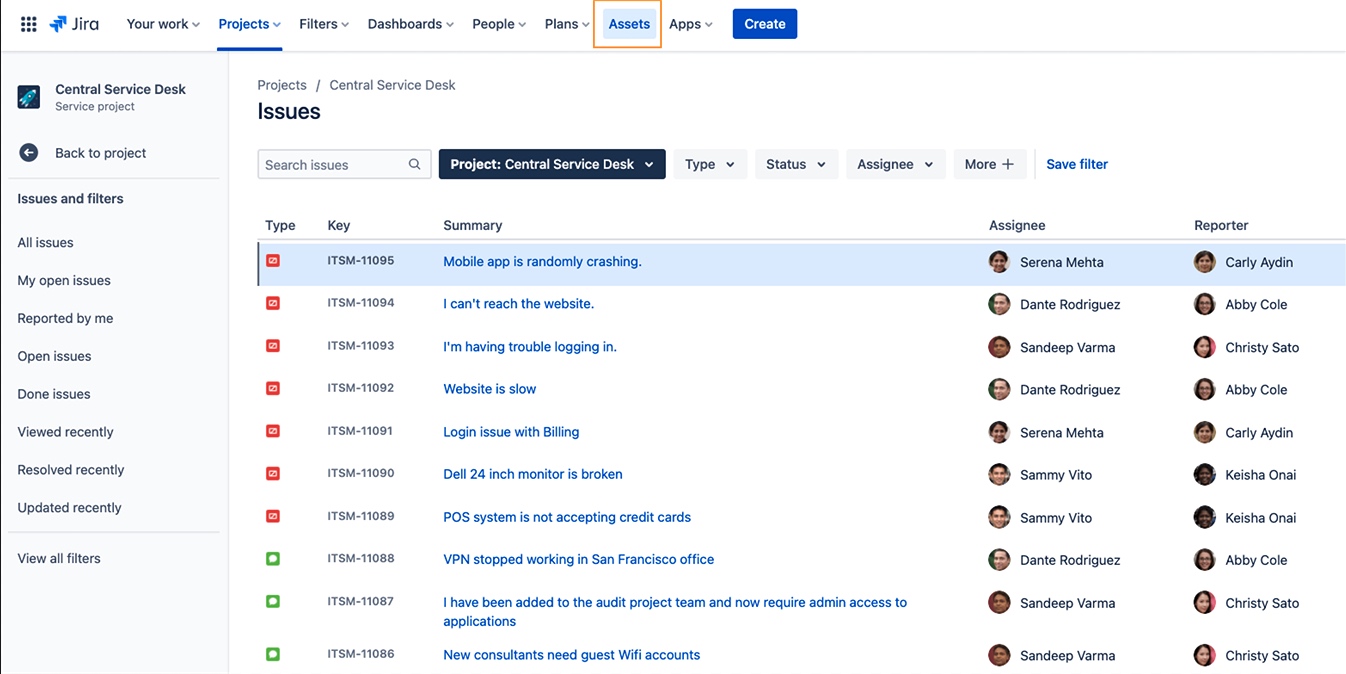
Whether you are on a licensed or trial version of Jira Service Management Premium or Enterprise, you can access Assets by selecting it from the top menu.
Step 2 - Understand how Assets is structured
This section will give an overview of how the Assets database is structured.
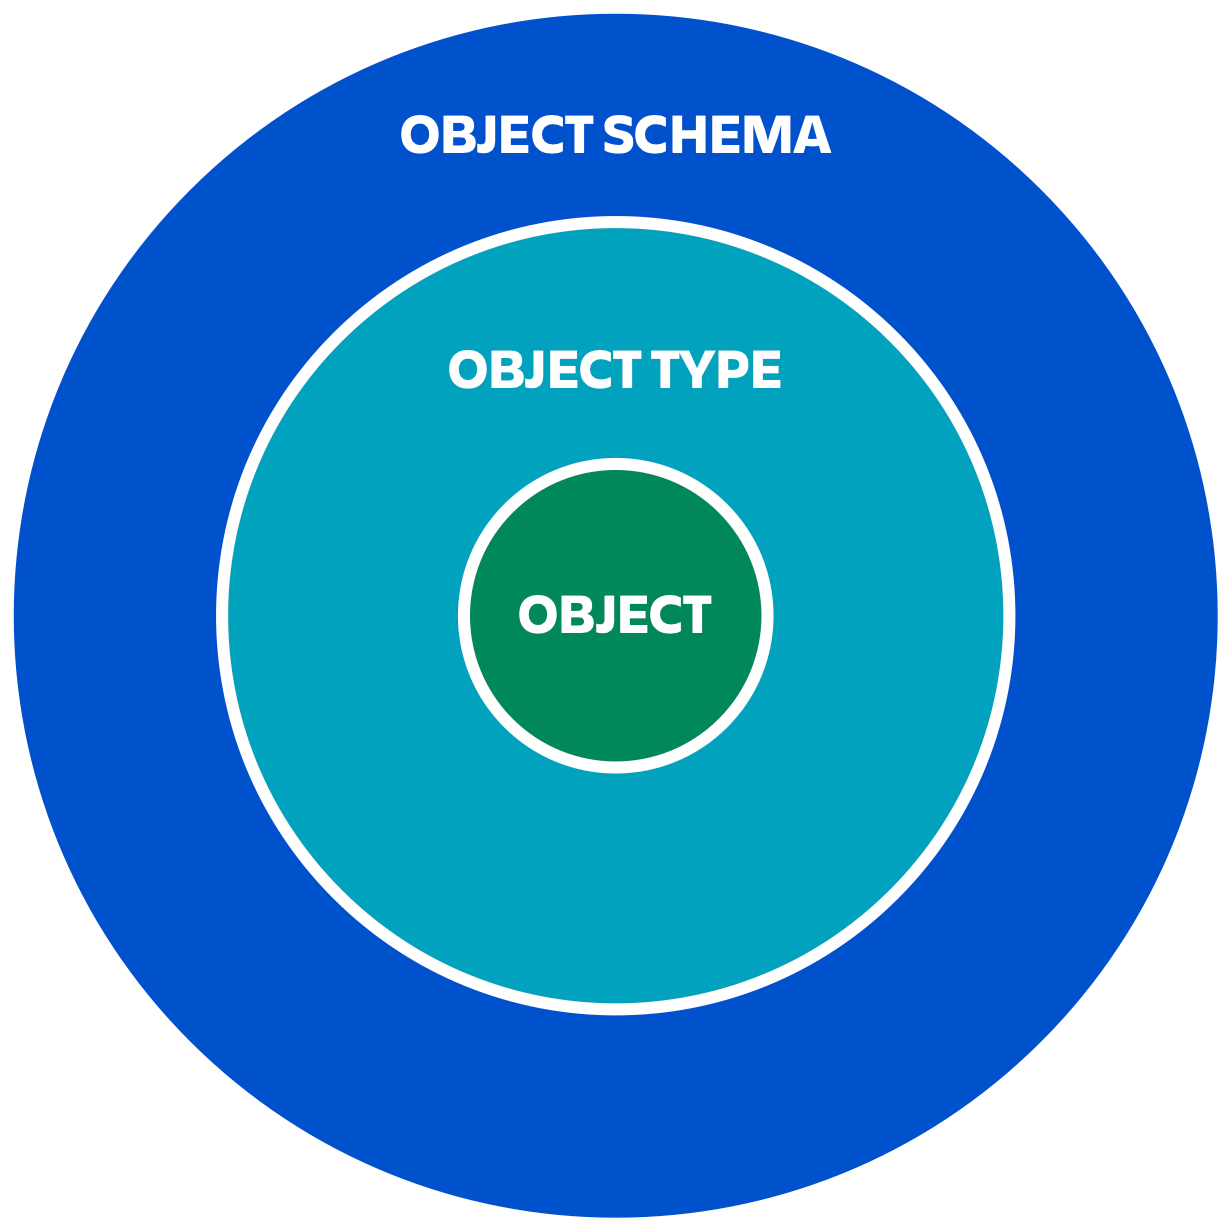
Objects
An object is anything that is singular and unique - a laptop, a server, a piece of equipment, a contract, or even a vehicle. Objects are your actual assets/configuration items (CIs).
Objects can be linked to your Jira issues so whenever an issue comes in, the issue immediately has more context. Objects can also be linked with each other using object references to show how objects depend on each other.
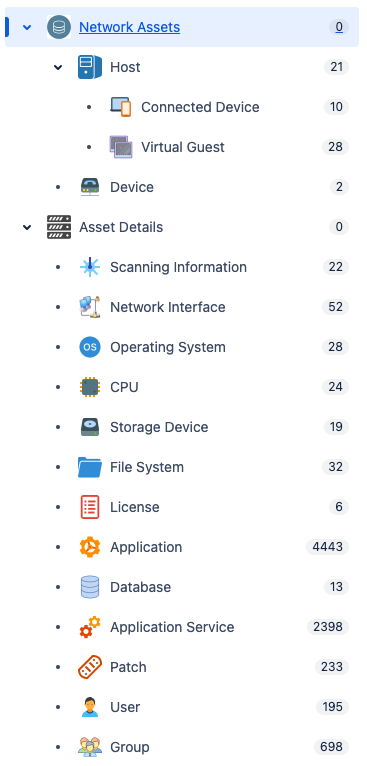
Object types
Similar objects are grouped into object types. Object types act as containers for your actual objects. Object types go within a schema and define the objects that schema contains. You can define these yourself or you can use an object schema template that will come pre-populated with certain object types that you can customize. Common object types include:
- Business services
- Servers
- Laptops
- Software
But they don’t have to be IT assets. For example, many people add other useful information such as:
- Vendors
- Locations
- Employees
- Business Priority
You can organize object types in the hierarchy tree in a way that makes sense. This tree is mainly for navigation and readability and you can have empty object types to aid this, but it can be set up to offer inheritance of attributes to make creating object types easier.
Object schemas
An object schema is the actual configuration management database (CMDB) that contains your object types and objects. You can create multiple object schemas in Assets, which is useful for a number of reasons:
- Breaking data into smaller chunks helps with auditing the data and keeping it accurate.
- If you have sensitive data, e.g., employee information, it may be simpler to keep all that data together in one object schema with restricted access permissions.
When deciding how to put data into Assets, consider the uses of the data and who will update it so the data can be grouped into logical object schemas. You can easily use multiple object schemas for one use case and create links between objects in different object schemas.
Templates are also available for core use cases such as IT Asset Management, People, and Facilities. These templates contain a variety of relevant object types based on your needs, giving you a head start as you build out an effective database and providing an initial structure for importing objects. Learn more about templates here.
Assets automatically syncs with the Services feature within Jira Service Management and creates a read-only object schema within the Assets database with objects entered for each service documented within your service registry. This means you can link your Jira Service Management services to various assets and CIs to build up a service map to support changes, incidents, and problems.
Object attributes
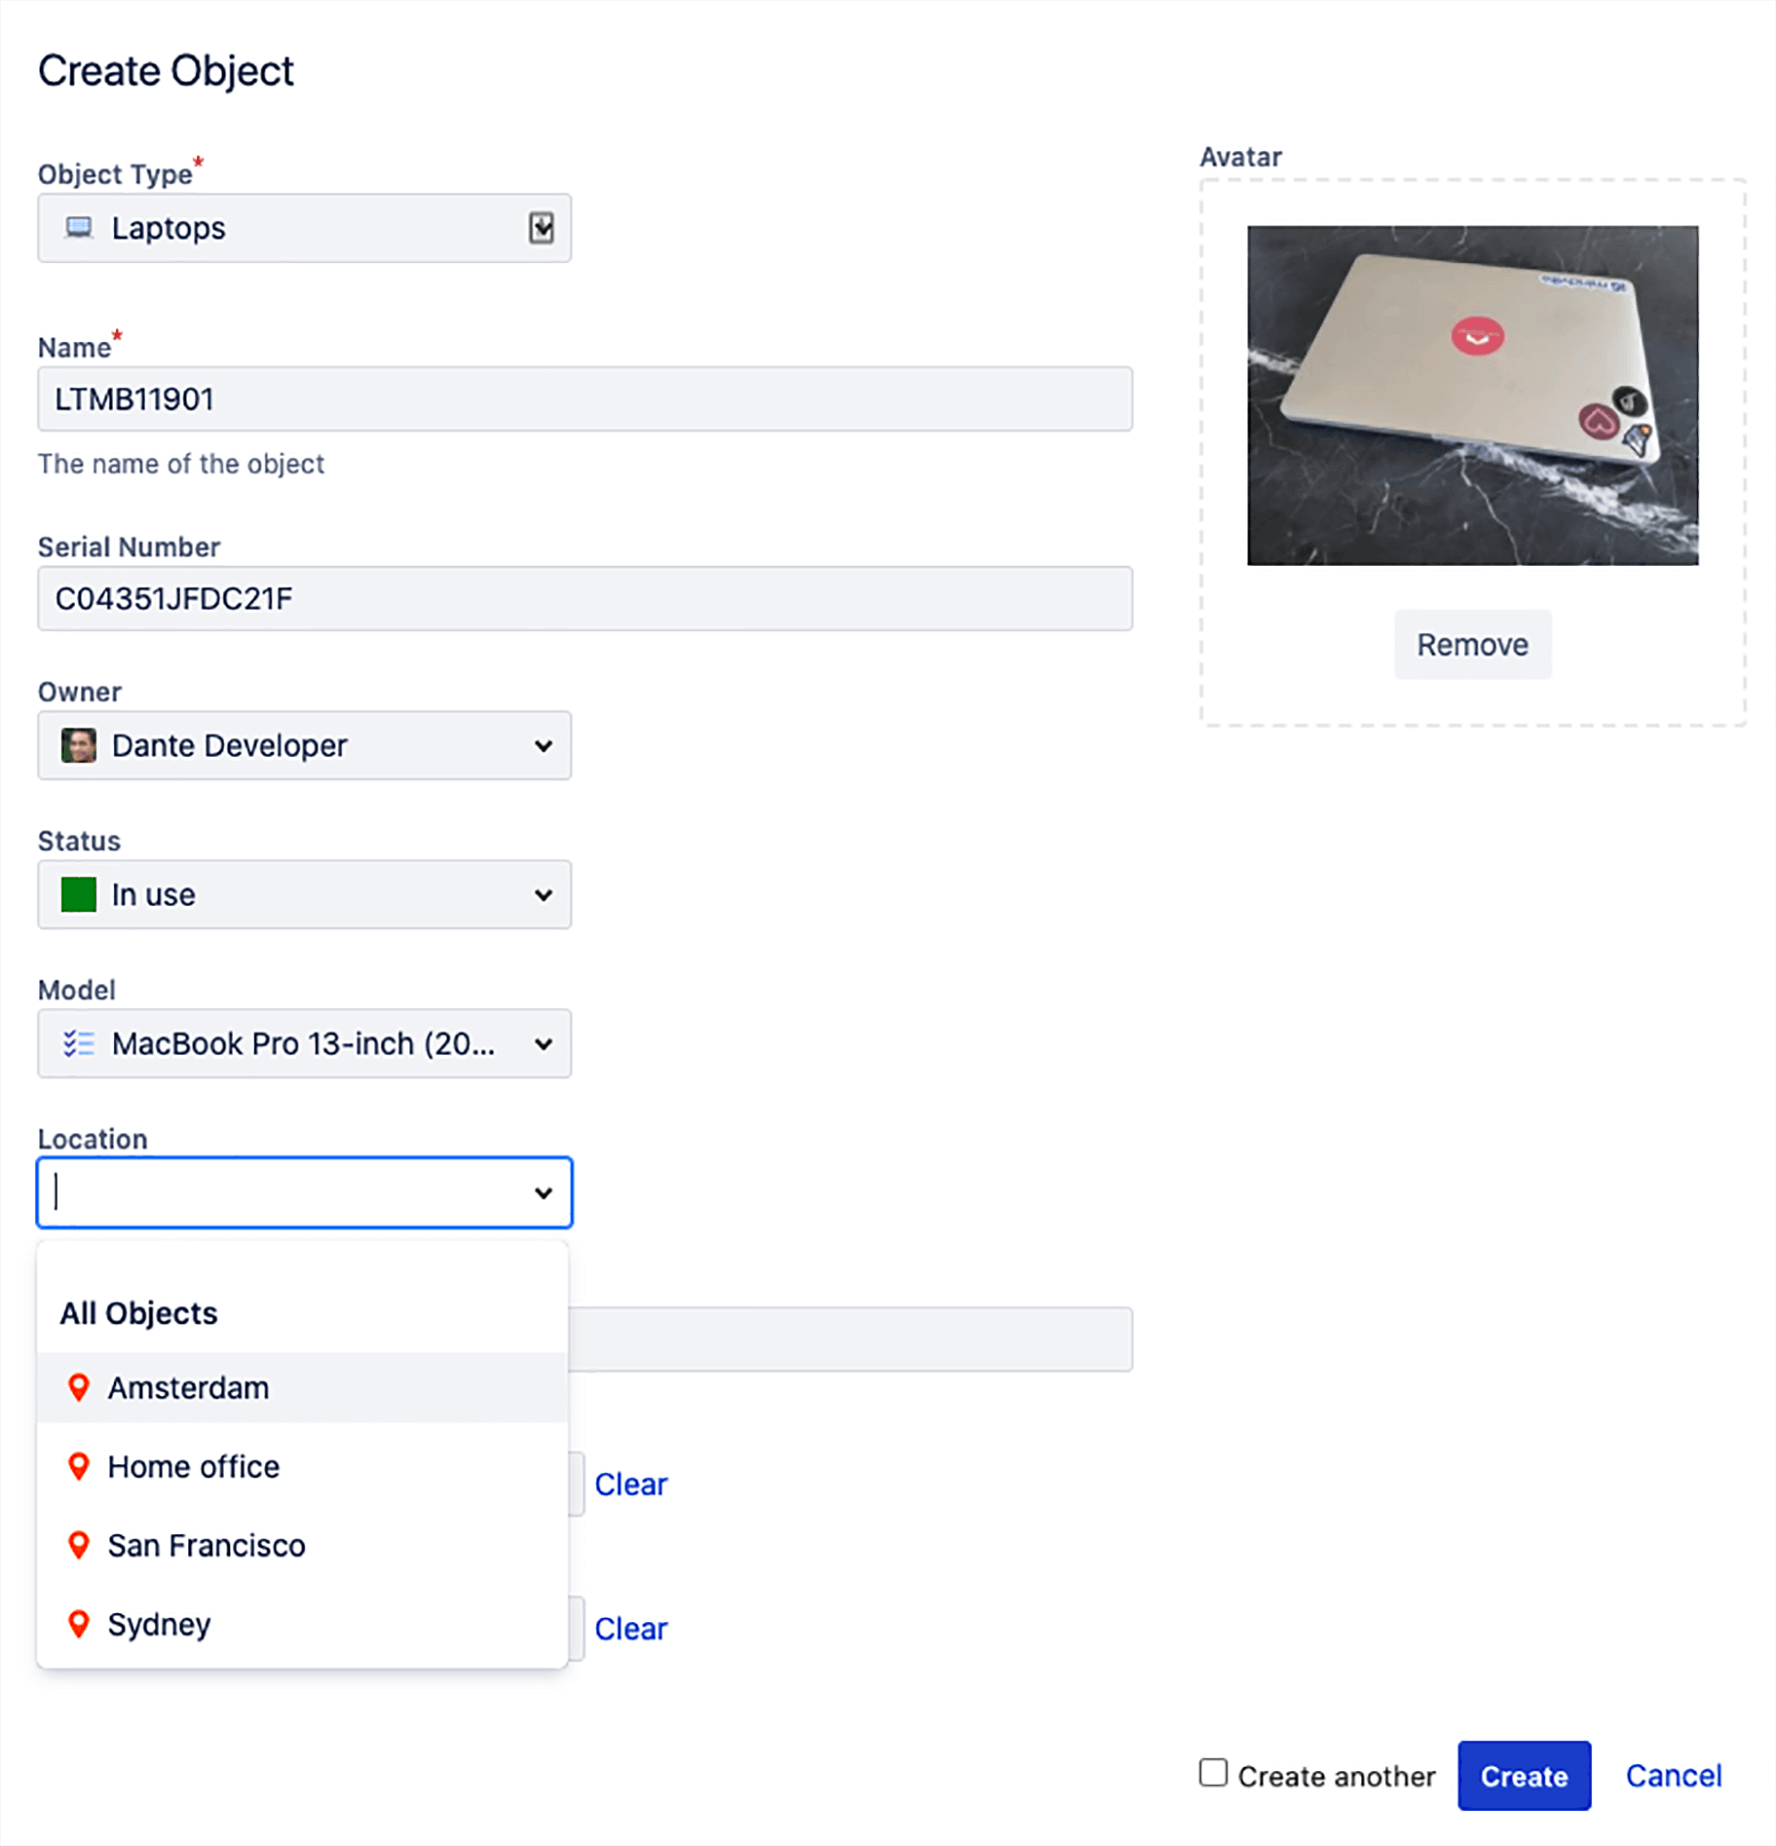
An attribute represents a specific piece of information that is attached to an object, such as a description of that object, its model number, another associated object, or a user assigned as the object’s owner.
Each object type will have its own set of attributes. For example, the object type “laptops” might have the attributes: model, serial number, user, warranty expiry date, etc.
Entering actual values for the attribute will define an object. This can be done manually or automatically (see Step 4).
All object types will have four mandatory attributes:
- Name
- Key
- Created Date
- Last Updated Date
The last three are set automatically. Every other attribute can be defined by the admin. And because there’s a unique key attribute, the name of each object does not need to be unique.
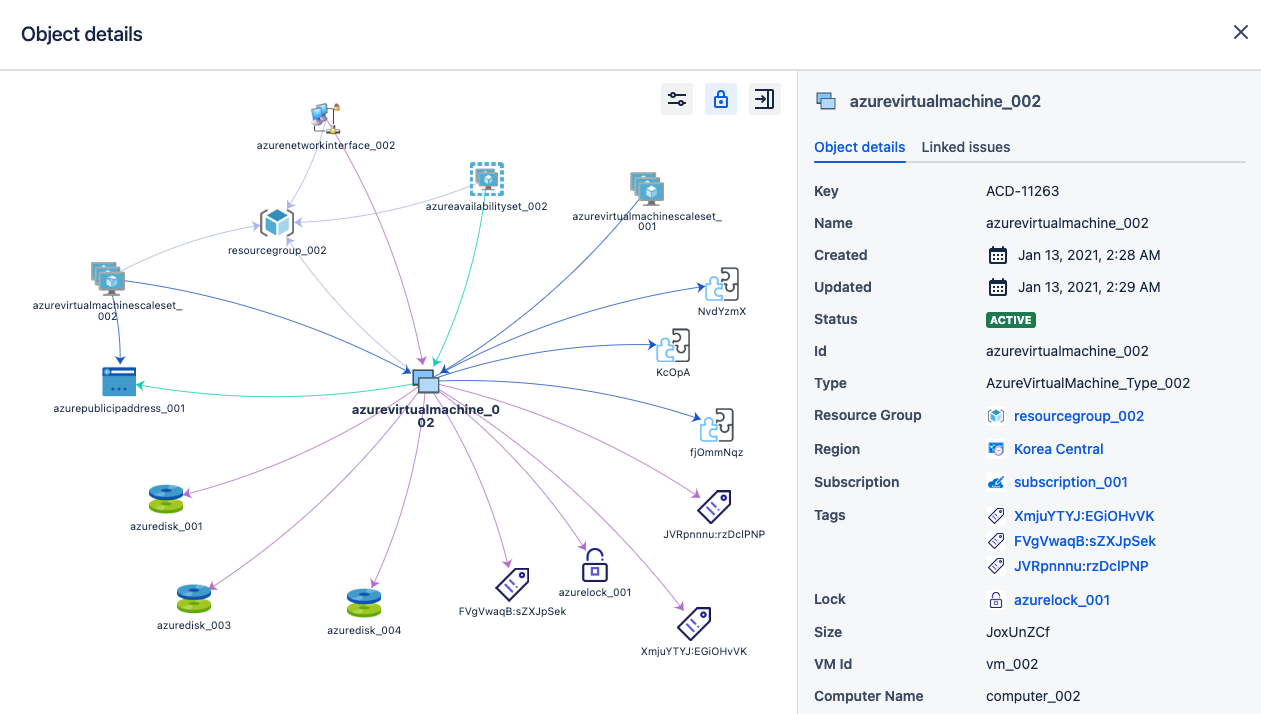
Object references
A reference is a connection between two different objects in Assets. Each object can be connected to many other objects, not directly, but through attributes containing references to other objects.
For example, if location is its own object type, then each location object can be one of your business' office locations. This allows you to quickly set the location for every laptop by selecting “Stockholm” for example.
Object references don’t have to be set manually. They can be added automatically from network scanners, importers, automation rules, etc.
References between objects have two main benefits:
- You can map dependencies between your objects. For example, you can map your ITSM application to business services and the different hosts, operating systems, and files they depend on. This map can be incredibly useful for understanding the downstream effects of changes (if I change this OS, what might be impacted?), as well as finding the causes of incidents and problems. And because each object can be linked to a Jira issue, over time you build up a comprehensive history of your infrastructure or other business assets which further helps with solving issues and problems.
- It is easier to manage. For example, if an office moves from Montreal to Toronto, you only need to update the object Montreal rather than go through each laptop changing Montreal to Toronto.
There are two types of object references:
- Outbound references are references from the current object to another object.
- Inbound references point from another object toward the current object.
References between objects can be viewed using the graphical viewer. You can decide what reference types you have (e.g. installed on, owned by, vendor) and you can color-code these in the object schema settings.
Assets permissions
Assets has two types of permissions:
- Object schema permissions - In object schema settings, you can define who has administrative permissions for a particular object schema, who can update object schema data, and who can just view the data.
- Object type permissions - Sometimes you might want Jira Service Management customers to only see certain information in an object schema but you don’t want to give them access to view all the data within the entire object schema. You can use object type permissions here.
Step 3 - Choose what data to include
Every instance of Assets will be unique as every company requires different information to be tracked. Assets can store any piece of information that is useful for you and your business to know and understand. What specific assets or configuration items you should include will depend on what you are trying to do. This section includes our advice for deciding what data should be included.
Define your problem
Most tools are implemented to solve a problem, and Assets is no exception. It could be that your incident resolution time is not as fast as you’d like, or perhaps changes to a specific service often cause unexpected outcomes because you can’t easily see service dependencies.
Find your problem and use that to define everything else, from who you involve to what assets and information you include in your database. Look at the problem and understand what extra information is needed to help overcome it. This information will define your object types.
Adding too much information at once can make it tough to check accuracy so try to focus on one problem at a time. Once your first problem is solved, Assets can grow to solve other problems.
Start with your services
If you plan to use Assets for configuration management, our advice would be to use a top-down approach by starting with your services. Then map what those services depend on (e.g., applications and hosts). Then map what those dependencies depend on and so on. This way you will quickly build up a service map that can be used when incidents and change requests come in. You can expand to documenting other areas as needed.
Think beyond physical items
As Assets lets you define the objects you need, you aren’t limited to traditional or even physical assets. Business services, for example, are not physical assets but are often critical for people to understand in detail. You can link all of a service’s physical and non-physical dependencies to it so just by looking at a business service object, you can get a full understanding of how it’s running.
You can go as abstract as you’d like. Common examples include objects of business importance, environment types, departments/teams, locations, etc.
Example: categorizing business services
Let’s say all your business services are added to Assets under the object type “Business Services”. You may want to categorize those business services into “Finance,” “Logistics,” “Sales,” “Infrastructure,” etc. You can do this with an attribute in the Business Service object type or you can make these categories their own object type called “Service Category”.
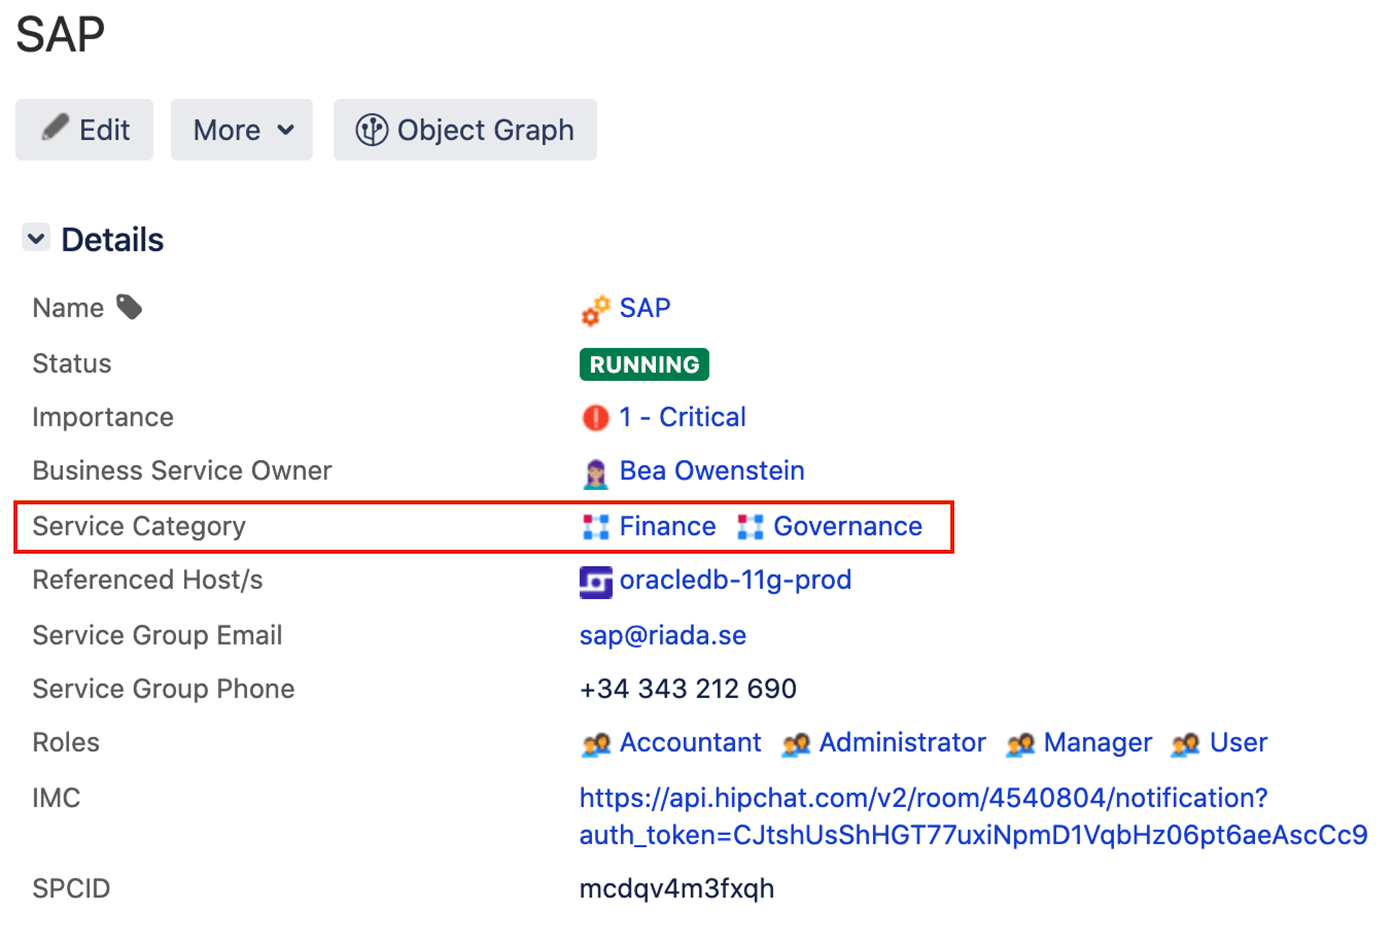
The benefit of this is that you can add details (attributes) specific to the business service category. Maybe there’s someone responsible for all finance business services. You don’t want to add that person directly to every finance “Business Service” object as it will become harder to maintain. Instead, you just add it once to the “Finance” object in the “Service Category” object type and now you only need to update it in one place and don't have to duplicate data.
You can also have rules that take the operation status of each individual finance business service and roll them up into an overall status for the finance category. This way you can quickly see if there are any service problems with each category of service by viewing the category objects.
You don’t need to add these types of objects to Assets but it’s important to know that you’re not limited by traditional assets/configuration items. It all depends on what you want to do which is why understanding your goals and the information you need to achieve them is so key.
Look ahead and grow gradually
Keep in mind any extensions you may want to include in the future. This will both shape what data you choose to include, as well as how you structure your data.
While it’s good to keep your desired end-state in mind, we recommend building Assets up in a gradual way. Trying to do one huge big release with 100% accurate data for 1000s of objects is very tough. Building small and adding new attributes, objects, and object schemas as you go is going to be significantly simpler.
Our recommendation is to find a problem, build up Assets to fix it, then move on to the next problem, growing Assets as you go.
Set realistic expectations for accuracy
100% accuracy at all times should be the goal but in reality, that may not be possible. As long as the data is sufficiently accurate to offer more business value than not having it in the first place, then you’re still coming out ahead. Many CMDB projects can be delayed or even fail as they’re waiting to be ‘perfect’ before go-live.
Step 9 - Track metrics that demonstrate improvement
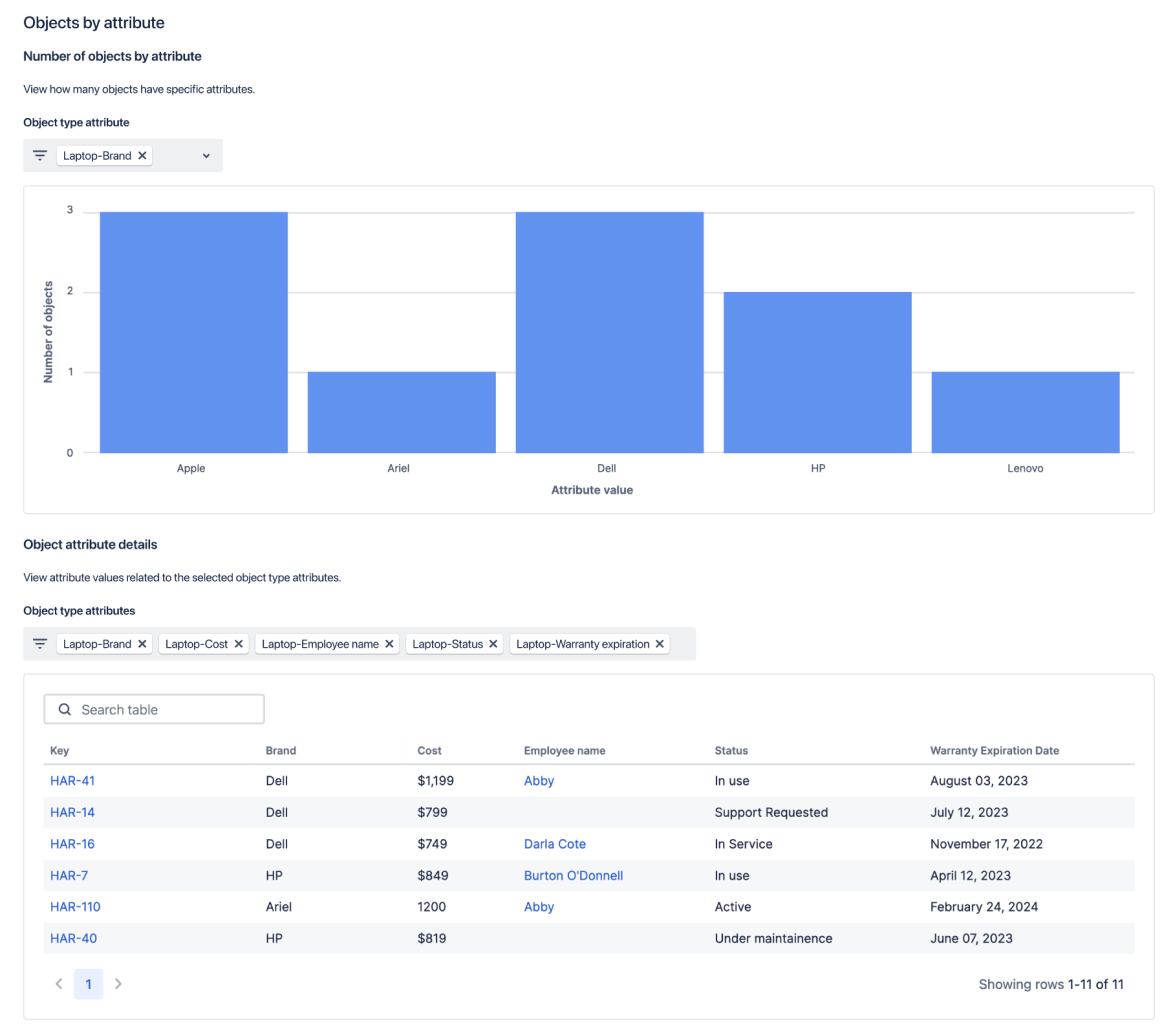
Once your assets are set up, you can start proving value by using out-of-the-box reports. This allows you to critically analyze your asset and configuration management data, power better decision-making, and report out easily. Depending on what you’re tracking in Assets, you can use these reports for inventory management, lifecycle management, measuring employee productivity, and more. The reports show types of objects, objects by attribute, or objects over time. For example, you could look at data on how many employee laptops are currently in service and the amount that require maintenance, who they are owned by, and how much they cost.
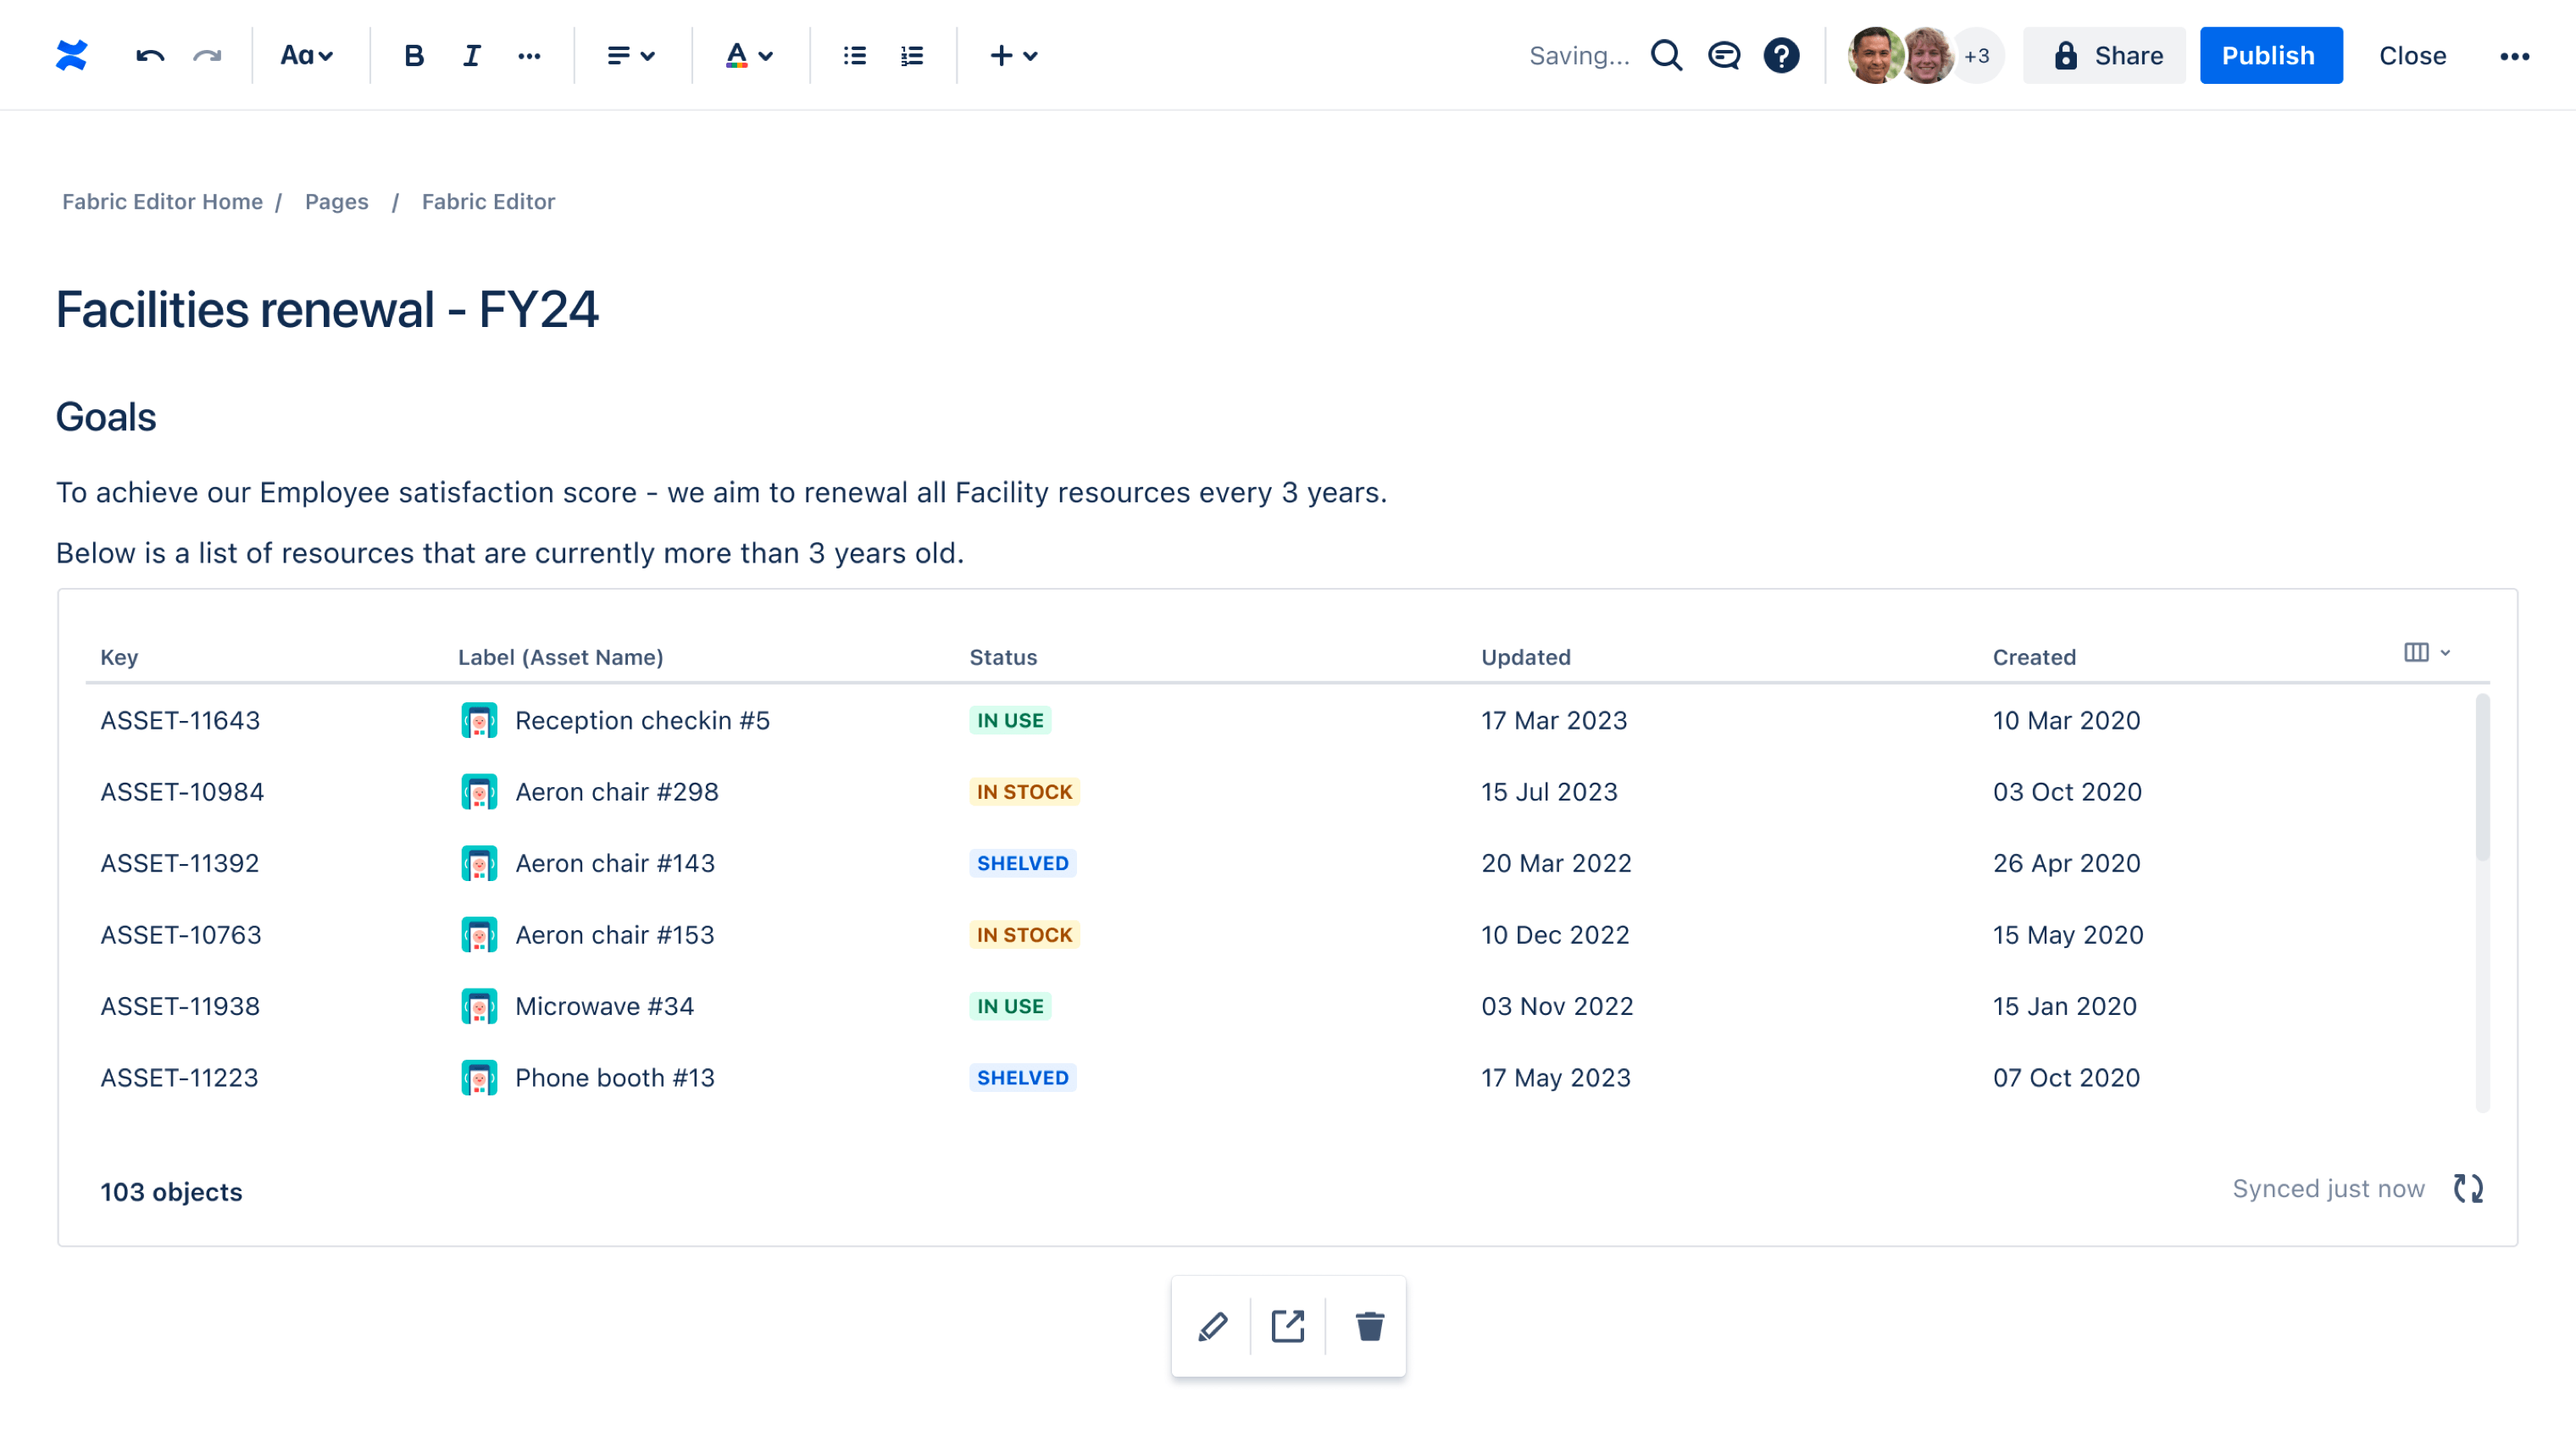
Step 10 - Make Assets data visible in Confluence Cloud
With the Assets macro in Confluence, agents can build smart lists of objects from Assets directly in Confluence. Bring asset data where you work with reports on the state of your important assets with the relevant teammates and increase visibility across teams.
These lists pull from object schemas and can also be customized for specific attributes or data.
To get started with this feature, follow these three steps:
- Hit the slash key ("/") on your keyboard
- Type and select "Assets" from the dropdown
- Select and display the Assets objects of your choice
This feature enables all licensed users of Confluence, regardless of their access to Jira Service Management, to see lists of Assets. This can be done by having a Jira admin assign them the "object viewer" role within Assets. To configure these lists in Confluence and add relevant permissions, you must be a Jira admin and/or have permission to see the relevant object schema in Assets in Jira Service Management.
Other topics
Assets Query Language- AQL
Assets Query Language (AQL) is the language used to query Assets. AQL comes in handy when you want to build search views, automation rules, advanced references between assets, or even instruct imports.
Other topics
Assets Query Language- AQL
Assets Query Language (AQL) is the language used to query Assets. AQL comes in handy when you want to build search views, automation rules, advanced references between assets, or even instruct imports.
Tips and tricks
Form design