Formatowanie i edycja strony
Po utworzeniu strony sformatuj ją, aby zapewnić swojej pracy należytą uwagę. W kilka sekund możesz dodać zachwycające obrazy, element nawigacyjny lub makro w zależności od bieżących potrzeb.
Gdy wszyscy członkowie zespołu pracują nad tym samym, możesz szybciej podejmować lepsze decyzje. I zawsze możesz cofnąć zmiany za pomocą kilku prostych kliknięć.
Tryb edycji, styl nagłówka i formatowanie tekstu

Istnieje nieskończenie wiele sposobów dostosowania strony Confluence, a każdy z nich ma swój początek na naszym praktycznym pasku narzędzi. Natomiast skróty klawiaturowe (poniżej w nawiasach) pozwalają oszczędzić cenny czas podczas tworzenia w Confluence.
Przejdź dalej
Edytuj (e) — kliknij ikonę ołówka lub naciśnij klawisz „e”, aby przejść do trybu edycji.
W trybie edycji pasek narzędzi edytora Confluence pojawia się u góry strony.
Poznaj podstawowe elementy paska narzędzi edytora w kolejności od lewej do prawej.
- Polecenia Cofnij (Cmd/Ctrl + Z) i Ponów (Cmd/Ctrl + Y) są widoczne jako strzałki po lewej stronie.
- Styl nagłówka i tekstu — wybierz rozmiar tekstu, od normalnego (Cmd/Ctrl + Option/Alt + 0) do największego, czyli „Nagłówek 1” (Cmd/Ctrl + Option/Alt + 1).
- Formatowanie tekstu — użyj opcji na pasku narzędzi edytora u góry, aby wyróżnić tekst pogrubieniem, kursywą lub w inny sposób go dostosować za pomocą ikony trzech kropek.
- Listy, wyrównanie i kolor — zwiększ przejrzystość strony dzięki listom i opcjom wyrównania, oznacz kolorami niektóre sekcje oraz zwiększ lub zmniejsz wcięcia.
- Czynności do wykonania ([ ])
- Dodaj łącze, obraz lub film.
- Wzmianki (@) umożliwiające tagowanie użytkowników.
- Emoji (:)
- Tabele (Shift + Opcja/Alt + T)
- Układy sekcji — po wstawieniu na stronie pod kolumnami pojawi się więcej opcji formatowania (patrz 10a na ilustracji powyżej).
- Makra (/)
- Opcje szerokości strony — domyślna, średnia lub pełna
- Znajdź i zastąp (Cmd/Ctrl + F)
- Uprawnienia
- Opublikuj od razu lub Zamknij bez publikowania
- Więcej czynności związanych z edycją i publikowaniem
Masz wątpliwości? Odrzuć zmiany, klikając przycisk „•••”, a następnie „Przywróć ostatnią opublikowaną wersję”.
Korzystanie z Atlassian Intelligence w Confluence
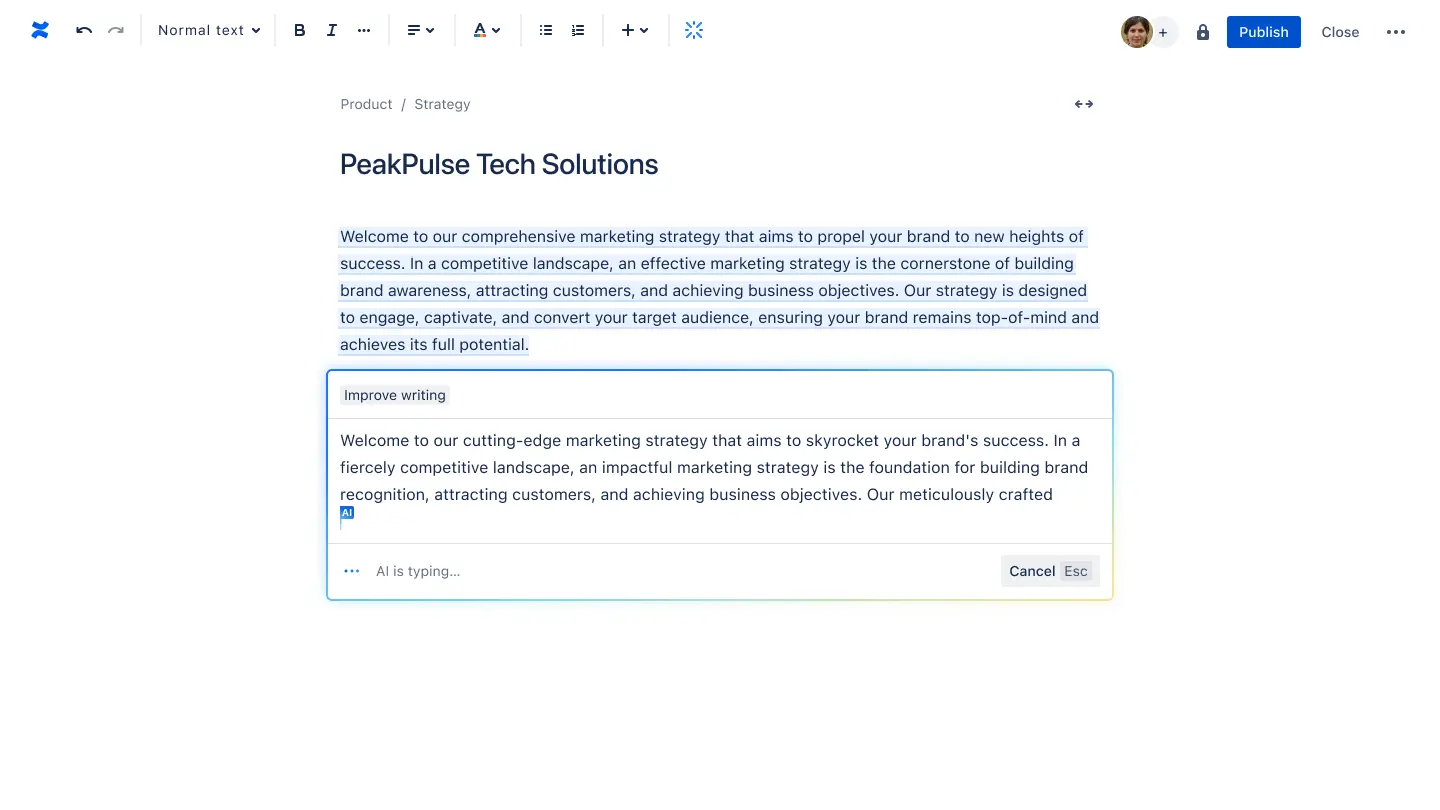
Masz blokadę twórczą lub chcesz dokładnie dopracować treść? Atlassian Intelligence może Ci pomóc! Jeśli korzystasz z wersji Premium lub Enterprise Confluence, Atlassian Intelligence może wygenerować nową treść, zaproponować zarys lub wyróżnić w istniejącym tekście fragmenty do udoskonalenia i nie tylko.
Po prostu kliknij przycisk AI lub wpisz /AI i napisz polecenie, aby rozpocząć.
Oto kilka wstępnie zdefiniowanych poleceń w Atlassian Intelligence, których możesz użyć:
- Poprawa jakości tekstu pisanego. Koncentruje się na zrozumiałym stylu oraz poprawie kompozycji i tonu tekstu.
- Poprawa pisowni i gramatyki, aby tekst nie zawierał błędów i aby brzmiał profesjonalnie.
- Skrócenie, aby uprościć tekst poprzez jego skondensowanie i dopracowanie.
- Zmiana tonu, aby dopasować emocjonalny i stylistyczny charakter wypowiedzi do określonych odbiorców. Możesz wybrać spośród 5 tonów — swobodny, dydaktyczny, empatyczny, neutralny lub profesjonalny.
- Tłumaczenie (beta) pozwala łatwo tłumaczyć treści Confluence na wiele języków w przypadku współpracy z międzynarodowymi zespołami lub udostępniania informacji globalnym odbiorcom.
Chcesz jeszcze bardziej doprecyzować polecenie? Możesz spróbować napisać je ponownie lub powiedzieć AI, co zrobić dalej.
Tryb edycji, styl nagłówka i formatowanie tekstu
Istnieje nieskończenie wiele sposobów dostosowania strony Confluence, a każdy z nich ma swój początek na naszym praktycznym pasku narzędzi. Natomiast skróty klawiaturowe (poniżej w nawiasach) pozwalają oszczędzić cenny czas podczas tworzenia w Confluence.
Przejdź dalej
Edytuj (e) — kliknij ikonę ołówka lub naciśnij klawisz „e”, aby przejść do trybu edycji.
W trybie edycji pasek narzędzi edytora Confluence pojawia się u góry strony.
Poznaj podstawowe elementy paska narzędzi edytora w kolejności od lewej do prawej.
- Polecenia Cofnij (Cmd/Ctrl + Z) i Ponów (Cmd/Ctrl + Y) są widoczne jako strzałki po lewej stronie.
- Styl nagłówka i tekstu — wybierz rozmiar tekstu, od normalnego (Cmd/Ctrl + Option/Alt + 0) do największego, czyli „Nagłówek 1” (Cmd/Ctrl + Option/Alt + 1).
- Formatowanie tekstu — użyj opcji na pasku narzędzi edytora u góry, aby wyróżnić tekst pogrubieniem, kursywą lub w inny sposób go dostosować za pomocą ikony trzech kropek.
- Listy, wyrównanie i kolor — zwiększ przejrzystość strony dzięki listom i opcjom wyrównania, oznacz kolorami niektóre sekcje oraz zwiększ lub zmniejsz wcięcia.
- Czynności do wykonania ([ ])
- Dodaj łącze, obraz lub film.
- Wzmianki (@) umożliwiające tagowanie użytkowników.
- Emoji (:)
- Tabele (Shift + Opcja/Alt + T)
- Układy sekcji — po wstawieniu na stronie pod kolumnami pojawi się więcej opcji formatowania (patrz 10a na ilustracji powyżej).
- Makra (/)
- Opcje szerokości strony — domyślna, średnia lub pełna
- Znajdź i zastąp (Cmd/Ctrl + F)
- Uprawnienia
- Opublikuj od razu lub Zamknij bez publikowania
- Więcej czynności związanych z edycją i publikowaniem
Masz wątpliwości? Odrzuć zmiany, klikając przycisk „•••”, a następnie „Przywróć ostatnią opublikowaną wersję”.
Dodawanie obrazu, pliku lub łącza
Aby zebrać wszystko w jednym miejscu, możesz łatwo dodawać obrazy, filmy i łącza do innych stron Confluence lub zewnętrznych stron internetowych.
Przesyłanie obrazów, filmów i plików:
- Skopiuj i wklej plik bezpośrednio na stronie lub użyj ikony Pliki i obrazy na pasku narzędzi edytora, aby znaleźć plik do dodania na urządzeniu.
- Kliknij pole „Dodaj podpis”, które pojawia się poniżej, aby wpisać krótki opis.
Wyrównaj plik, korzystając z paska narzędzi, który pojawia się pod polem podpisu.
Wstawianie łączy do stron:
- Skopiuj i wklej adres URL bezpośrednio na stronie lub użyj ikony łącza na pasku narzędzi edytora.
-
Funkcja Inteligentne łącza Confluence umożliwia umieszczenie adresu URL na stronie Confluence w postaci zwykłego łącza, karty z podsumowaniem lub osadzonej i edytowalnej strony. Użyj paska narzędzi, który pojawia się po kliknięciu wklejonego adresu URL, aby wypróbować różne widoki.
Opcję wstawiania elementów na stronach Confluence można w bardzo różnych celach, takich jak:
- Osadzenie harmonogramu Jira w plakacie projektu.
- Wyświetlenie samouczka wideo w osadzonym widoku inteligentnego łącza jako uzupełnienia treści poradnika tekstowego.
Wklejenie powiązanych łączy dla czytelników, którzy chcą dalej zgłębić dany temat.
Przyspiesz dodawanie multimediów, po prostu przeciągając obrazy, filmy i pliki na stronę w celu ich przesłania.
Jeśli jesteś klientem Loom, możesz nagrać wideo Loom i osadzić je bezpośrednio na stronie Confluence. Po włączeniu tej funkcji przez administratora możesz użyć przycisku nagrywania Loom w edytorze lub po prostu wpisać „/loom” na stronie Confluence, aby rozpocząć.
Publikowanie i powiadamianie po swojemu
Aby ułatwić nawigację i korzystanie ze strony Confluence, upewnij się, że jej treść jest przejrzysta, poprzez wstawienie elementów strukturalnych za pomocą makr.
Przejdź dalej
- Kliknij ikonę plusa (+) na pasku narzędzi edytora LUB użyj polecenia ukośnika (/), aby otworzyć menu rozwijane makr.
- Przewiń w dół, aby przeczytać podsumowanie każdego elementu.
- Po kliknięciu wybranego elementu ten pojawi się na stronie. Skonfiguruj go, korzystając z wyświetlonego paska narzędzi.
- W menu rozwijanym kliknij pozycję „Wyświetl więcej”, aby przeglądać więcej opcji według kategorii, takich jak raportowanie, nawigacja i rozwój.
- Wybierz opcję, a następnie kliknij pozycję „Wstaw”.
Każda opcja ma na celu usprawnienie współpracy asynchronicznej za pomocą łatwych w obsłudze narzędzi do edycji stron dla dowolnego zespołu.
/table— pozwala dodać tabelę i odpowiedni układ do prezentacji danych./status— pozwala dodać oznaczenie STATUS i dostosować tekst oraz kolor.//— pozwala dodać daty, na przykładNov 11, 2024(11 listopada 2024 r.)./jira— pozwala osadzać, wyświetlać i edytować zgłoszenia Jira;/jiraroadmap— udostępnia pełny plan działań./panel— udostępnia opcje dodawania różnych rodzajów paneli; wszystkie można skonfigurować za pomocą różnych kolorów i emotikonów./tableofcontents— udostępnia automatycznie wygenerowane makro spisu treści opartego na nagłówkach na stronie (/h) na potrzeby szybkiego przeskakiwania na stronie./expand— pozwala ukryć długie bloki tekstu, aby uzyskać bardziej przejrzysty wygląd./quote— pozwala wyróżnić fragment tekstu lub cytat za pomocą odmiennego formatowania i koloru czcionki./decision— do obsługi pól decyzji, dzięki którym można łatwo śledzić decyzje.
Wpisz / podczas edycji, aby szybko wyświetlić wszystkie opcje ulepszania strony i wybrać jedną z nich.
Zapoznaj się bliżej z formatowaniem stron w Confluence:
Rozszerzanie funkcjonalności Confluence za pomocą makr
Najlepsze praktyki dotyczące korzystania z tabel w Confluence
Czy przejrzystość w pracy zwiększa kreatywność? HubSpot uważa, że tak
Tworzenie nowej strony
Dowiedz się, jak tworzyć strony Confluence.
Współpraca na stronie Confluence
Dowiedz się, jak skutecznie współpracować w Confluence.