Aprenda a usar o Git com o Bitbucket Cloud
Objetivo
Aprenda o básico sobre o Git com este tutorial com temática espacial.
Missão breve
Sua missão é aprender os fundamentos do Git concluindo o tutorial e rastreando as estações de espaço de toda a sua equipe. Comandos abordados neste tutorial:
- git clone, git config, git add, git status, git commit, git push, git pull, git branch, git checkout e git merge
Tempo
30 minutos
Público-alvo:
Você é novo no Git e no Bitbucket Cloud
Criar um repositório do Git
Como novo administrador da estação espacial do Bitbucket, você precisa ser organizado. Ao fazer arquivos para a estação espacial, você vai querer mantê-los em um lugar só e compartilháveis com colegas de equipe, não importa onde eles estejam. Com o Bitbucket, isso significa adicionar tudo a um repositório. Vamos criar um!
Algumas curiosidades sobre repositórios
- Você tem acesso a todos os arquivos em seu repositório local, quer esteja trabalhando em um ou vários arquivos.
- Você pode visualizar repositórios públicos sem uma conta do Bitbucket se tiver a URL desse repositório.
- Cada repositório pertence a uma conta de usuário ou a uma equipe. No caso de uma conta de usuário, esse usuário é o responsável pelo repositório. + No caso de uma equipe, essa equipe é responsável por ele.
- O responsável pelo repositório é a única pessoa que pode excluir o repositório. Se o repositório pertencer a uma equipe, um administrador pode excluir o repositório.
- Um projeto de código pode consistir em vários repositórios em várias contas, mas também pode ser um repositório único de uma conta única.
- Cada repositório tem um limite de espaço de 2 GB, mas recomendamos manter seu repositório com no máximo 1 GB.

Material relacionado
Comandos do Git
VER SOLUÇÃO
Como criar um repositório
Passo 1. Crie o repositório
Inicialmente, o repositório que você criar no Bitbucket vai estar vazio, sem nenhum código nele. Isso não tem problema porque você vai começar a adicionar alguns arquivos a ele em breve. Esse repositório do Bitbucket vai ser o repositório central dos arquivos, o que significa que outras pessoas podem acessar esse repositório se você der permissão a elas. Depois de criar um repositório, copie uma versão para o sistema local—dessa forma, é possível atualizá-lo de um repositório e, em seguida, transferir essas alterações para o outro.

Faça o seguinte para criar seu repositório:
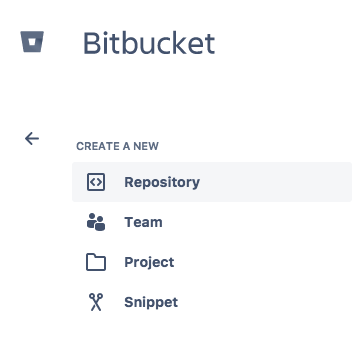
1. From Bitbucket, click the + icon in the global sidebar and select Repository.
Bitbucket displays the Create a new repository page. Take some time to review the dialog's contents. With the exception of the Repository type, everything you enter on this page you can later change.
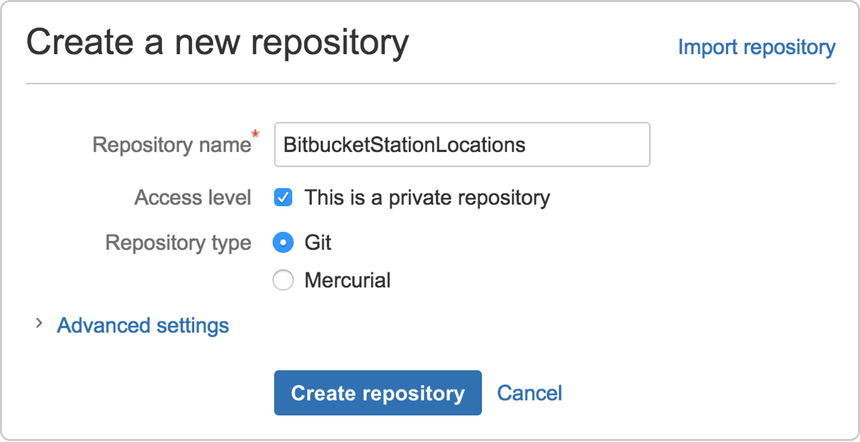
2. Enter BitbucketStationLocations for the Name field. Bitbucket uses this Name in the URL of the repository. For example, if the user the_best has a repository called awesome_repo, the URL for that repository would be https://bitbucket.org/the_best/awesome_repo.
3. For Access level, leave the This is a private repository box checked. A private repository is only visible to you and those you give access to. If this box is unchecked, everyone can see your repository.
4. Pick Git for the Repository type. Keep in mind that you can't change the repository type after you click Create repository.
5. Click Create repository. Bitbucket creates your repository and displays its Overview page.
Passo 2. Explore seu novo repositório
Take some time to explore the repository you have just created. You should be on the repository's Overview page:
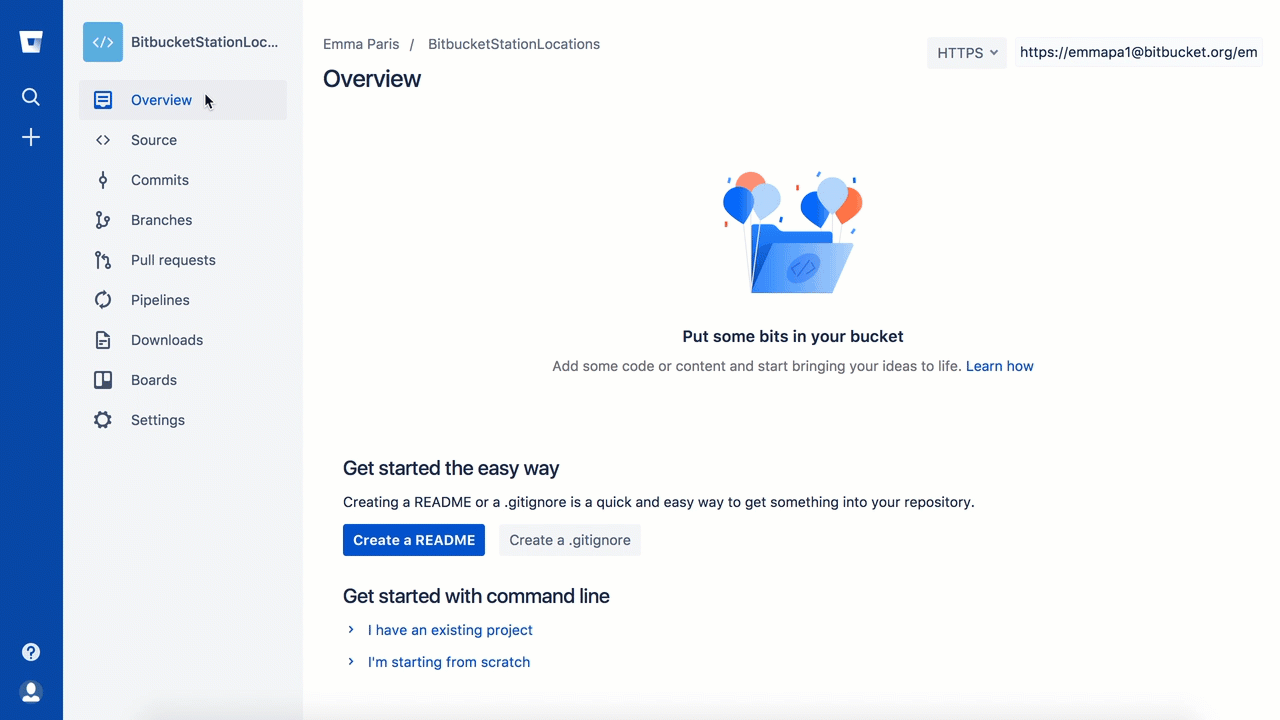
Click + from the global sidebar for common actions for a repository. Click items in the navigation sidebar to see what's behind each one, including Settings to update repository details and other settings. To view the shortcuts available to navigate these items, press the ? key on your keyboard.
When you click the Commits option in the sidebar, you find that you have no commits because you have not created any content for your repository. Your repository is private and you have not invited anyone to the repository, so the only person who can create or edit the repository's content right now is you, the repository owner.
Copiar seu repositório do Git e adicionar arquivos
Agora que você possui um local para adicionar e compartilhar seus arquivos da estação espacial, você precisa de uma forma de obtê-los do seu sistema local. Para configurar isto, você precisa copiar o repositório do Bitbucket para o seu sistema. O Git se refere à cópia de um repositório como "clone". Ao clonar um repositório , você cria uma conexão entre o servidor Bitbucket (que o Git conhece como origem) e o seu sistema local.

Passo 1. Clone seu repositório em seu sistema local
Abra um navegador e uma janela de terminal de seu desktop. Depois de abrir a janela do terminal, faça o seguinte:
1. Navigate to your home (~) directory
$ cd ~Ao usar mais o Bitbucket, você provavelmente trabalhará em múltiplos repositórios. Por essa razão, é uma boa ideia criar um diretório para conter todos esses repositórios.
2. Create a directory to contain your repositories.
$ mkdir repos3. From the terminal, update the directory you want to work in to your new repos directory.
$ cd ~/repos4. From Bitbucket, go to your BitbucketStationLocations repository.
5. Click the + icon in the global sidebar and select Clone this repository.
Bitbucket displays a pop-up clone dialog. By default, the clone dialog sets the protocol to HTTPS or SSH, depending on your settings. For the purposes of this tutorial, don't change your default protocol.

6. Copy the highlighted clone command.
7. From your terminal window, paste the command you copied from Bitbucket and press Return.
8. Enter your Bitbucket password when the terminal asks for it. If you created an account by linking to Google, use your password for that account.
- If you experience a Windows password error:
- In some versions of Microsoft Windows operating system and Git you might see an error similar to the one in the following example.
Windows clone password error example
- In some versions of Microsoft Windows operating system and Git you might see an error similar to the one in the following example.
$ git clone

https://emmap1@bitbucket.org/emmap1/bitbucketstationlocations.git

Cloning into 'bitbucketspacestation'...

fatal: could not read

Password for 'https://emmap1@bitbucket.org': No such file or directory- Se esse erro for exibido, digite o seguinte na linha de comando:
$ git config --global core.askpass- Em seguida, volte para a etapa 4 e repita o processo de clonagem. O agente bash deve agora solicitar sua senha. Você só deve ter que fazer isso uma vez.
Neste ponto, sua janela do terminal deve ser semelhante a esta:
$ cd ~/repos

$ git clone https://emmap1@bitbucket.org/emmap1/bitbucketstationlocations.git
Cloning into 'bitbucketstationlocations'...
Password
warning: You appear to have cloned an empty repository.- Você já sabia que seu repositório estava vazio, certo? Lembre-se de que você não adicionou nenhum arquivo fonte a ele ainda.
9. List the contents of your repos directory and you should see your bitbucketstationlocations directory in it.
$ lsParabéns! Você clonou seu repositório para o sistema local.
Etapa 2. Adicionar um arquivo ao repositório local e colocá-lo no Bitbucket
Com o repositório no sistema local, é hora de ir trabalhar. Você quer começar a controlar todos os locais de sua estação espacial. Para fazer isso, vamos criar um arquivo sobre todos os seus locais.
1. Go to your terminal window and navigate to the top level of your local repository.
$ cd ~/repos/bitbucketstationlocations/2. Enter the following line into your terminal window to create a new file with content.
$ echo "Earth's Moon" >> locations.txtSe a linha de comando não retornar nada, significa que você criou o arquivo corretamente!
3. Get the status of your local repository. The git status command tells you about how your project is progressing in comparison to your Bitbucket repository.
Nesse ponto, o Git está ciente de que você criou um novo arquivo e você vai ver algo assim:
$ git status
 On branch main
 Initial commit
 Untracked files:
   (use "git add <file>..." to include in what will be committed)
     locations.txt
 nothing added to commit but untracked files present (use "git add" to track)
O arquivo não é rastreado, o que significa que o Git vê um arquivo que não faz parte de um commit anterior. O resultado de status também mostra a próxima etapa: adicionar o arquivo.
4. Tell Git to track your new locations.txt file using the git add command. Just like when you created a file, the git add command doesn't return anything when you enter it correctly.
$ git add locations.txtThe git add command moves changes from the working directory to the Git staging area. The staging area is where you prepare a snapshot of a set of changes before committing them to the official history.

5. Verifique o status do arquivo.
 $ git status
 On branch main
 Initial commit
 Changes to be committed:
   (use "git rm --cached <file>..." to unstage)
     new file: locations.txt
Now you can see the new file has been added (staged) and you can commit it when you are ready. The git status command displays the state of the working directory and the staged snapshot.
6. Issue the git commit command with a commit message, as shown on the next line. The -m indicates that a commit message follows.
$ git commit -m 'Initial commit'
 [main (root-commit) fedc3d3] Initial commit
  1 file changed, 1 insertion(+)
  create mode 100644 locations.txt
The git commit takes the staged snapshot and commits it to the project history. Combined with git add, this process defines the basic workflow for all Git users.

Até este momento, tudo o que você fez está em seu sistema local e é invisível para seu repositório do Bitbucket até que você transmita essas mudanças.
- Saiba um pouco mais sobre o Git e repositórios remotos
- A capacidade do Git de se comunicar com repositórios remotos (no seu caso, o Bitbucket é o repositório remoto) é a base de cada fluxo de trabalho de colaboração baseado em Git.
- O modelo de colaboração do Git dá a cada desenvolvedor sua própria cópia do repositório, completa com seu próprio histórico local e estrutura de branch. Geralmente, os usuários precisam compartilhar uma série de commits em vez de um único conjunto de alterações. Em vez de fazer o commit de um conjunto de alterações de uma cópia ativa para o repositório central, o Git permite compartilhar branches inteiros entre os repositórios.

- Você gerencia conexões com outros repositórios e publica o histórico local "enviando" ramificações para outros repositórios. Você vê com que outras pessoas contribuíram ao "enviar pull" de ramificações para o repositório local.
7. Go back to your local terminal window and send your committed changes to Bitbucket using git push origin main. This command specifies that you are pushing to the main branch (the branch on Bitbucket) on origin (the Bitbucket server).
Você deve ver algo como a resposta a seguir:
 $ git push origin main
 Counting objects: 3, done.
 Writing objects: 100% (3/3), 253 bytes | 0 bytes/s, done.
 Total 3 (delta 0), reused 0 (delta 0) To https://emmap1@bitbucket.org/emmap1/bitbucketstationlocations.git
  * [new branch] main -> main
 Branch main set up to track remote branch main from origin.
Seus commits estão agora no repositório remoto (origem).

8. Go to your BitbucketStationLocations repository on Bitbucket.
9. If you click Commits in the sidebar, you'll see a single commit on your repository. Bitbucket combines all the things you just did into that commit and shows it to you. You can see that the Author column shows the value you used when you configured the Git global file ( ~/.gitconfig).
If you click Source in the sidebar, you'll see that you have a single source file in your repository, the locations.txt file you just added.
Lembra qual era o aspecto do repositório na primeira vez que você o criou? Agora, ele provavelmente está um pouco diferente.
Puxar as alterações do seu repositório do Git no Bitbucket Cloud
A seguir na sua lista de atividades do administrador da estação espacial, você precisa de um arquivo com mais detalhes sobre seus locais. Como não tem muitos locais no momento, você vai adicioná-los diretamente do Bitbucket.
Passo 1. Crie um arquivo no Bitbucket
Para adicionar seu novo arquivo de locais, faça o seguinte:
1. From your BitbucketStationLocations repository, click Source to open the source directory. Notice you only have one file, locations.txt , in your directory.
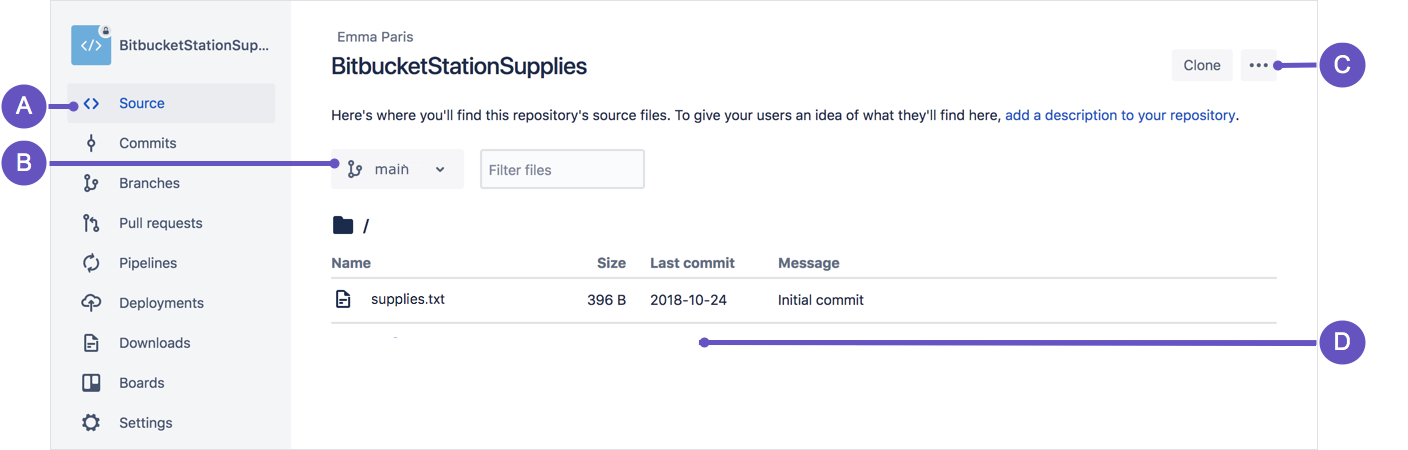
A. Source page: Click the link to open this page.
B. Branch selection: Pick the branch you want to view.
C. More options button: Click to open a menu with more options, such as 'Add file'.
D. Source file area: View the directory of files in Bitbucket.
2. From the Source page, click the More options button in the top right corner and select Add file from the menu. The More options button only appears after you have added at least one file to the repository.
Uma página é aberta para a criação do novo arquivo, como mostrado na imagem a seguir.
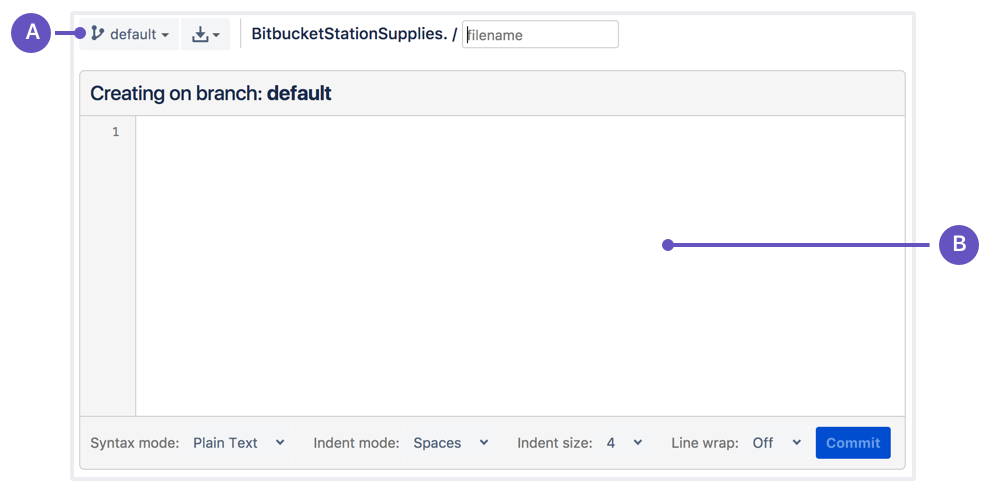
A. Branch with new file: Change if you want to add file to a different branch.
B. New file area: Add content for your new file here.
3. Enter stationlocations in the filename field.
4. Select HTML from the Syntax mode list.
5. Add the following HTML code into the text box:
 <p>Bitbucket has the following space stations:</p>
 <p>
     <b>Earth's Moon</b><br>
     Headquarters
 </p>
6. Click Commit. The Commit message field appears with the message: stationlocations created online with Bitbucket.
7. Click Commit under the message field.
Agora, você tem um novo arquivo no Bitbucket! Você é levado para uma página com detalhes da confirmação, em que é possível ver a alteração que você acabou de fazer:
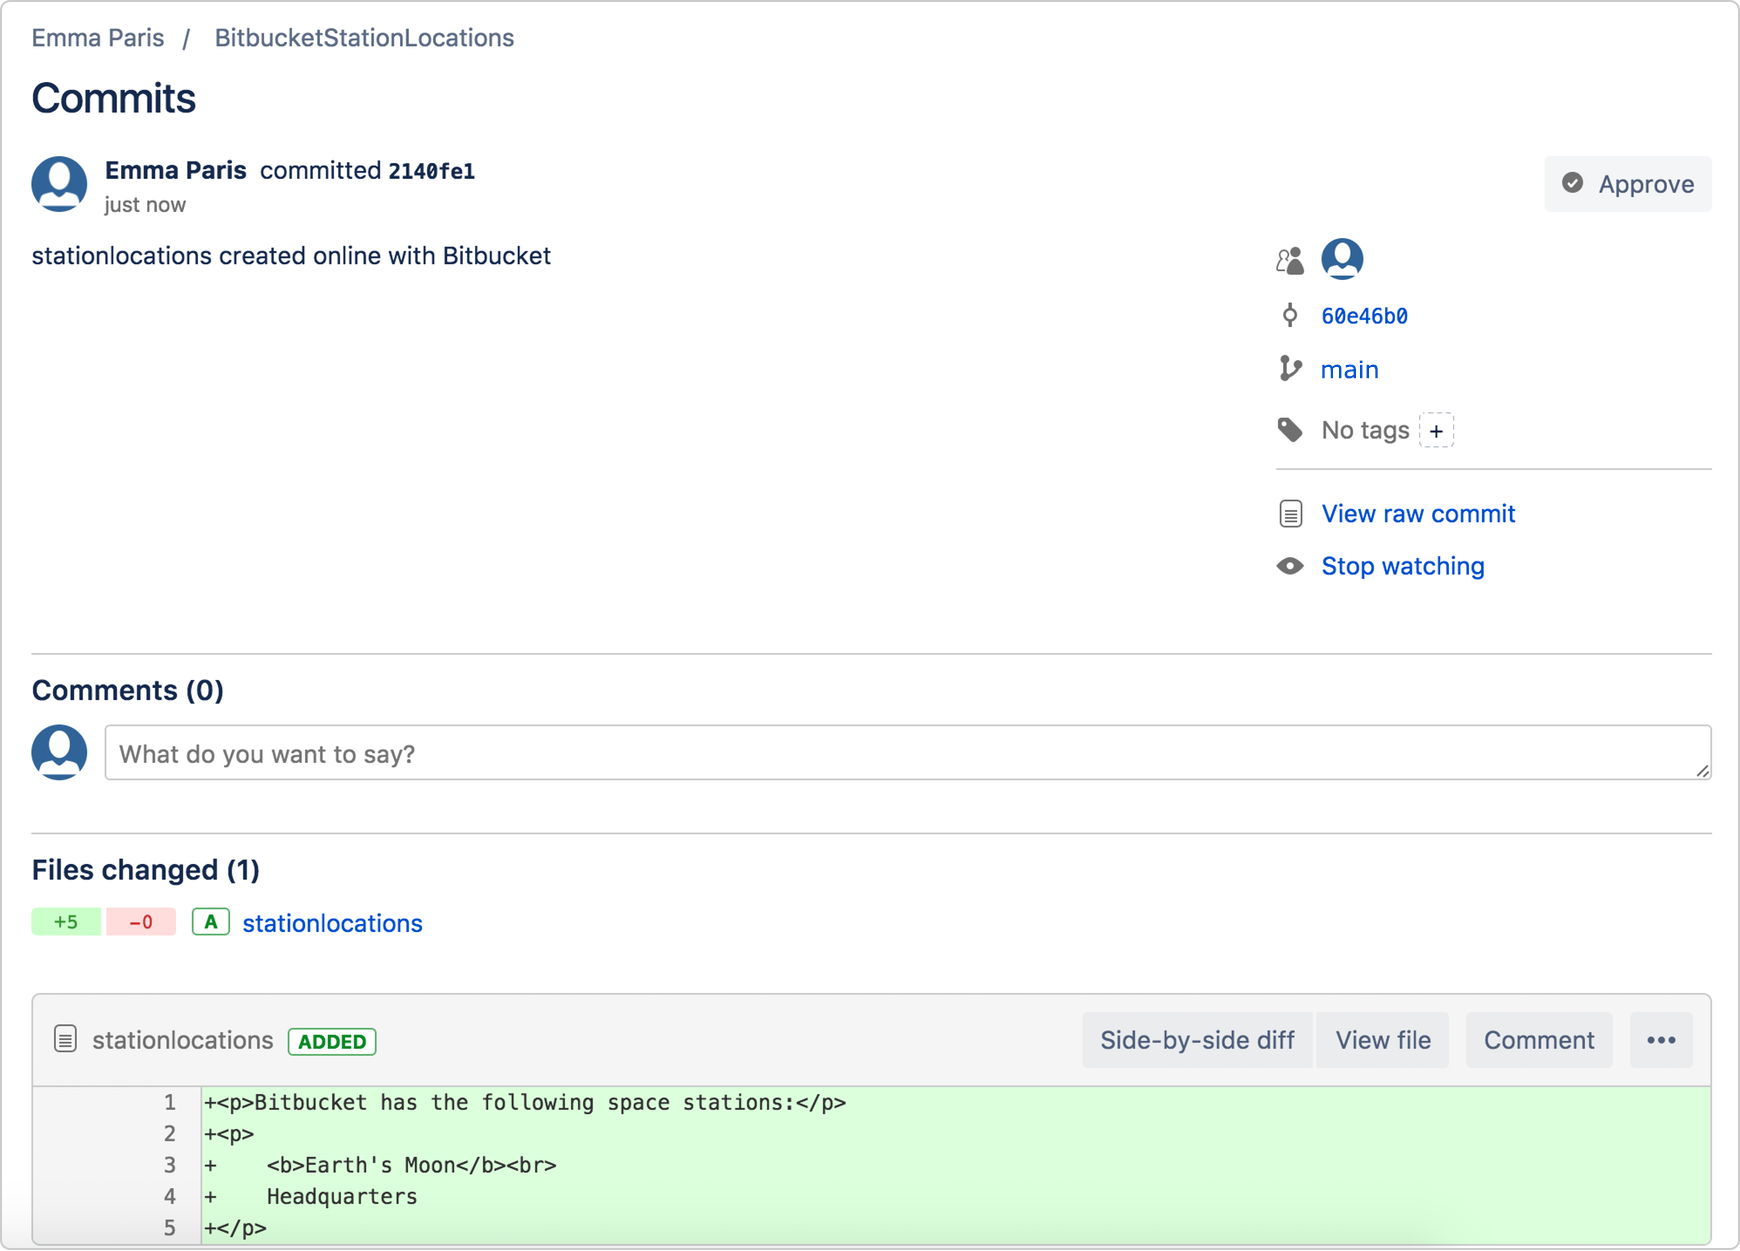
If you want to see a list of the commits you've made so far, click Commits in the sidebar.
Passo 2. Colocar as alterações de um repositório remoto
Now we need to get that new file into your local repository. The process is pretty straight forward, basically just the reverse of the push you used to get the locations.txt file into Bitbucket.
Para puxar o arquivo para o repositório local, faça o seguinte:
1. Open your terminal window and navigate to the top level of your local repository.
$ cd ~/repos/bitbucketstationlocations/2. Enter the git pull --all command to pull all the changes from Bitbucket. (In more complex branching workflows, pulling and merging all changes might not be appropriate .) Enter your Bitbucket password when asked for it. Your terminal should look similar to the following
$ git pull --all
 Fetching origin
 remote: Counting objects: 3, done.
 remote: Compressing objects: 100% (3/3), done.
 remote: Total 3 (delta 0), reused 0 (delta 0)
 Unpacking objects: 100% (3/3), done.
 From https://bitbucket.org/emmap1/bitbucketstationlocations
    fe5a280..fcbeeb0 main -> origin/main
 Updating fe5a280..fcbeeb0
 Fast-forward
  stationlocations | 5 ++++++++++++++
  1 file changed, 5 insertions(+)
  create mode 100644 stationlocations
The git pull command merges the file from your remote repository (Bitbucket) into your local repository with a single command.
3. Navigate to your repository folder on your local system and you'll see the file you just added.
Fantástico! Com a adição dos dois arquivos sobre a localização de sua estação espacial, você executou o fluxo de trabalho básico do Git (clonar, adicionar, confirmar, enviar e puxar) entre o Bitbucket e o sistema local.
Usar uma ramificação do Git para mesclar um arquivo
Ser um administrador de estação espacial vem com certas responsabilidades. Às vezes, você vai precisar manter informações bloqueadas, especialmente quando estiver mapeando novos locais do sistema solar. As ramificações de aprendizagem vão permitir que você atualize seus arquivos e compartilhe as informações apenas quando estiver pronto.
As ramificações são mais poderosas quando você trabalha em equipe. Você pode trabalhar em sua própria parte de um projeto a partir de sua própria ramificação, enviar pull de atualizações do Bitbucket e, então, mesclar todo o seu trabalho na ramificação principal quando ela estiver pronta. Nossa documentação inclui mais explicações sobre por que pode ser recomendável usar ramificações.
Uma ramificação representa uma linha de desenvolvimento independente para seu repositório. Pense nisso como um diretório de trabalho, uma área de staging e um histórico de projeto novos. Antes de criar qualquer ramificação nova, você começa automaticamente com a ramificação principal. Para um exemplo visual, este diagrama mostra a ramificação principal e a outra ramificação com uma atualização de correção de bug.

Passo 1: Crie uma ramificação e faça uma alteração
Crie uma ramificação onde você puder adicionar planos futuros para a estação espacial que ainda não está pronto para confirmar. Quando você estiver pronto para tornar esses planos conhecidos a todos, poderá mesclar as alterações no seu repositório do Bitbucket e, em seguida, excluir a ramificação que não for mais necessária.
É importante entender que as ramificações são apenas indicadores para commits. Quando você cria uma ramificação, tudo o que o Git precisa fazer é criar um novo indicador, ele não cria um conjunto totalmente novo de arquivos ou pastas. Antes de começar, seu repositório é parecido com o seguinte:

Para criar uma ramificação, faça o seguinte:
1. Go to your terminal window and navigate to the top level of your local repository using the following command:
cd ~/repos/bitbucketstationlocations/2. Create a branch from your terminal window.
$ git branch future-plansEsse comando cria uma ramificação, mas não o alterna para essa ramificação, então seu repositório é parecido ao seguinte:

A história do repositório permanece inalterada. Tudo o que você tem é um novo indicador para a ramificação atual: Para começar a trabalhar na nova ramificação, você deve conferir a ramificação que deseja usar.
3. Checkout the new branch you just created to start using it.
$ git checkout future-plans
Switched to branch 'future-plans'
The git checkout command works hand-in-hand with git branch . Because you are creating a branch to work on something new, every time you create a new branch (with git branch), you want to make sure to check it out (with git checkout) if you're going to use it. Now that you’ve checked out the new branch, your Git workflow looks something like this:

4. Search for the bitbucketstationlocations folder on your local system and open it. You will notice there are no extra files or folders in the directory as a result of the new branch.
5. Open the stationlocations file using a text editor.
6. Make a change to the file by adding another station location:
<p>Bitbucket has the following space stations:</p>
<p>
   <b>Earth's Moon</b><br>
   Headquarters
</p>
<p>
   <b>Mars</b><br>
   Recreation Department
</p>
7. Save and close the file.
8. Enter git status in the terminal window. You will see something like this:
$ git status
On branch future-plans
Changes not staged for commit:
 (use "git add <file>..." to update what will be committed)
 (use "git checkout -- <file>..." to discard changes in working directory)
   modified: stationlocations
no changes added to commit (use "git add" and/or "git commit -a")
Notice the On branch future-plans line? If you entered git status previously, the line was on branch main because you only had the one main branch. Before you stage or commit a change, always check this line to make sure the branch where you want to add the change is checked out.
9. Stage your file.
$ git add stationlocations10. Enter the git commit command in the terminal window, as shown with the following:
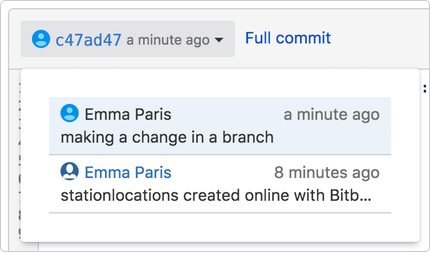
$ git commit stationlocations -m 'making a change in a branch'
[future-plans e3b7732] making a change in a branch
1 file changed, 4 insertions(+)
Com esse commit recente, seu repositório é algo parecido com o seguinte:

Now it's time to merge the change that you just made back into the main branch.
Passo 2. Mescle sua ramificação: mesclagem de avanço rápido
Your space station is growing, and it's time for the opening ceremony of your Mars location. Now that your future plans are becoming a reality, you can merge your future-plans branch into the main branch on your local system.
Como você criou somente uma ramificação e fez uma alteração, use o método de ramificação de avanço rápido para mesclar. Você pode fazer uma mesclagem de avanço rápido porque tem um caminho linear da ponta da ramificação atual até a ramificação de destino. Em vez de "realmente"mesclar as ramificações, o Git precisa apenas mover (ou seja, "avançar rapidamente") a ponta da ramificação atual até a ponta da ramificação de destino para integrar os históricos. Isso efetivamente combina os históricos, pois todas as confirmações alcançáveis da ramificação de destino agora estão disponíveis por meio da atual.

Este fluxo de trabalho de ramificação é comum para ramificações de tópicos de curta duração com alterações menores e não são tão comuns para funções de duração mais longa.
Para concluir uma mesclagem de avanço rápido, faça o seguinte:
1. Go to your terminal window and navigate to the top level of your local repository.
$ cd ~/repos/bitbucketstationlocations/2. Enter the git status command to be sure you have all your changes committed and find out what branch you have checked out.
$ git status
On branch future-plans
nothing to commit, working directory clean
3. Switch to the main branch.
$ git checkout main
Switched to branch 'main'
Your branch is up-to-date with 'origin/main'.
4. Merge changes from the future-plans branch into the main
$ git merge future-plans
Updating fcbeeb0..e3b7732
Fast-forward
stationlocations | 4 ++++
1 file changed, 4 insertions(+)
You've essentially moved the pointer for the main branch forward to the current head and your repository looks something like the fast forward merge above.
5. Because you don't plan on using future-plans anymore, you can delete the branch.
$ git branch -d future-plans
Deleted branch future-plans (was e3b7732).
When you delete future-plans, you can still access the branch from main using a commit id. For example, if you want to undo the changes added from future-plans, use the commit id you just received to go back to that branch.
6. Enter git status to see the results of your merge, which show that your local repository is one ahead of your remote repository. It will look something like this:
$ git status
On branch main
Your branch is ahead of 'origin/main' by 1 commit.
 (use "git push" to publish your local commits)
nothing to commit, working directory clean
Aqui está o que você fez até agora:
- Foi criada uma ramificação, que foi conferida
- Foi feita uma alteração na nova ramificação
- Foi feito commit da alteração na nova ramificação
- Foi integrada essa alteração de volta na ramificação principal
- Foi excluída a ramificação que você não está mais usando.
Em seguida, temos que enviar todo esse trabalho de volta para o Bitbucket, seu repositório remoto.
Passo 3. Coloque sua alteração no Bitbucket
Você quer que seja possível a todos ver o local da nova estação espacial. Para fazer isso, você pode enviar o estado atual do seu repositório local para Bitbucket.
Este diagrama mostra o que acontece quando seu repositório local tem alterações que o repositório central não tem e você envia essas alterações para Bitbucket.

Aqui está como enviar sua alteração para o repositório remoto:
1. From the repository directory in your terminal window, enter git push origin main to push the changes. It will result in something like this:
$ git push origin main
Counting objects: 3, done.
Delta compression using up to 8 threads.
Compressing objects: 100% (3/3), done.
Writing objects: 100% (3/3), 401 bytes | 0 bytes/s, done.
Total 3 (delta 0), reused 0 (delta 0)
To https://emmap1@bitbucket.org/emmap1/bitbucketstationlocations.git
  fcbeeb0..e3b7732 main -> main
2. Click the Overview page of your Bitbucket repository, and notice you can see your push in the Recent Activity stream.
3. Click Commits and you can see the commit you made on your local system. Notice that the change keeps the same commit id as it had on your local system.
You can also see that the line to the left of the commits list has a straight-forward path and shows no branches. That’s because the future-plans branch never interacted with the remote repository, only the change we created and committed.
4. Click Branches and notice that the page has no record of the branch either.
5. Click Source, and then click the stationlocations file. You can see the last change to the file has the commit id you just pushed.
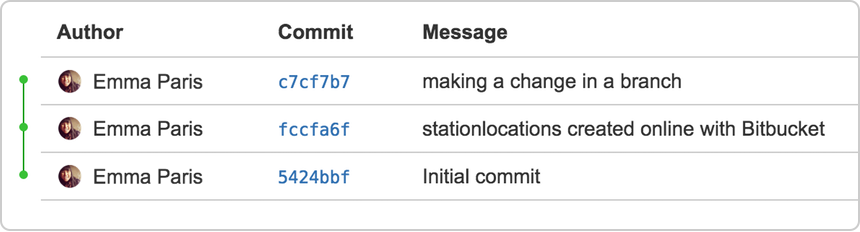
6. Click the file history list to see the changes committed for this file, which will look similar to the following figure.
Está pronto!
Not sure you will be able to remember all the Git commands you just learned? No problem. Bookmark our basic Git commands page so that you can refer to it when needed.
Compartilhar este artigo
Próximo tópico
Leitura recomendada
Marque esses recursos para aprender sobre os tipos de equipes de DevOps ou para obter atualizações contínuas sobre DevOps na Atlassian.

Blog do Bitbucket
Caminho de aprendizagem de DevOps