Использование чата в Jira Service Management

Обзор
Это руководство предназначено для администраторов проектов Jira Service Management, которые хотят связать свои проекты службы поддержки со Slack или Microsoft Teams (Teams). Интеграция выбранного инструмента чата с продуктом Jira Service Management позволит использовать его функциональные возможности для регистрации и решения задач, а также управления ими прямо из сообщений. Читайте далее, чтобы больше узнать о нашем подходе к созданию заявок в процессе общения и о том, как максимально эффективно использовать эту возможность.
Atlassian Assist is Jira Service Management’s conversational request management chat extension that facilitates real-time responses to incoming questions and requests from your chat tool and provides an automated two-way sync with Jira Service Management.
Use chat and Atlassian Assist to create and manage requests directly from Slack or Microsoft Teams.
- Give and get help where you already are
- Work requests from start to finish, all in the same conversation
- Automatically recognize requests and reply with the virtual agent, a premium feature (Slack only)
Get Jira Service Management’s request management Slack or Microsoft Teams app.
ChatOps is Jira Service Management’s alert and incident management chat functionality that enables responder teams to stay notified of alerts, quickly swarm and collaborate on incidents, track important information, and take actions directly from chat applications.
For end-to-end alert and incident management within Slack and Microsoft Teams.
- Get alert and incident notifications
- Create channels and meetings to collaboratively resolve incidents
- Respond to alerts and incidents using buttons and commands from channels
Get Jira Service Management’s incident management Slack, Microsoft Teams, or Zoom apps.
Watch our Jira Service Management Microsoft Teams and Slack Integrations

Integrating chat tools with Jira Service Management offers several benefits, enhancing team productivity, communication, and incident management. Enhance your team’s efficiency and effectiveness in team collaboration, incident management, and customer service.
Все о создании заявок в процессе общения

Что такое создание заявок в процессе общения?
Создание заявок в процессе общения — это поддержка пользователей в режиме реального времени, которую агенты Jira Service Management оказывают на платформе чата, такой как Slack или Microsoft Teams. Благодаря взаимной синхронизации между службой поддержки и сообщениями чата всю обработку запросов, от начала до конца, можно выполнять, не покидая чата.
Для чего оно нужно?
В эпоху гибридной и удаленной работы Slack и Microsoft Teams стали основными инструментами для связи команд и продвижения работы. Если учесть, как часто их используют для общения, становится понятно, почему клиенты хотят получать ответы на свои вопросы прямо в беседах чата. Без создания заявок в процессе общения командам службы поддержки приходится отслеживать сотни запросов, разбросанных по личным сообщениям и каналам, и переносить их в свой процесс. Частое переключение контекста и дополнительные действия, выполняемые вручную, могут отрицательно влиять на производительность, время решения и другие показатели.


Как его использовать?
Создание заявок в процессе общения позволяет агентам общаться с пользователями, обратившимися за помощью, независимо от их местонахождения и с использованием привычных способов работы. Если вы когда-нибудь перенаправляли пользователей на портал службы поддержки в канале Slack или превращали личные сообщения Microsoft Teams в тему задачи от имени сотрудника, вам могло бы пригодиться эффективное создание заявок в процессе общения. Помимо предоставления информации для классических рабочих процессов службы ИТ-поддержки, чат помогает и различным бизнес-командам: отделам кадров — отвечать на вопросы об адаптации и льготах; командам по продажам — управлять сопровождением сделок и обновлением систем CRM; юридическим отделам — получать запросы на проверку договоров и т. д.
Почему оно должно вам понравиться?
Это быстрый, простой и человекоориентированный способ. Он не только требует от пользователей меньше усилий для получения поддержки, но и позволяет агентам, обрабатывающим запросы из личных сообщений, электронных писем, различных каналов и порталов, наглядно видеть и отслеживать работу. Получение и обработка запросов прямо из чата делает работу более наглядной, помогает повысить производительность команды и удовлетворенность клиентов.

Наконец, самый важный вопрос…
Как попробовать его в Jira Service Management?
В Jira Service Management есть функция чата, которая позволяет подключить проект службы поддержки к чат-боту поддержки Atlassian Assist. Взаимная синхронизация бесед в чате и службы поддержки обеспечивает качественное обслуживание независимо от способа работы и местонахождения команды поддержки и клиентов. Настроить функцию чата и управлять ею можно через каналы или настройки проекта. Настройка и запуск займут всего несколько минут.
Начало работы с чатом
Функция чата в Jira Service Management создана для повышения гибкости и упрощения работы, при этом освоить ее не составит труда. Перед началом работы ознакомьтесь с тремя основными элементами, которые играют ключевую роль в рабочих процессах при создании заявок в процессе общения.
- Канал/команда агентов
- Канал запросов
- Atlassian Assist
Канал/команда агентов
Закрытый канал или команда в рабочем пространстве Slack или Microsoft Teams соответственно, где агенты могут назначать и редактировать запросы, а также отвечать на них. Со всей очередью можно работать прямо отсюда, не выходя из чата.

Канал запросов
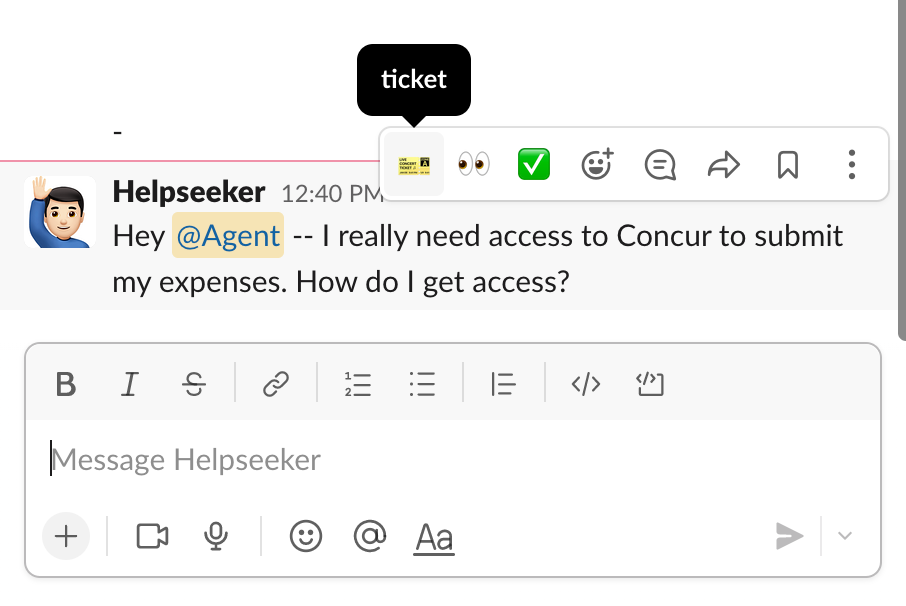
Канал Slack или Microsoft Teams, в который пользователи, нуждающиеся в помощи, могут отправлять запросы. Сообщение, отправленное пользователем в канал запросов, можно превратить в заявку с помощью эмодзи или действий с сообщением. Задачу можно быстро создать, отреагировав с помощью эмодзи «заявка» или нажав More actions (Другие действия). После этого запрос появится в канале агентов для очереди соответствующего проекта службы поддержки.

Atlassian Assist
Assist — название приложения в Slack и Microsoft Teams, которое открывает доступ к возможностям диалоговой поддержки. Бот Assist позволяет не только подключать проекты службы поддержки к чату, но и выполнять различные действия по управлению задачами, вплоть до их решения, прямо в Slack и Teams.
Краткое руководство по началу работы
Чтобы начать работу, администраторы проекта Jira Service Management могут нажать на левой панели навигации Channels (Каналы), а затем Chat > Configure (Чат > Настроить). (Примечание: доступ к функции чата также можно получить в настройках проекта.)
После этого нужно выполнить три описанных ниже быстрых действия, которые зависят от конкретного инструмента. Обратите внимание, что порядок действий для разных инструментов немного отличается.

Если вы используете Slack…

Чтобы настроить чат в проекте службы поддержки, выполните следующие действия.
1. На боковой панели в проекте службы поддержки нажмите Channels (Каналы), затем — Chat (Чат) и Configure (Настроить).
2. Нажмите Add to Slack (Добавить в Slack).
3. Выберите рабочее пространство Slack, к которому нужно подключить сайт Jira, и нажмите Allow (Разрешить).
Совет. Если к Slack уже подключен другой проект службы поддержки с сайта Jira, вы не сможете изменить выбор рабочего пространства.
4. Выберите типы запросов, которые будут использоваться в Slack, и нажмите Add (Добавить). Вы можете добавить другие типы запросов позже.
5. На последнем этапе создается закрытый канал агентов для команды. Assist предлагает имя на основе ключа проекта, но при желании его можно изменить.
6. Нажмите Create (Создать), чтобы завершить настройку.

Если вы используете Microsoft Teams…

1. Настройте команду агентов. Перед установкой приложения Assist перейдите в Microsoft Teams, создайте специальную закрытую команду для канала агентов и пригласите агентов.
2. Подключитесь к Teams и выберите типы запросов. Вернитесь к настройкам чата. Следуя инструкциям по установке Assist в магазине приложений, подключитесь к Teams и добавьте бота в закрытую команду агентов. Далее можно выполнить вход через настройки чата и выбрать нужные типы запросов.
Совет. Во время ознакомительного тура вам может понадобиться предоставить приложению права. Если вы не можете сделать это, обратитесь за помощью к администратору Teams.
3. Настройте канал запросов. Создайте в Teams новый канал (или выберите существующий) и пригласите бота Assist.
Совет. Чтобы добавить бота Assist в команду, введите в канале «@get bots» и выберите Assist.
Полезная информация
- Сайт Jira можно подключить только к одному рабочему пространству Slack или одной организации Microsoft Teams.
- Некоторые поля типа запроса, например URL-адреса и вложения, не поддерживаются в Slack и Teams. Если неподдерживаемое поле помечено как обязательное, такие типы запросов использовать нельзя.
Создание заявок и управление ими с помощью Atlassian Assist
Главная страница приложения или вкладка Teams
Пользователи Slack и Teams могут использовать в Jira Service Management встроенный интерфейс приложения для управления службой поддержки.
После настройки и запуска функции чата появится множество простых способов регистрации задач и взаимодействия с ними с помощью приложения Assist.
Из канала запросов
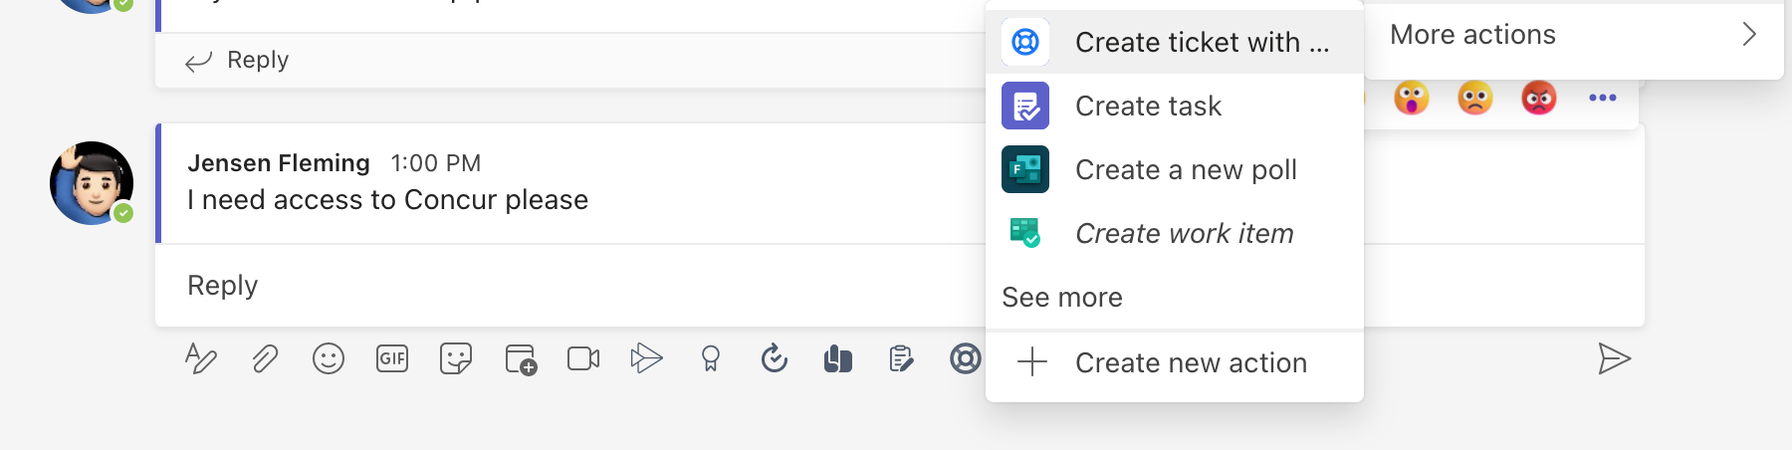
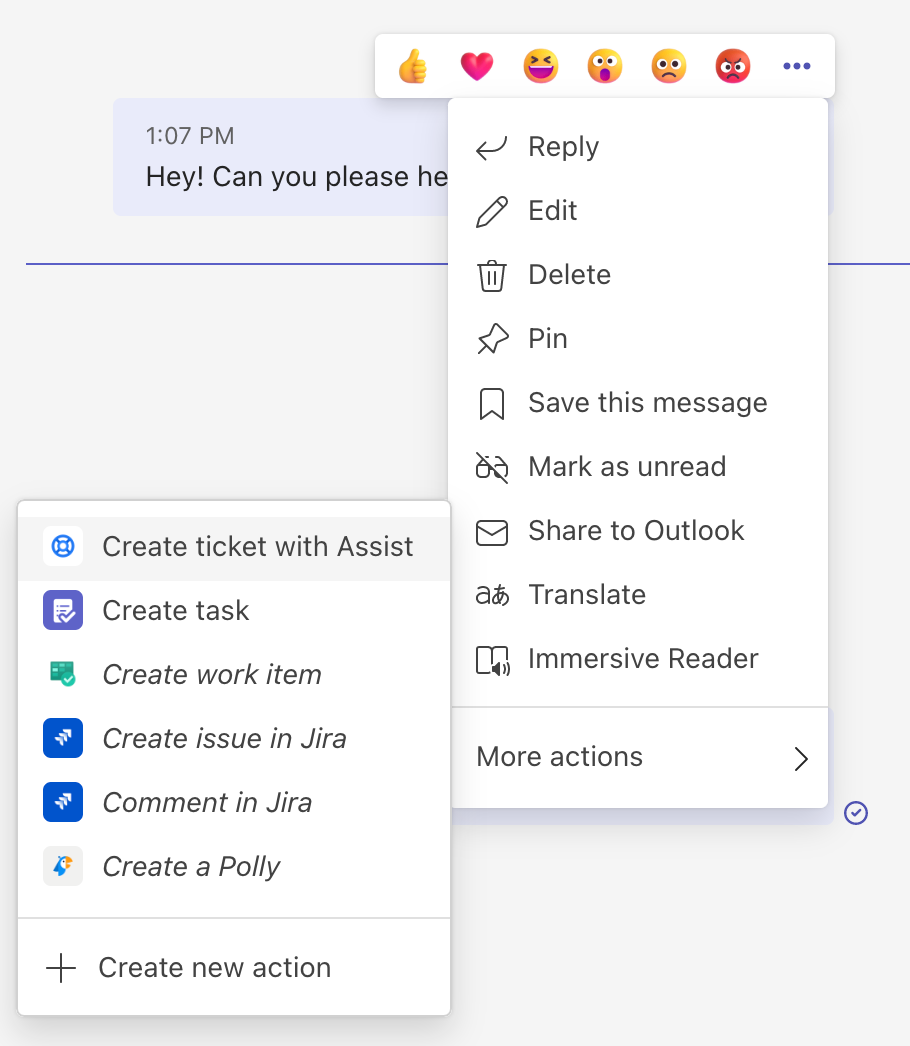
На любое сообщение в канале запросов можно отреагировать с помощью эмодзи «заявка» (для пользователей Slack) или воспользоваться действием с сообщением для создания заявки (для пользователей Teams).

Из личного сообщения
Используйте действия с сообщениями для создания запроса через Assist. После создания запроса пользователи, которые обращаются за помощью, смогут добавлять комментарии и следить за прогрессом прямо на главной странице приложения Assist.
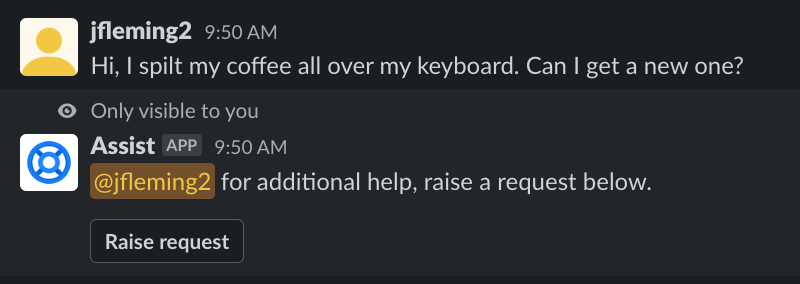
Из приложения Assist
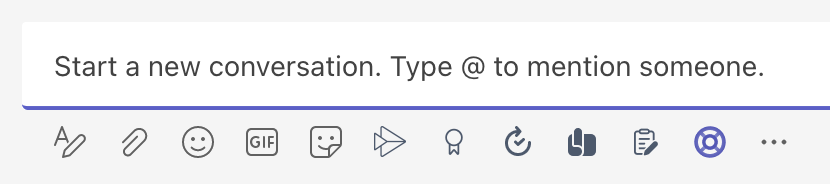
Можно перейти на главную страницу приложения Assist (для пользователей Slack) и нажать Raise a request (Создать запрос) или нажать значок спасательного круга в окне редактора сообщений (для пользователей Teams).

Мы уже говорили, что в Slack или Teams можно работать над задачами от начала до конца, и это действительно так. Вы можете добавлять комментарии, вносить внутренние примечания, назначать себе задачи, менять статусы, просматривать подробные сведения о задачах и выполнять другие действия, не выходя из чата.
Индивидуальная настройка чата
Усовершенствуйте предоставление поддержки в процессе общения, добавив некоторые популярные расширенные возможности.
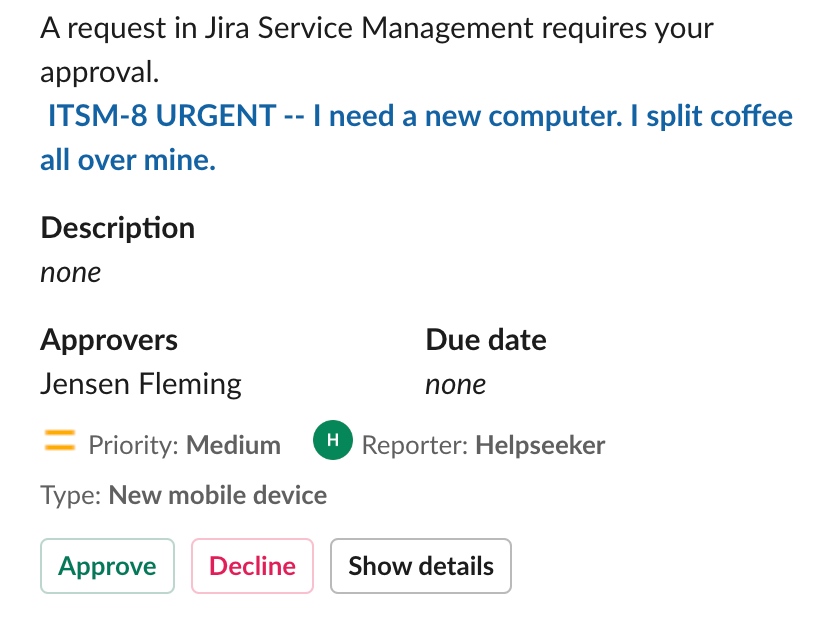
Подтверждения
Чтобы упростить подтверждение задач в Jira Service Management, отправляйте подтверждающим лицам личные сообщения в Slack или Microsoft Teams через Assist. Подтверждающее лицо может отклонить или подтвердить запрос прямо в чате, не переходя в Jira Service Management. После подтверждения или отклонения запроса в сообщении появится уведомление о решении с временной отметкой.
EmojiOps Только для Slack
Быстрый доступ к автоматизации Jira не требует написания кода — рабочие процессы в чате можно ускорить с помощью эмодзи.
Начните с простого: с помощью эмодзи «глаза» (👀) можно назначать задачи, а с помощью эмодзи «галочка» (✅) — закрывать запросы. Весь набор средств автоматизации Jira запускается одним простым эмодзи!
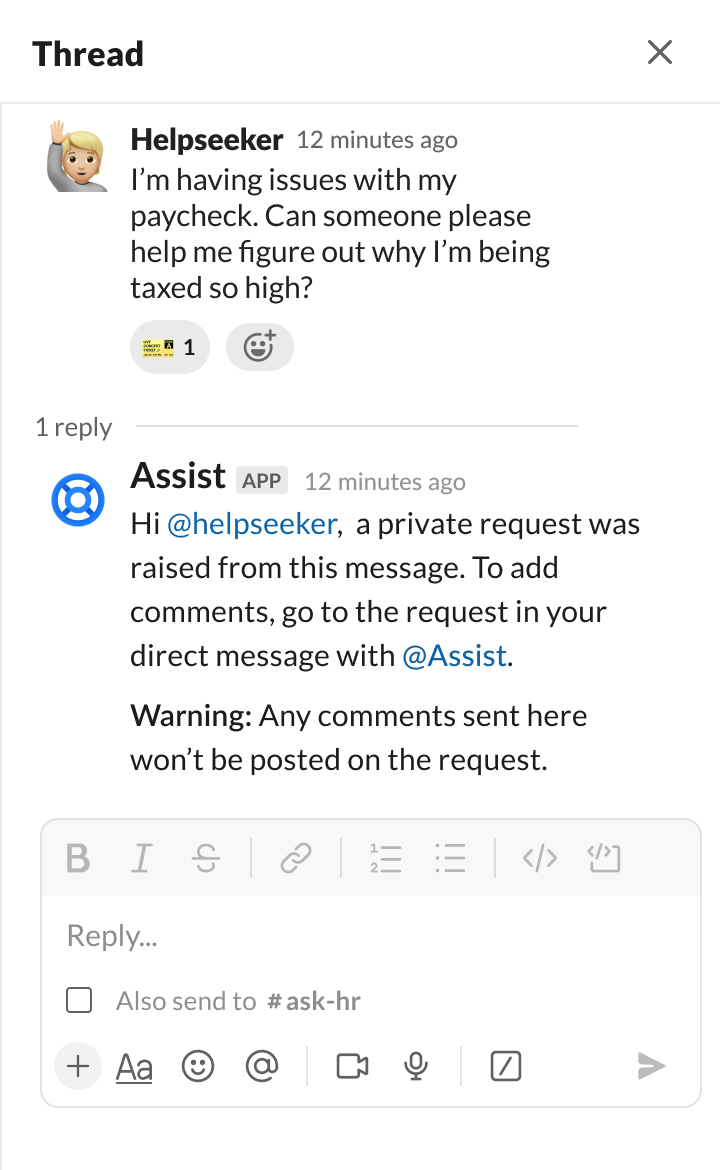
Конфиденциальные запросы в чате Только для Slack
Управляйте служебными запросами с учетом требований к конфиденциальности. Эта настройка идеально подходит для отделов по работе с кадрами, финансами или юридическими вопросами. Все обновления запросов отправляются в закрытых личных сообщениях, а не публикуются в открытом канале.
Совет. Все задачи, созданные в Microsoft Teams, автоматически становятся закрытыми, поэтому в настройках ничего менять не нужно.
Автоматическое создание задач Только для Slack
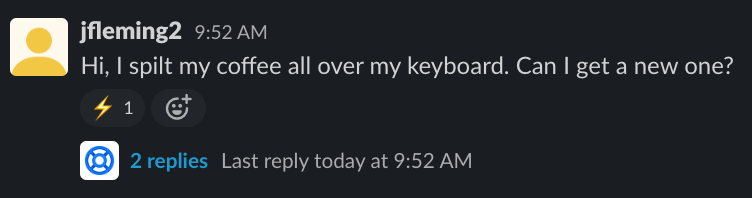
Автоматическое создание задач — это один из основных способов сэкономить время с помощью чата. Когда эта настройка включена, Assist мгновенно превращает любое сообщение на канале запросов в отслеживаемую задачу в проекте, то есть агентам и авторам запросов не нужно делать этот лишний шаг.
Если тип запроса имеет обязательные поля, автор запроса получит предложение заполнить их. Если обязательных полей нет, сообщение превратится в задачу сразу после его публикации. Assist добавляет эмодзи «молния» в реакции, чтобы показать, что заявка создана автоматически.
Требуется заполнение формы
Заполнение формы не требуется
Chat for Operations (ChatOps) 101
WHAT IS Chat for Operations (ChatOps)?
Chat for Operations (ChatOps) brings Jira Service Management’s real-time alerting, on-call, and incident management to your collaboration platforms like Slack, Microsoft Teams, and Zoom to facilitate software development and IT operations tasks. Bring everyone into one place so your responders don’t need to switch between multiple applications during their routine on-call shifts.
WHY DO YOU NEED IT?
When outages occur, every second counts, and the use of collaborative tools for communication has created a growing demand for teams to stay updated on critical notifications and tasks.
Integrating alert and incident workflows into platforms like Slack, Microsoft Teams, and Zoom allows agile Dev and IT Operations teams to stay aligned and react swiftly. Jira Service Management ChatOps App eliminates the need to switch between tools by bringing alerts and incidents directly to the team's workspace for seamless collaboration.
Why will you love it?
It centralizes all communication about Jira Service Management alerts, incidents, incident reports, plans, and progress, keeping everyone up to speed in real-time. And it provides a place for DevOps, IT, communications, security, legal, and other relevant teams to collaborate on not only incident resolution, but also future incident prevention and risk mitigation.
How can you try it in Jira Service Management?
By connecting your chat platforms with Jira Service Management ChatOps app, you can use Slack channels to work on alerts, create channels for your Jira Service Management incidents, add incident responders to your channels, update incident priorities, take incident actions, and help your team step in faster during incidents.
Connect your chat platforms to Jira Service Management’s ChatOps app today, in Slack, Microsoft Teams, or Zoom.
Quick start guide with ChatOps
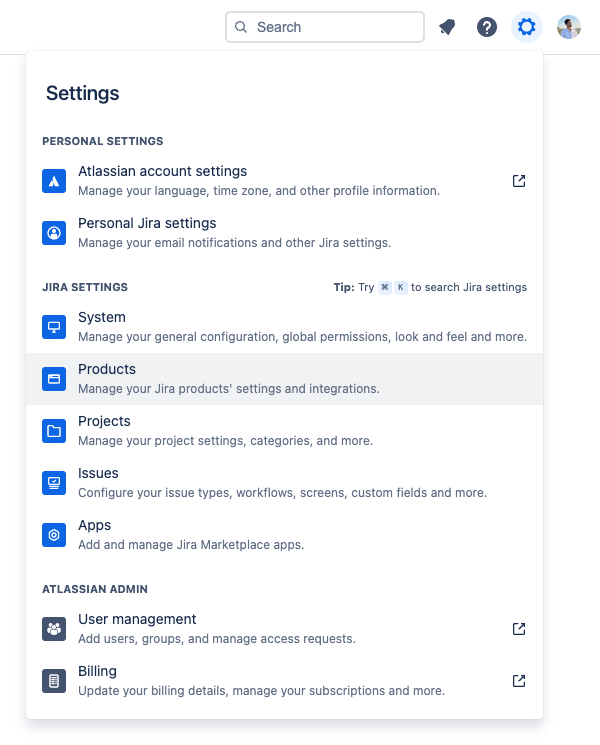
First off, you’ll need to connect your Jira Service Management site to your chat or video tool from Settings → Products → Chat and video tools. Only a Jira admin can do this, so if you’re not one, contact your Jira admin to get started.
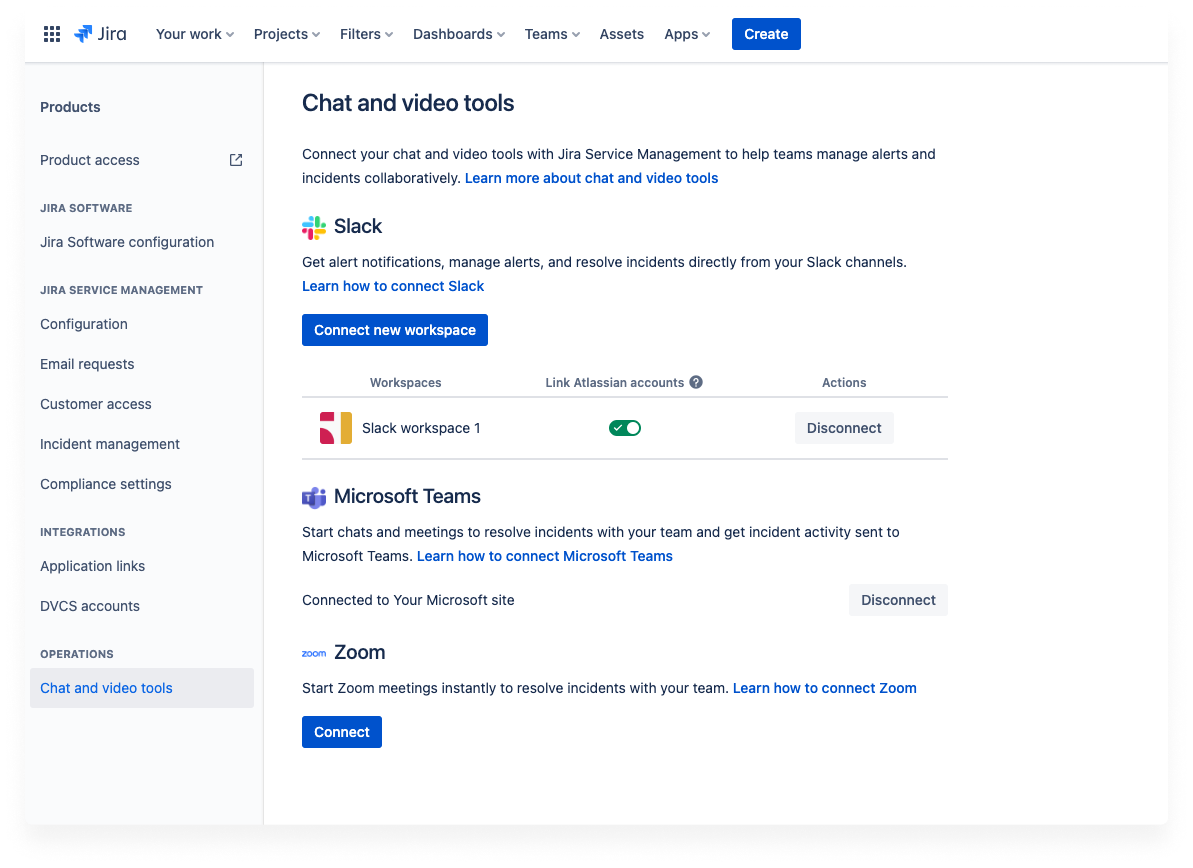
- Under Slack, select Connect new workspace
- Log in to Slack, and select Authorize to allow Jira Service Management to access your slack workspace.
Need more help? Read how to connect Slack
- Once you sign in to your Microsoft account, you’ll be redirected to Jira Service Management where you’ll see that the Microsoft Teams Administrator’s permission is required for Jira Service Management to create chats and meetings in Microsoft Teams.
- If you’re the Teams Administrator, select Give permission.
- If you’re not the Teams Administrator, select Copy link and share it with your Teams Administrator so they can authorize you to give permission to Jira Service Management. Once you’re authorized, select Give permission to continue. Learn more about permissions required by Atlassian ChatOps.
Need more help? Read how to connect Microsoft Teams
- Under Zoom, select Connect. You can only connect one Zoom account to your site. Similarly, you can only connect only one site to your Zoom account.
- You will now be prompted to select click Allow on the next screen. This will allow Zoom to access your Atlassian profile information and will let agents create Zoom meetings in Jira Service Management.
Need more help? Read how to connect Zoom
Helpful reminders
- A Jira site can connect to multiple Slack workspaces or Microsoft Teams, but a Slack workspace or Microsoft tenant can only connect to one Jira site.
- A Jira site can connect to only one Zoom account, and vice versa (a Zoom account can’t connect to multiple Jira sites).
Creating chats and meetings for incidents
Any agent in the Jira Service Management project can create a chat and meeting for incidents.
To create a chat or meeting:
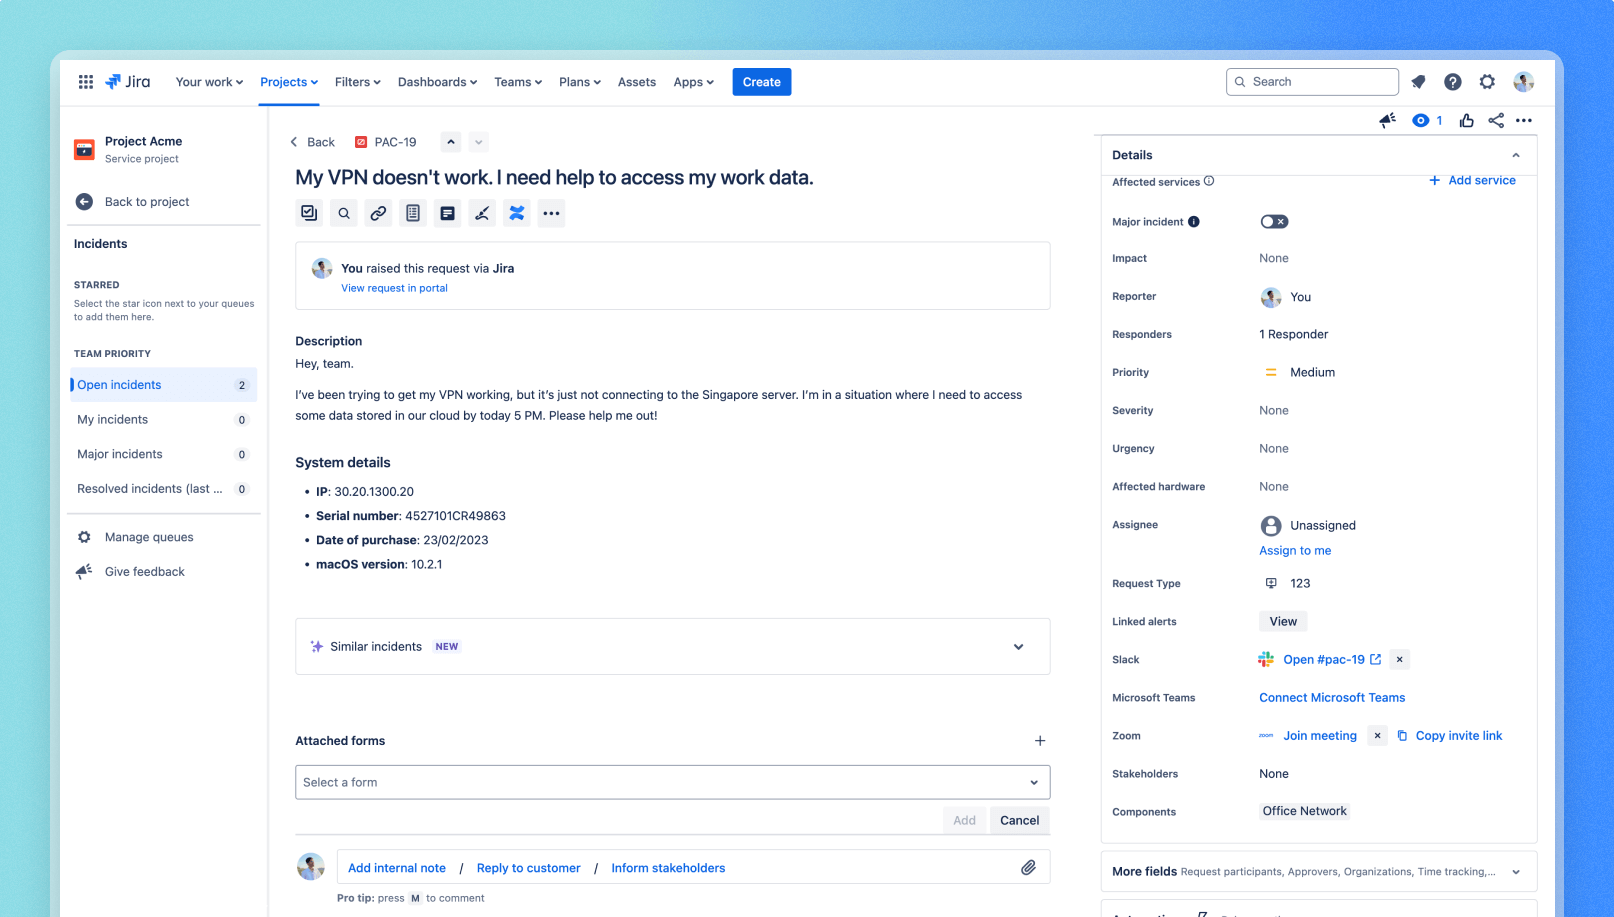
- In your service project, go to Incidents and open the incident you’d like to create the chat channel for.
- In the Details section, find the Slack, Microsoft Teams, and Zoom fields.
- Create a chat or meeting with your chat tools.
- You’ll be prompted to customize any prefilled details of the channel or meeting before you create it.
Once created, your chat or meeting will be linked to the incident’s details section.
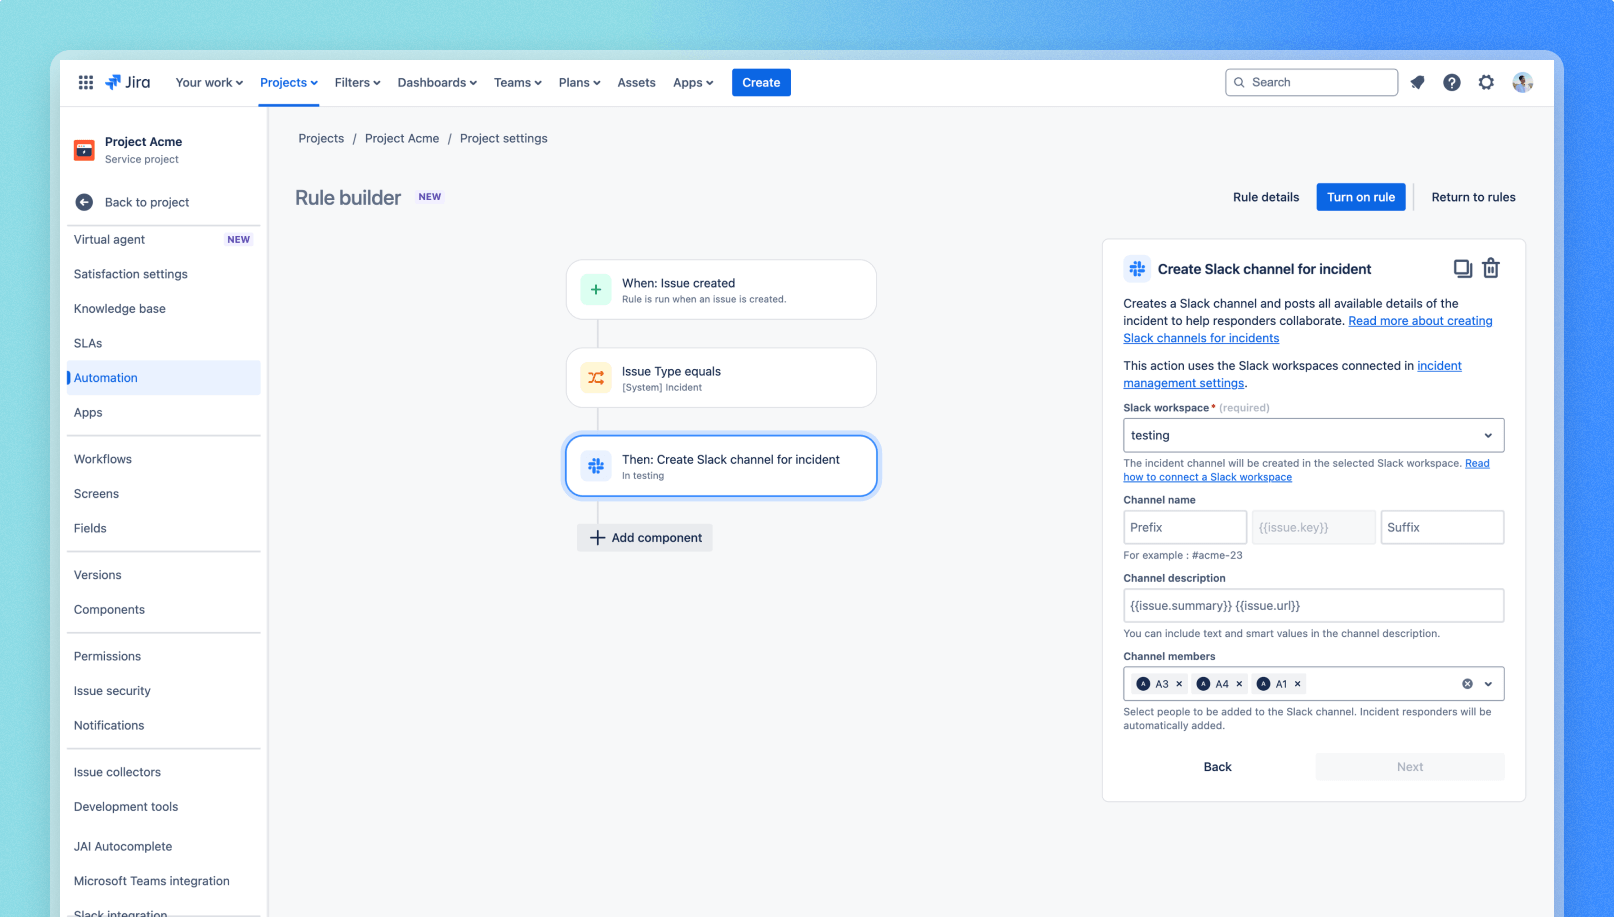
Automate creating Slack channels for incidents SLACK ONLY
Don’t want your team to waste time creating channels manually each and every time? Of course, there’s a way for you to automate it!
With Jira automation’s Create Slack channel for incident action, you can automate creating a Slack channel for incidents and adding incident responders to it, based on the conditions you specify in the rule. You even get to customize the name, description, and members of the channel. Read how to automate creating Slack channels
Manage incidents from chats

As soon as the channel is created, you'll receive a summary of the incident from which you can:
- add responders, stakeholders, and affected services,
- assign the incident to someone
- send stakeholder updates
- update the status and priority.
- add chat messages as comments to the incident, as an internal note or as a reply to the customer. You can do this from More options of a chat message.
Sync Zoom meeting recordings to the incident
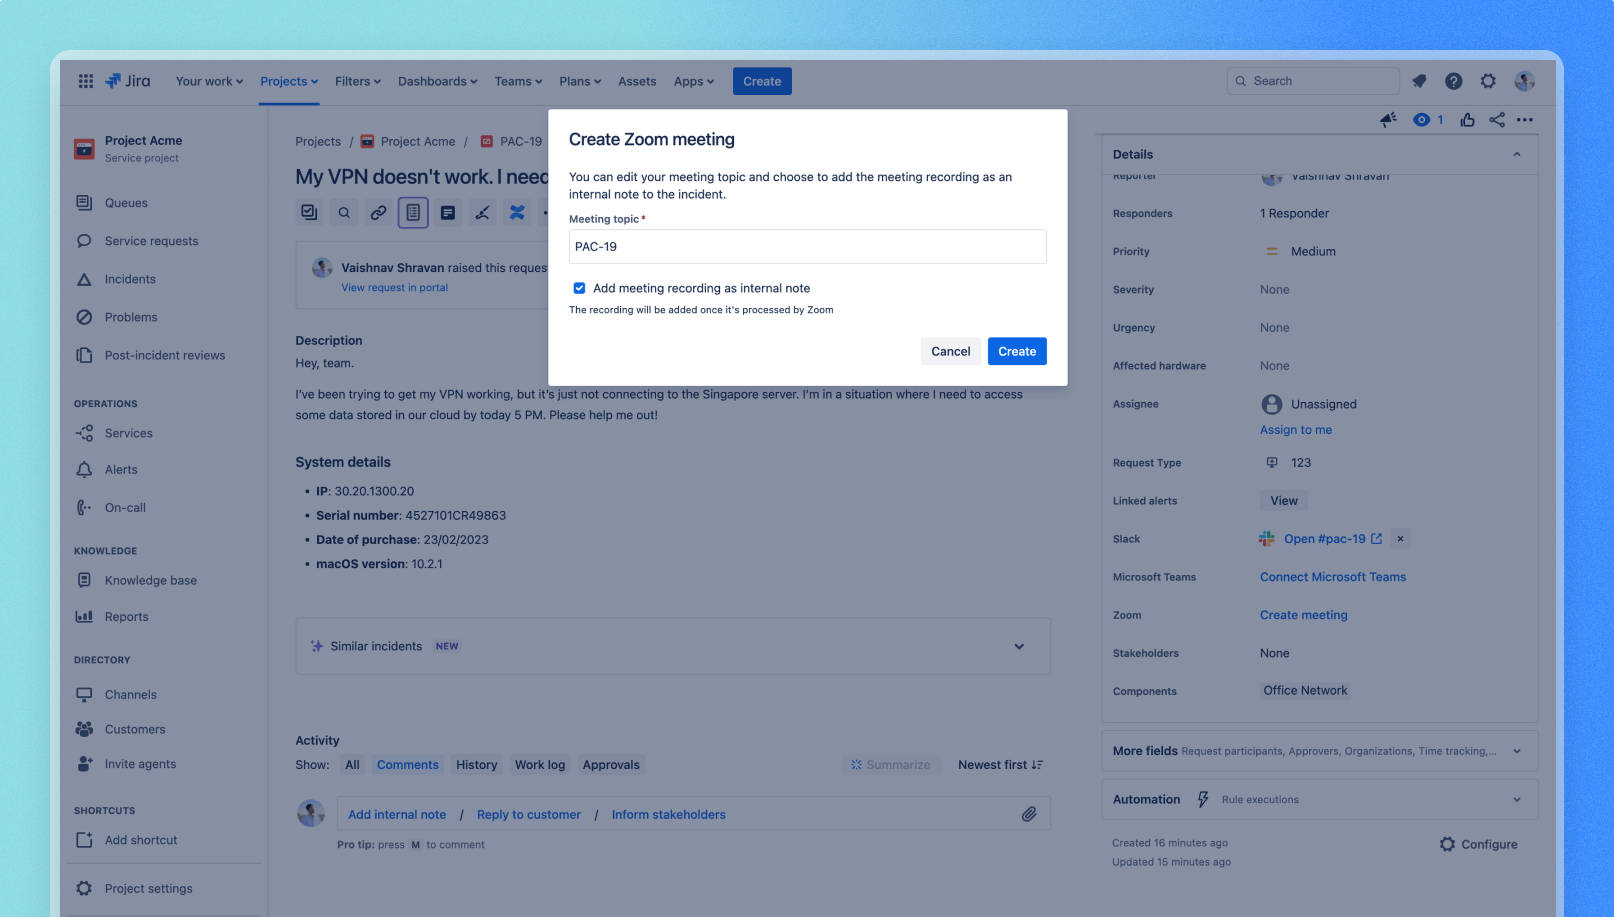
When you start a Zoom meeting for an incident, you don’t just bring your team together to resolve the incident, you also have the option to get the whole meeting recording posted on the incident’s comment, for reference later.
Get notified of Zoom meetings on Slack SLACK ONLY
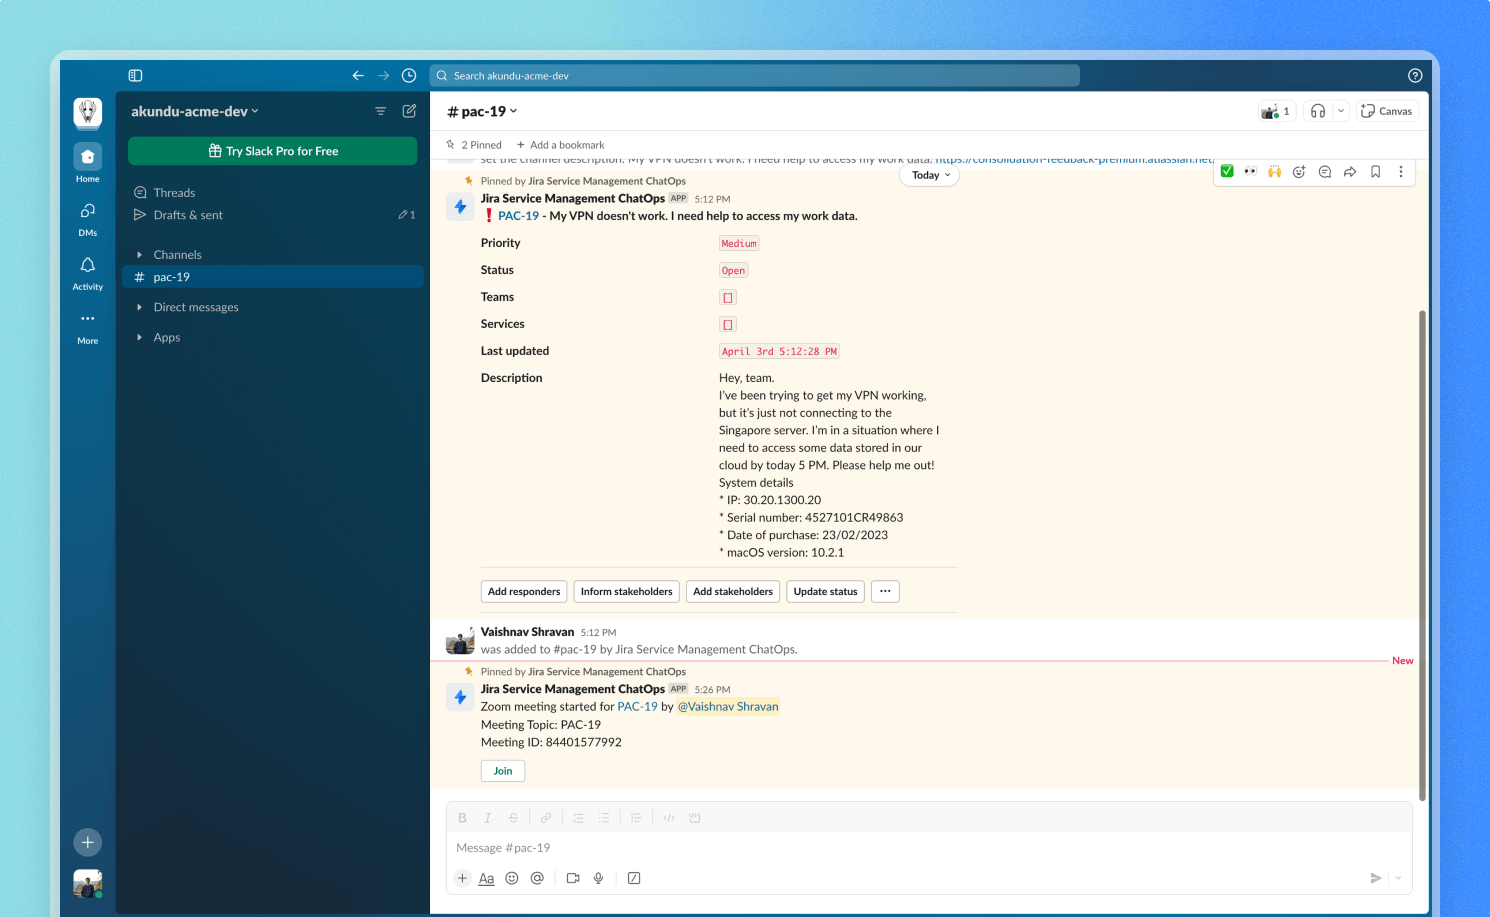
When you have Jira Service Management connected with Zoom and Slack, you’ll unlock perks such as getting notifications whenever a new meeting starts for an incident, directly in the Slack channel.
This keeps your team in the loop and saves you all the time you’d otherwise spend inviting everybody who’s required.
Respond to alerts using ChatOps
With Jira Service Management’s ChatOps app for Slack and Microsoft Teams, you can receive notifications for the alerts you care about, perform actions on the alerts, and manage some on-call work from your chats — using buttons and commands.
Add an alerting integration
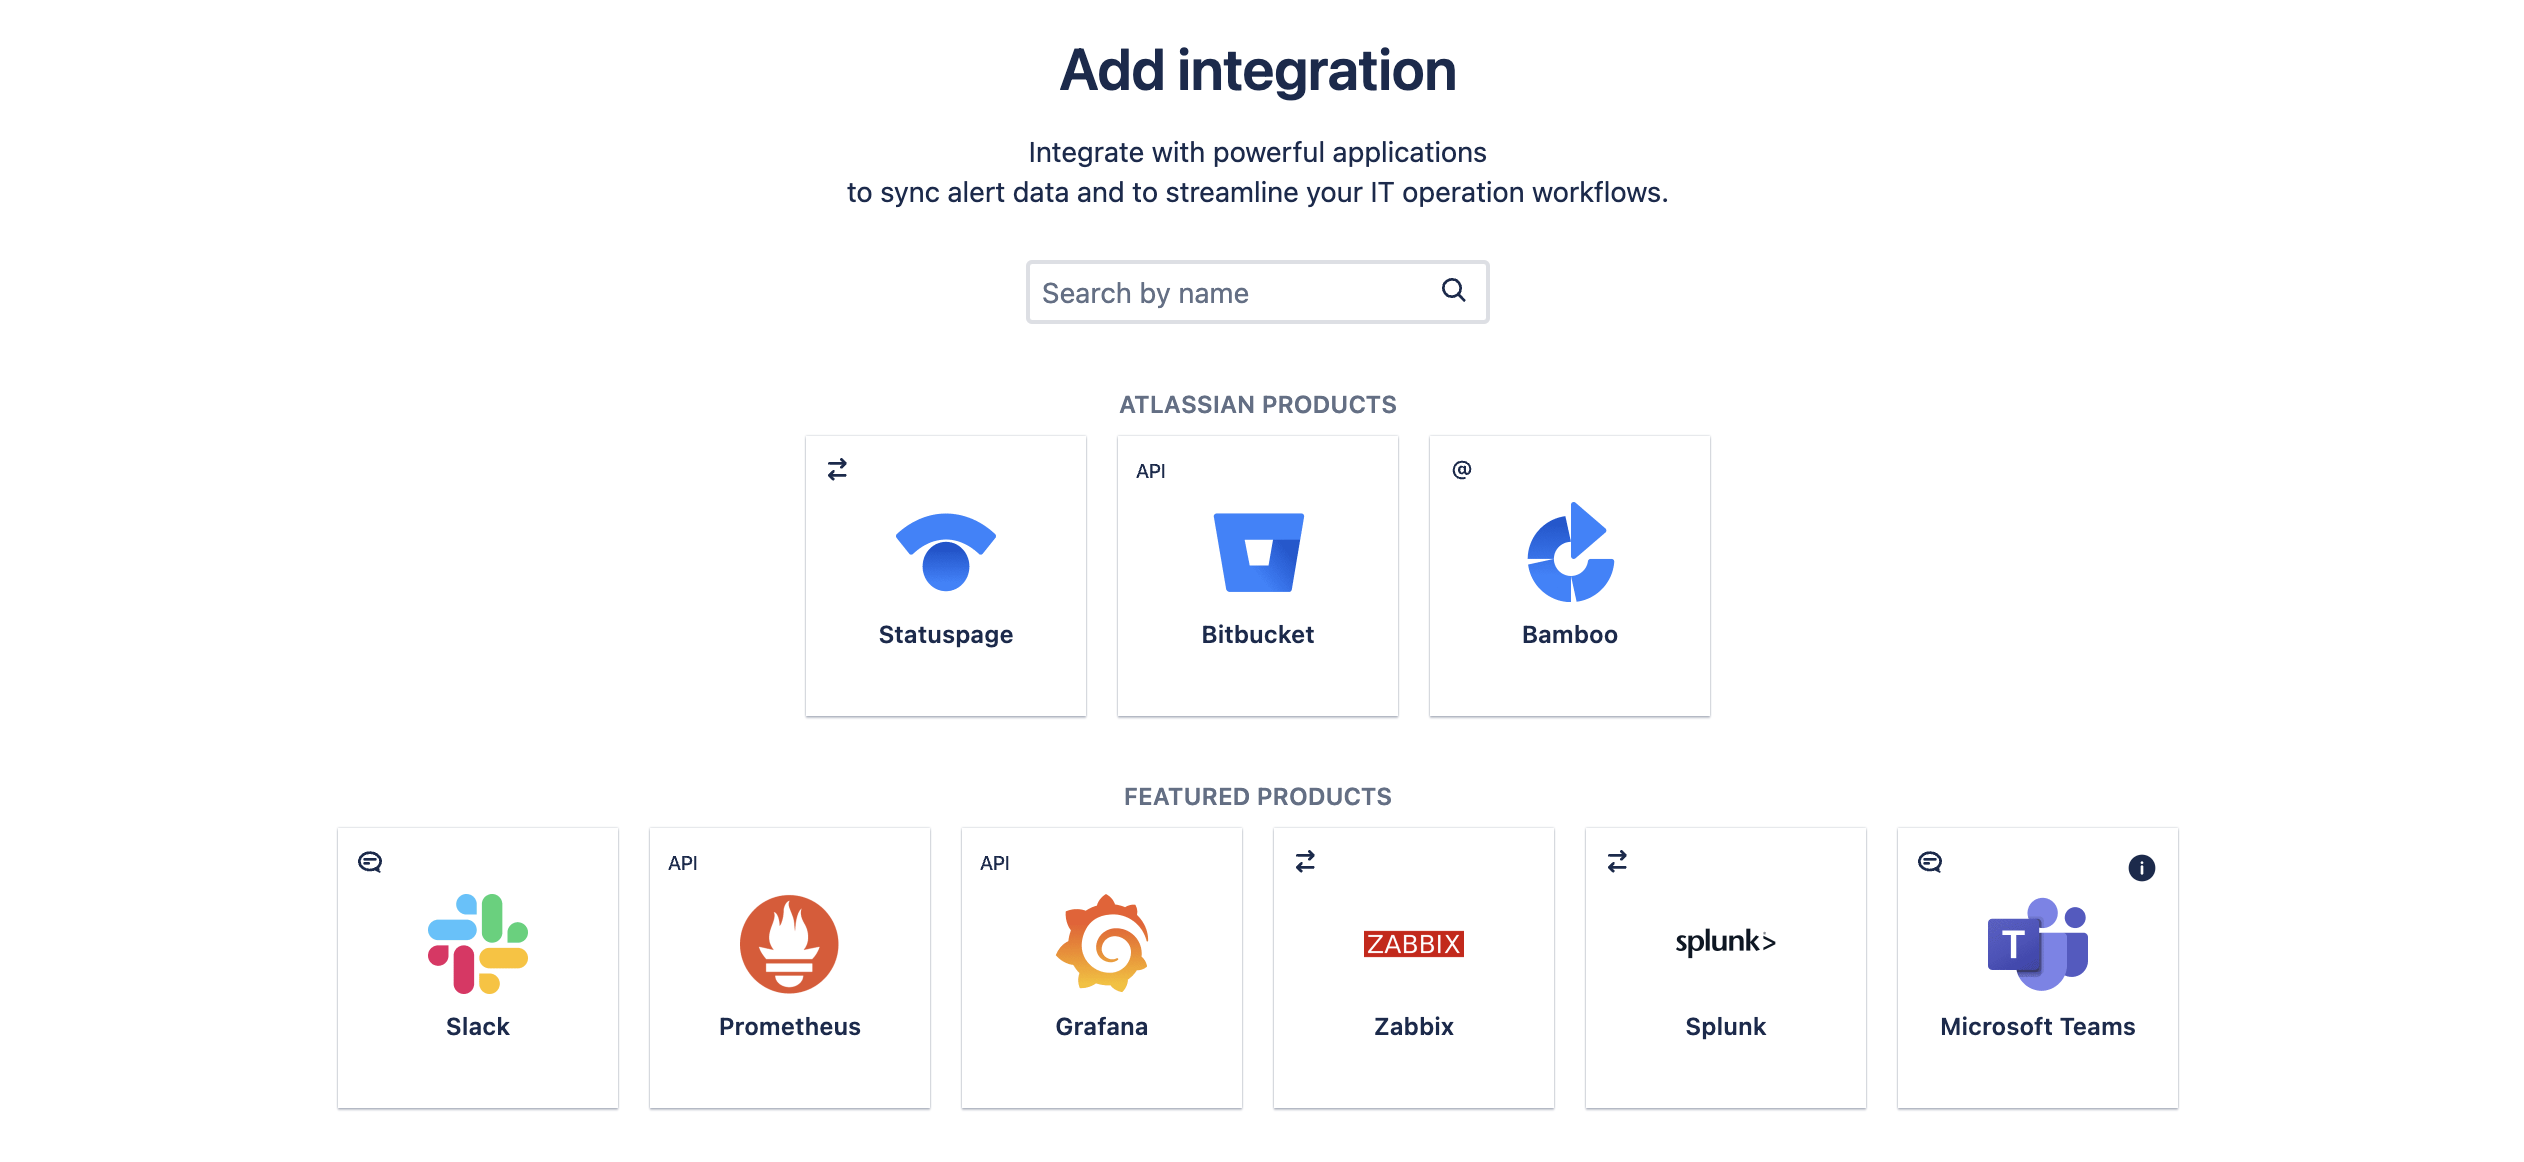
Jira admins can see add integrations for the Jira Service Management site from Settings → Products → Integrations, while team admins can add them from the team profile page’s Operations section → select Go to operations → select Integrations from the sidebar → select Add integration.
From the list of integrations, select Slack or Microsoft Teams.
SLACK
Fill in some important details for your integration.
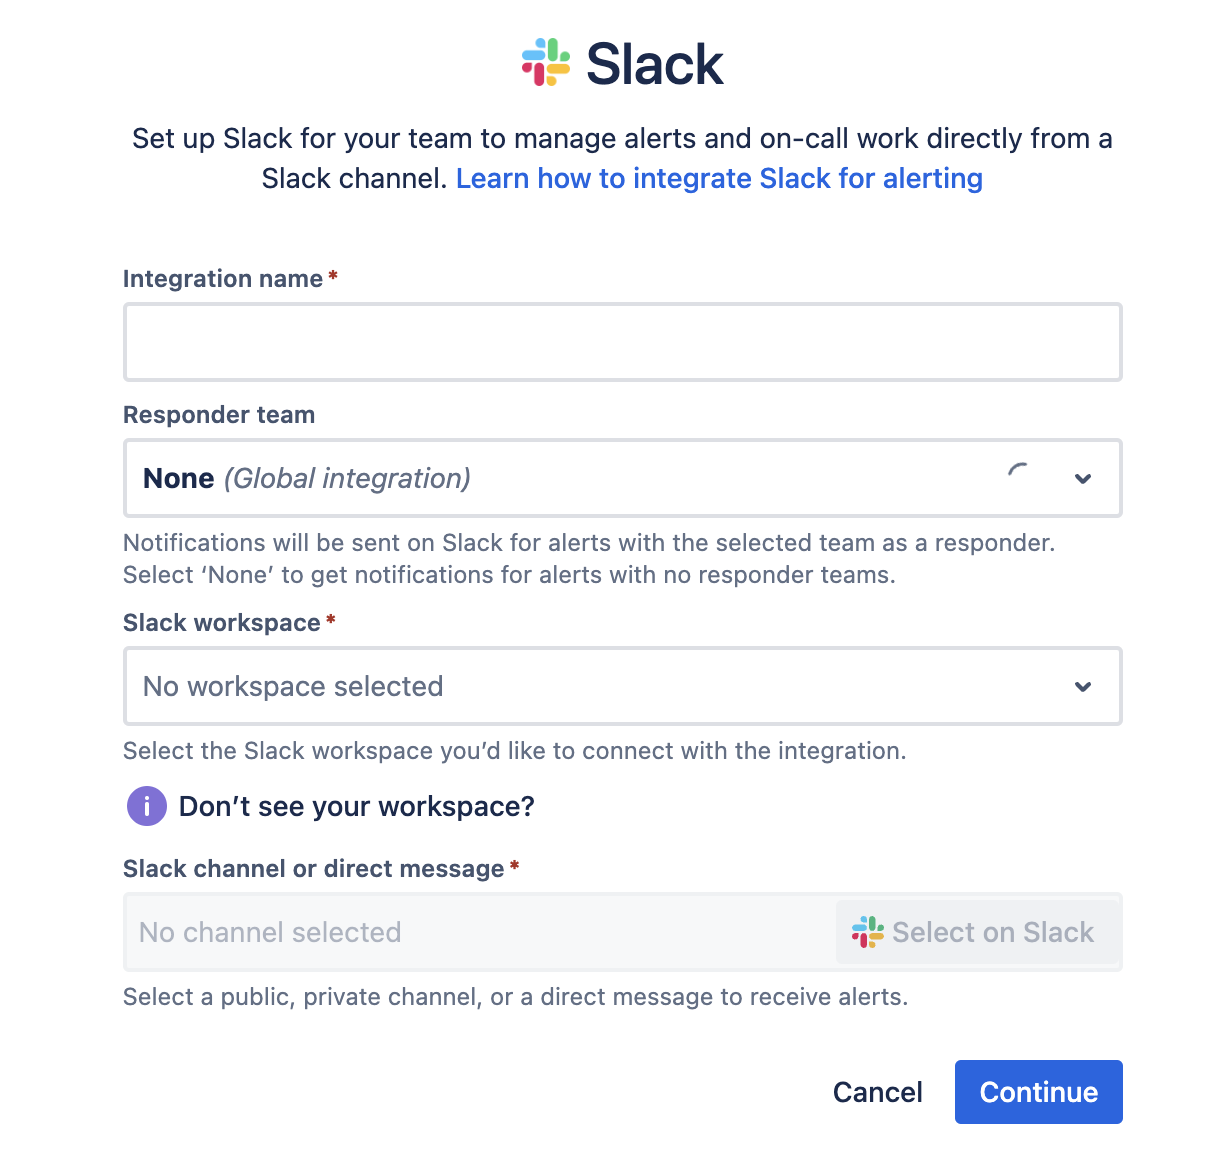
- Integration name: Name your integration to easily find it later.
- Responder team: The integration will send alerts for which the team you select is a responder.
- Slack workspace: Select the Slack workspace where your channels exist. If you don’t see your workspace, make sure you have joined the connected workspace, then, send /connect on any Slack channel or direct message.
- Slack channel or direct message: On selecting Select on Slack, you’ll be able to select a channel or direct message to receive alert notifications from this integration. Select Allow to confirm your choice and give Jira Service Management requested permissions on Slack.
- Select Continue to save the integration. It will be ON by default.
Need help? Read how to integrate with Slack
MICROSOFT TEAMS
Fill in some important details for your integration.
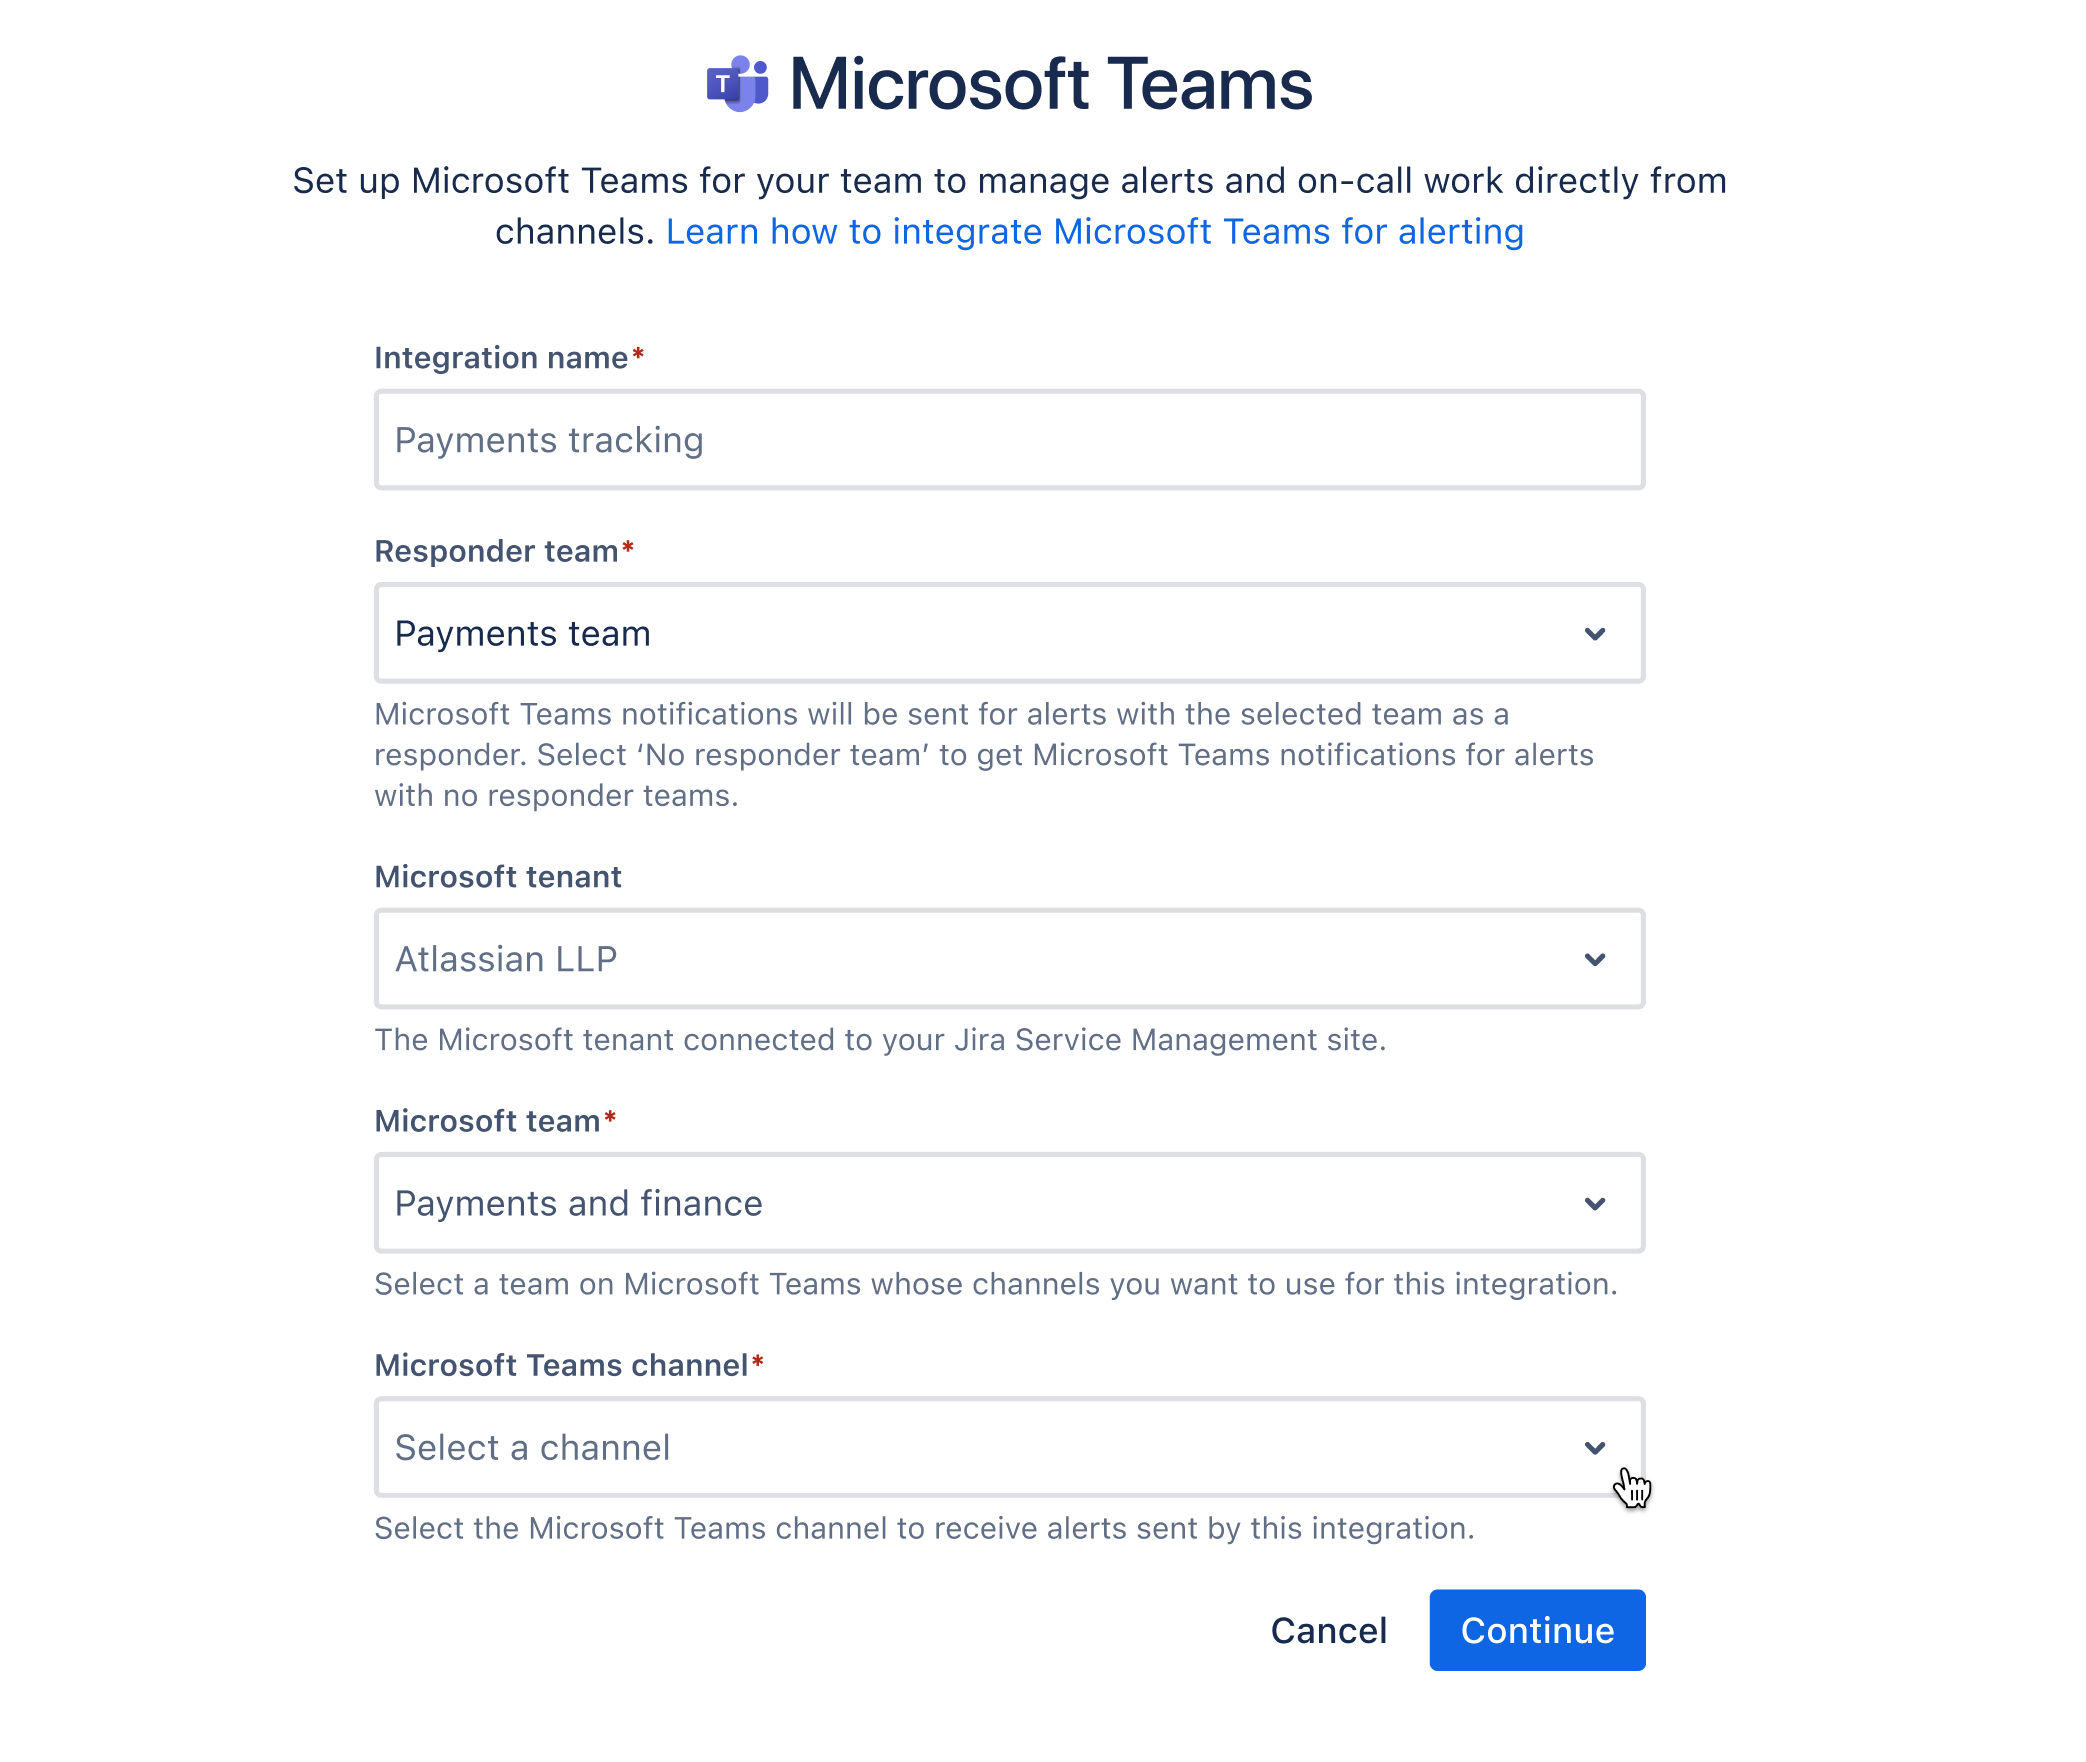
- Integration name: Name your integration to easily find it later.
- Responder team: The integration will send alerts for which the team you select is a responder. You can select ‘None’ to get notifications for alerts with no responder teams.
- Microsoft tenant: Select the Microsoft tenant where your channels exist.
- Microsoft team: Select your team on Microsoft Teams whose channels you’d like to use for this integration.
- Microsoft Teams channel: Select the channel to receive alert notifications from this integration.
- Select Continue to save the integration. It will be ON by default.
Giving permission to Jira Service Management
The Atlassian ChatOps app will need permission to post alerts to your channels in Microsoft Teams. Select Give permission to complete this step, if requested, and continue to setting up your integration.
Need help? Read how to integrate with Microsoft Teams
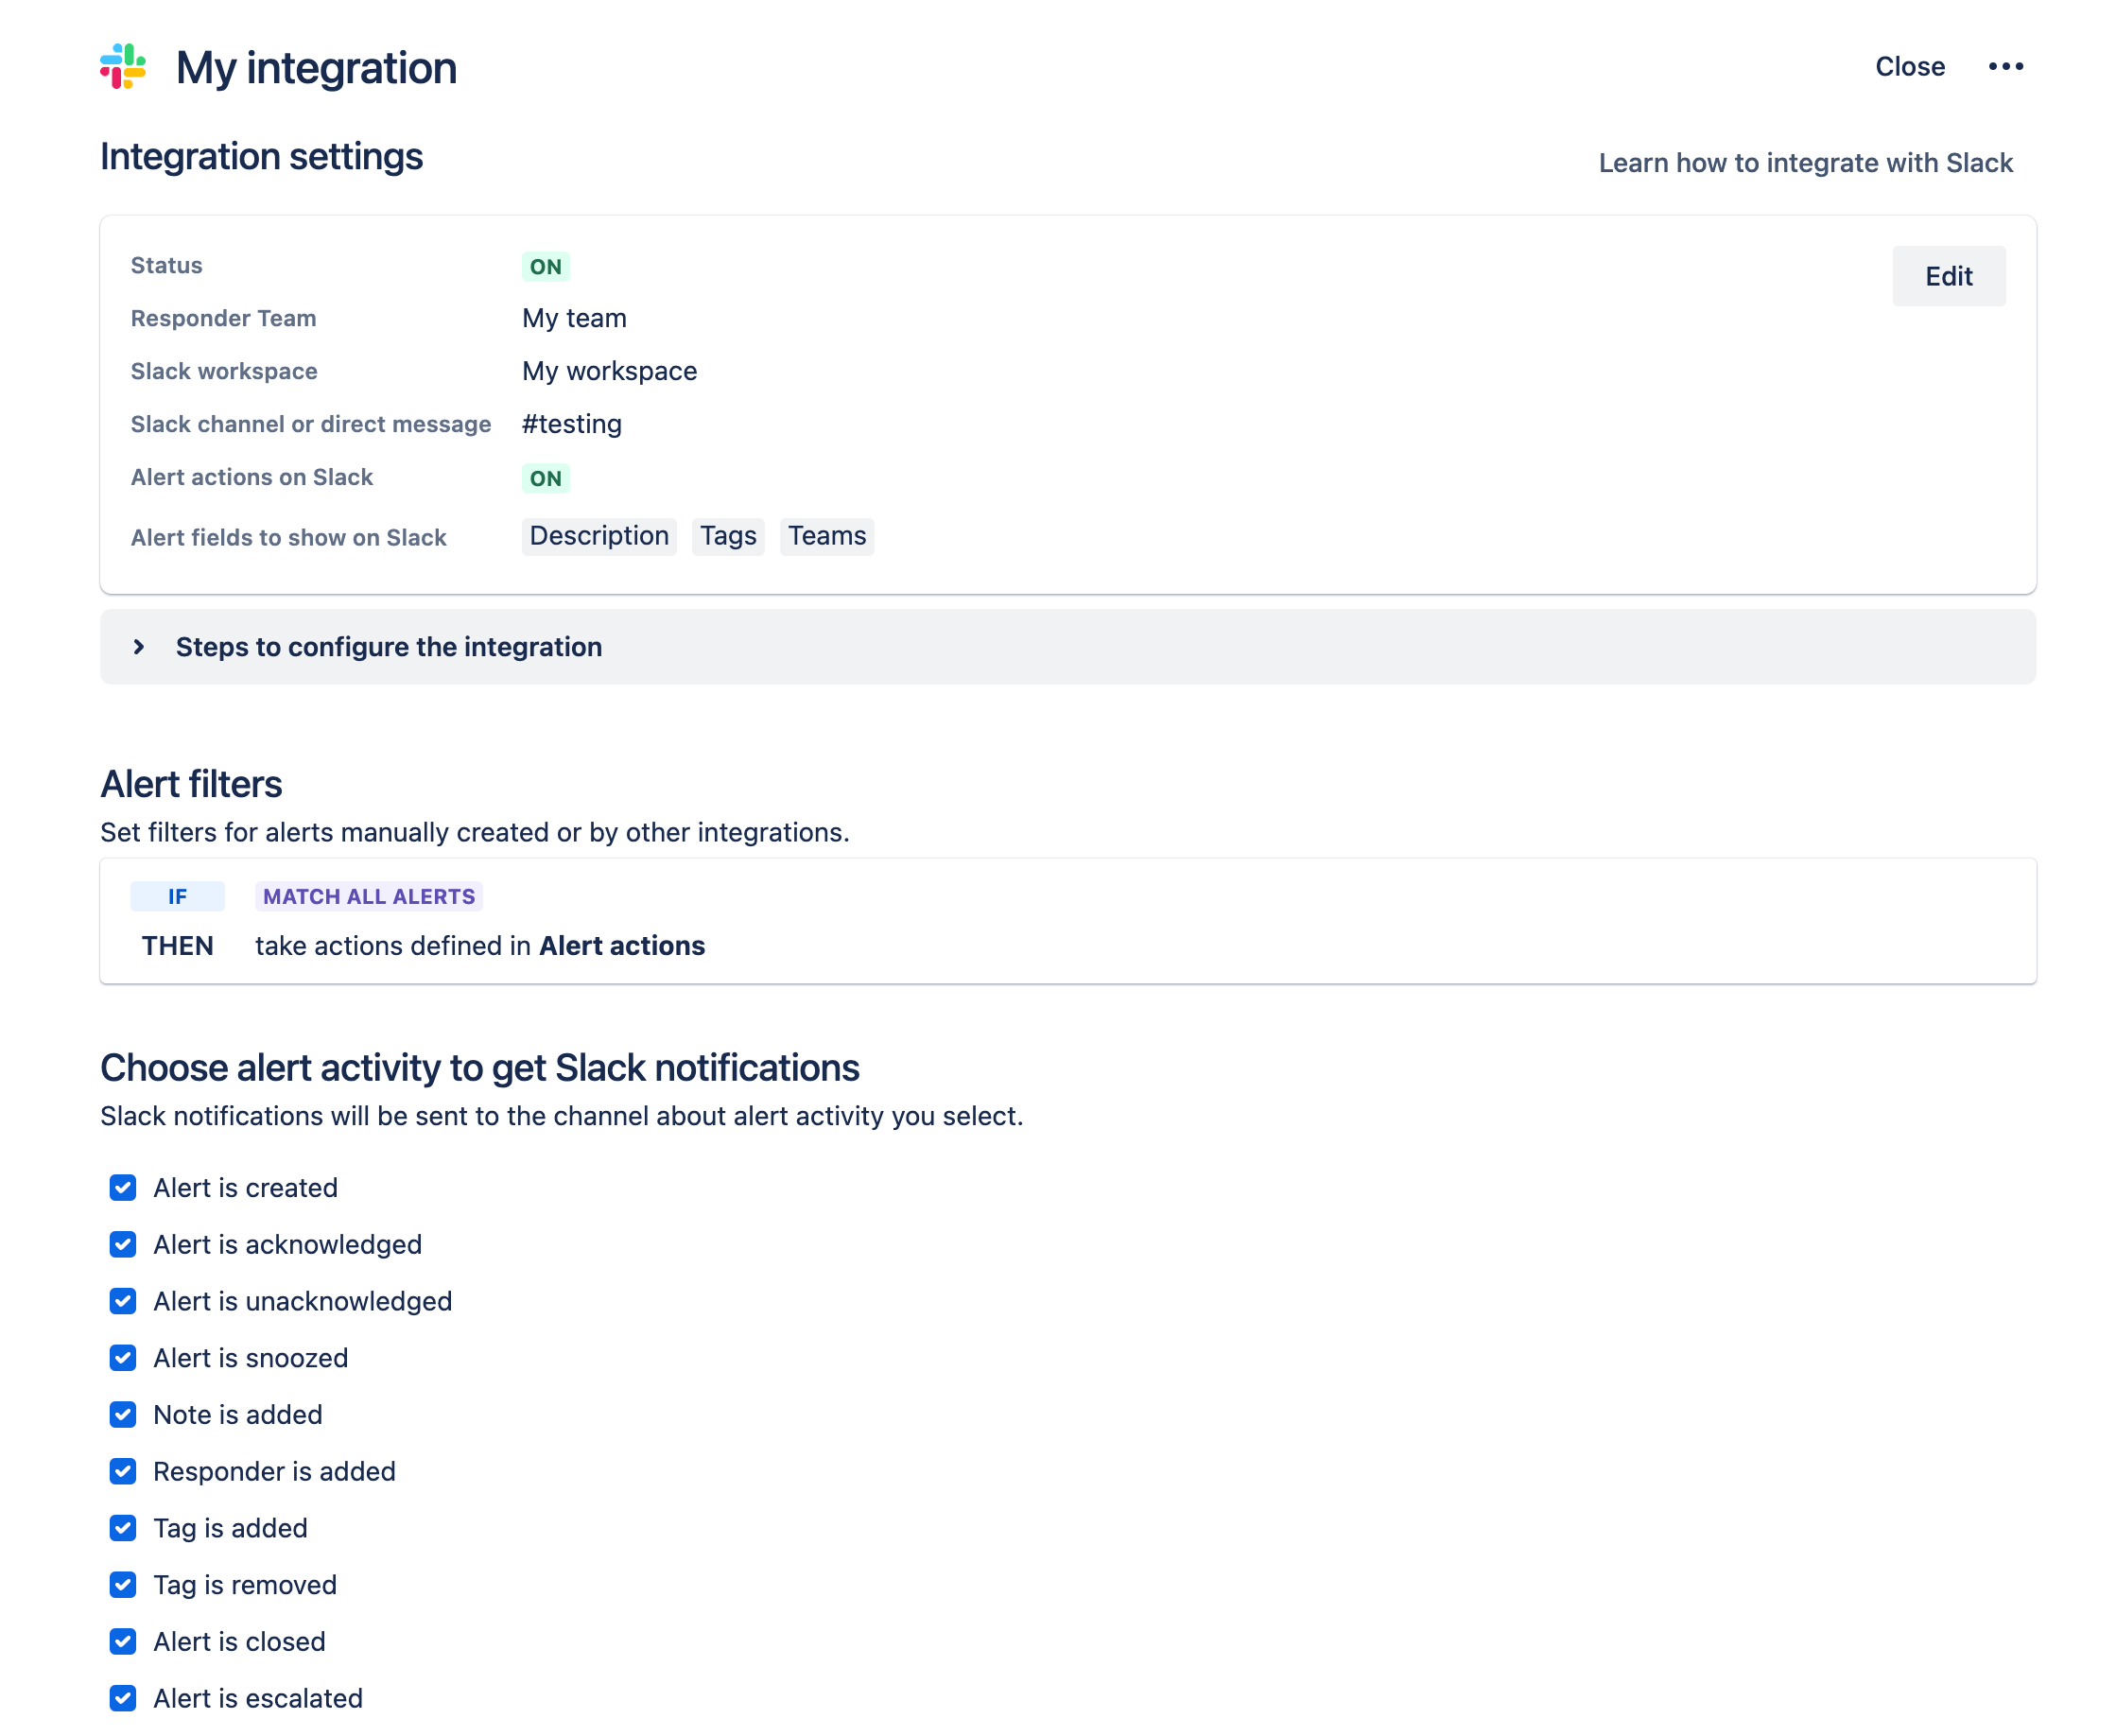
You can configure your integration as per your preferences:
- Edit integration settings to choose if alert actions show as buttons and to include additional alert fields in the incident summary sent to your chat channel.
- Add filters to receive only certain alerts. No filters are added by default.
- Select the alert activity to get notified of on your chat channel. All alert activity is selected by default.
You can add multiple integrations to streamline alert notifications. For example, you can create an integration that notifies a chat channel only about high-priority alerts, and another integration that notifies a different chat channel about low-priority alerts.
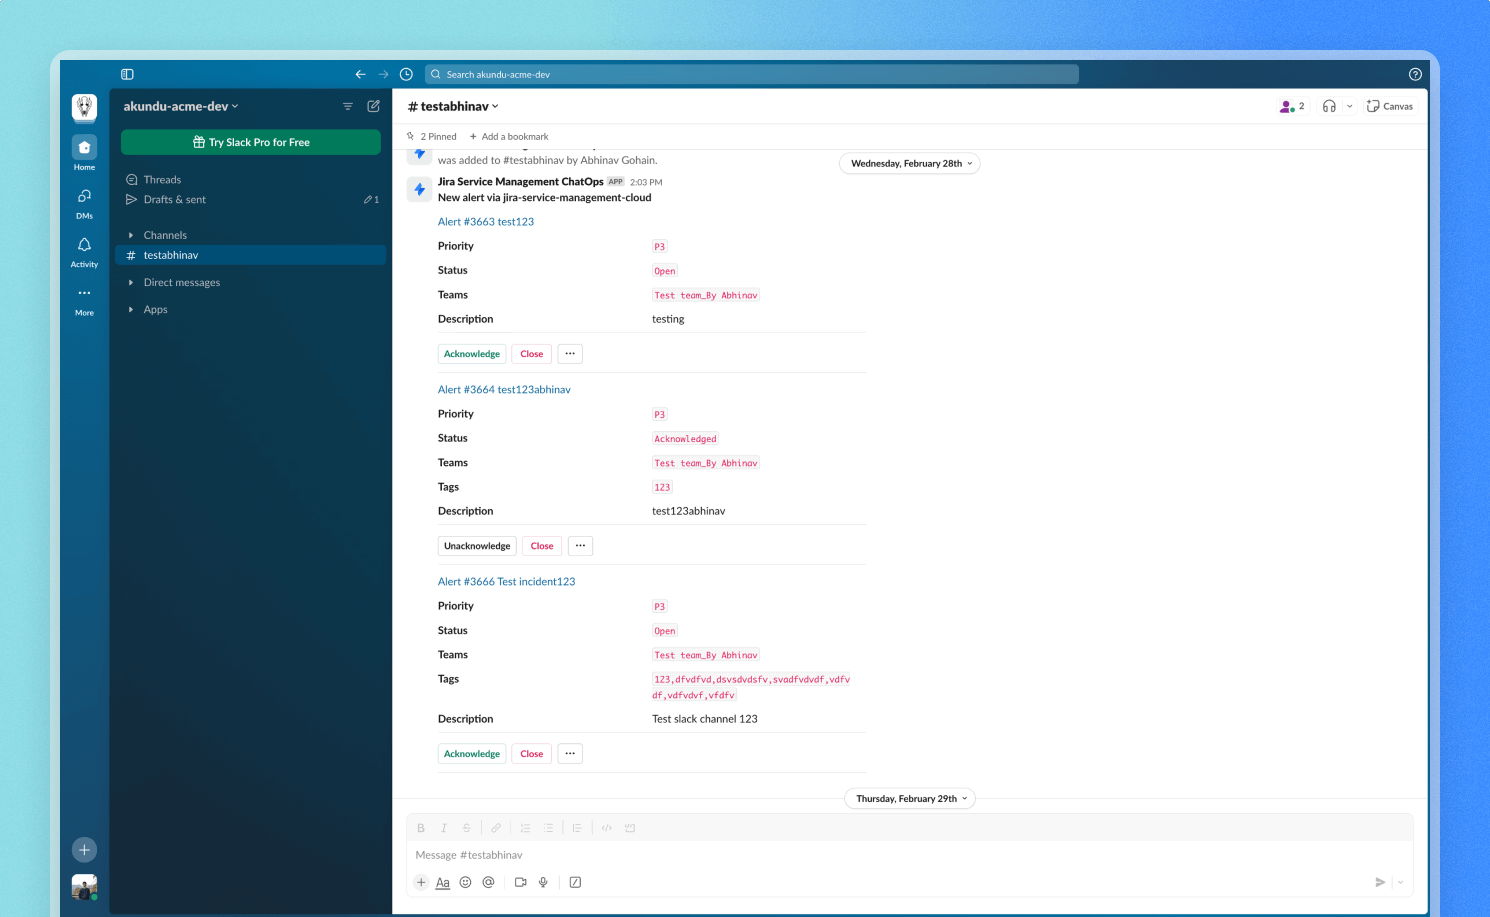
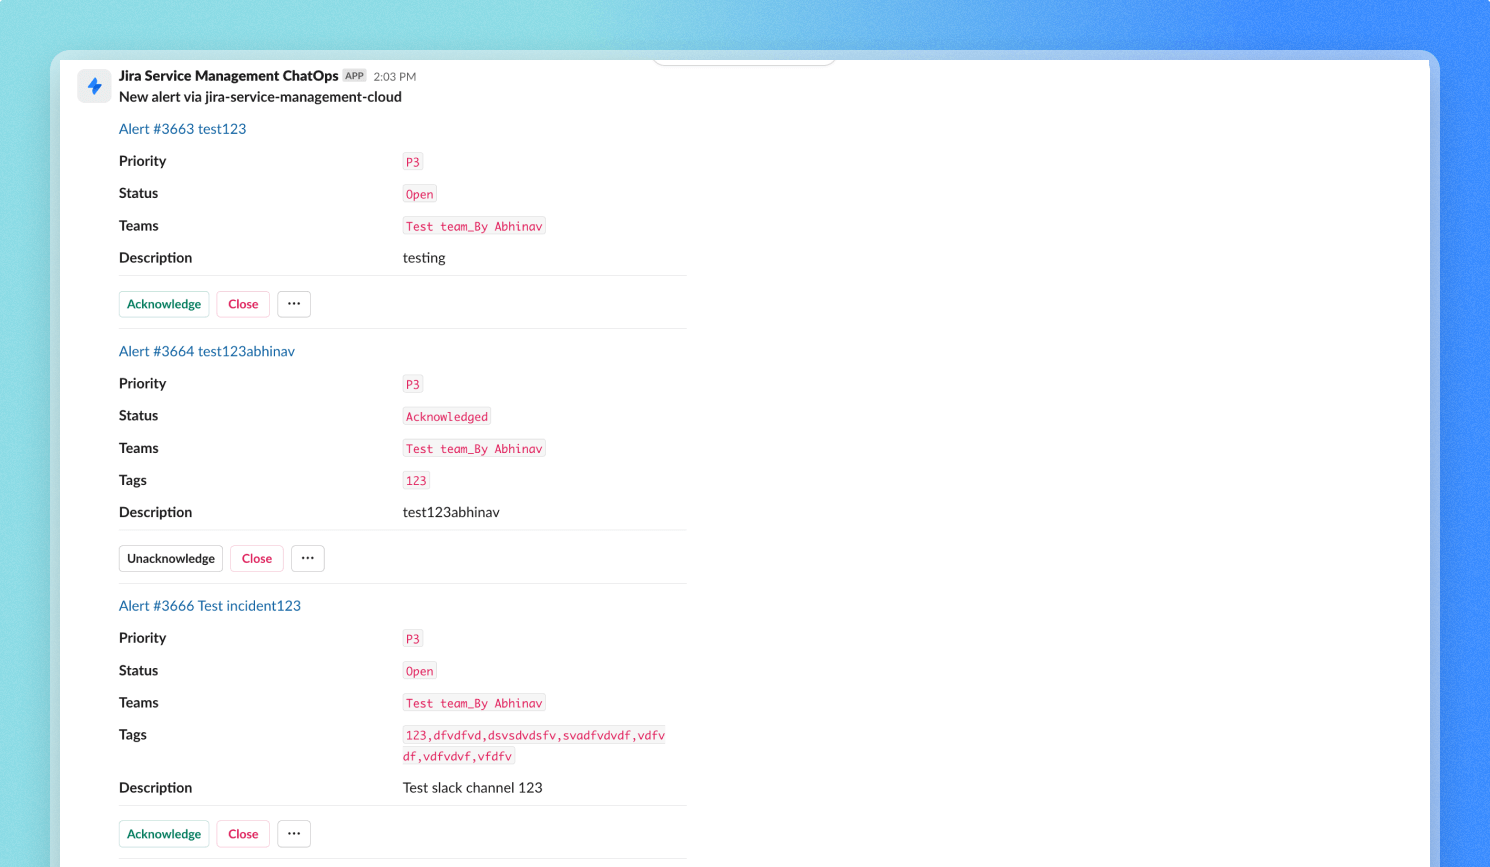
Respond to alerts using buttons and commands
BUTTONS
Use buttons to take common actions quickly on the alert in chat, without having to open it on Jira Service Management.
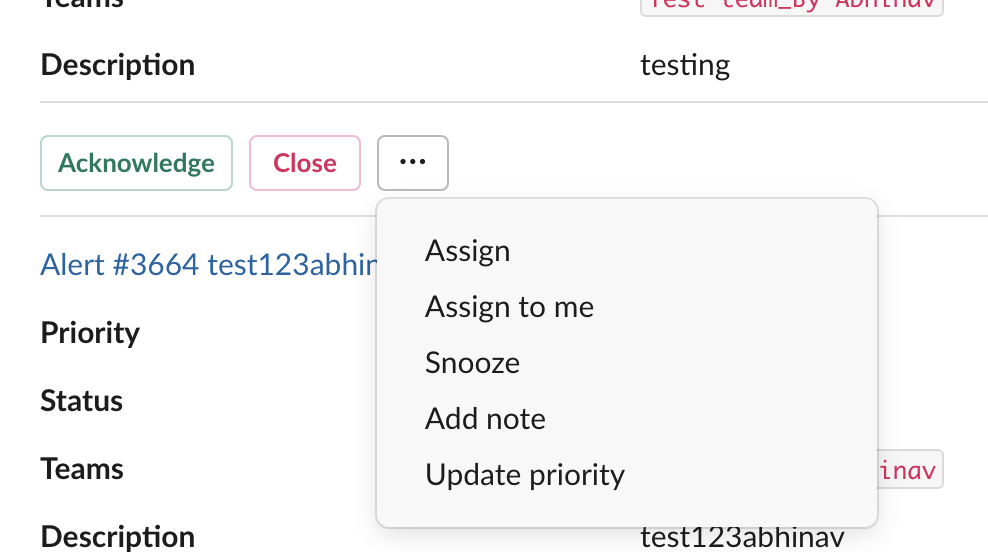
Supported actions include Acknowledge, Close, Assign, Snooze, and Update priority.
COMMANDS
Use commands to perform a lot more actions that aren’t supported via buttons.
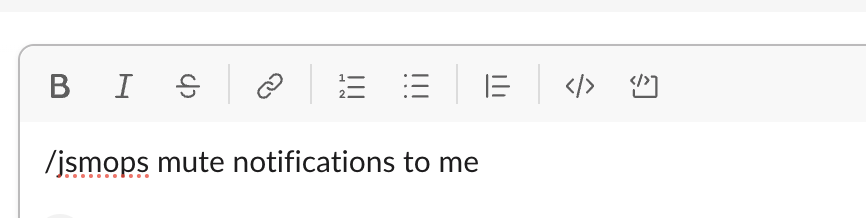
View all commands for Slack and Microsoft Teams
Советы и рекомендации
Руководство по функциям ИИ
Советы и рекомендации
Руководство по функциям виртуального агента
Советы и рекомендации
Адаптация агентов