A step-by-step guide to mapping OKRs with Jira and Confluence
Keep your team on track with objectives and key results in Jira and Confluence.
This is a guest post by Digital Toucan, an Atlassian Platinum Marketplace Partner dedicated to creating apps that bring data to life for agile teams.
Worried about how your year-long goals are progressing? Consider implementing a goal-setting system like Objectives and Key Results (OKRs) designed to help agile teams set and achieve ambitious goals. Objectives are bigger, ambitious goals that challenge your team to deliver their best. Key results break down these objectives into smaller, more manageable targets. First popularized by Google, OKRs are now widely known for their flexibility, transparency, and collaborative approach to setting the right objectives.
But introducing the right system isn’t enough to guarantee a good result. The key to successfully using OKRs is to track them closely so that you can see exactly which goals are on track and which ones aren’t – and the best way to do this is by using Jira.
At Digital Toucan, we use our app, OKR for Jira. It has templates and workflows that make it easy to track OKRs. But using an app is only one of the ways to map them. Another easy way is to use both Jira and Confluence simultaneously. We’ve gathered some of the best practices to get you started and provided a step-by-step guide to customizing your OKRs using Jira and Confluence.
OKR best practices
Here are a few tips to keep in mind before you begin your OKR journey.
- Set clear and measurable goals from the start – Set ambitious objectives, but support them with manageable key results. We recommend setting a benchmark and a target value for each key result.
- Link Jira issues to OKRs – With Jira, you can break down key results even further into issues – individual tasks assigned to team members – that can be linked to your ongoing projects. This way, the team can understand how their work contributes to wider goals.
- Do it as a team – OKRs work best when set and worked on as a team. This encourages collaboration and has a positive effect on employee engagement, as the team will be able to participate and share their ideas.
How to configure Jira and Confluence for OKRs
There are several OKR apps currently available. But if you’re an OKR newbie and would like to work with the tools you currently have, you can map your goals using a basic Jira project template along with Confluence.
Step 1: Start a new project in Jira
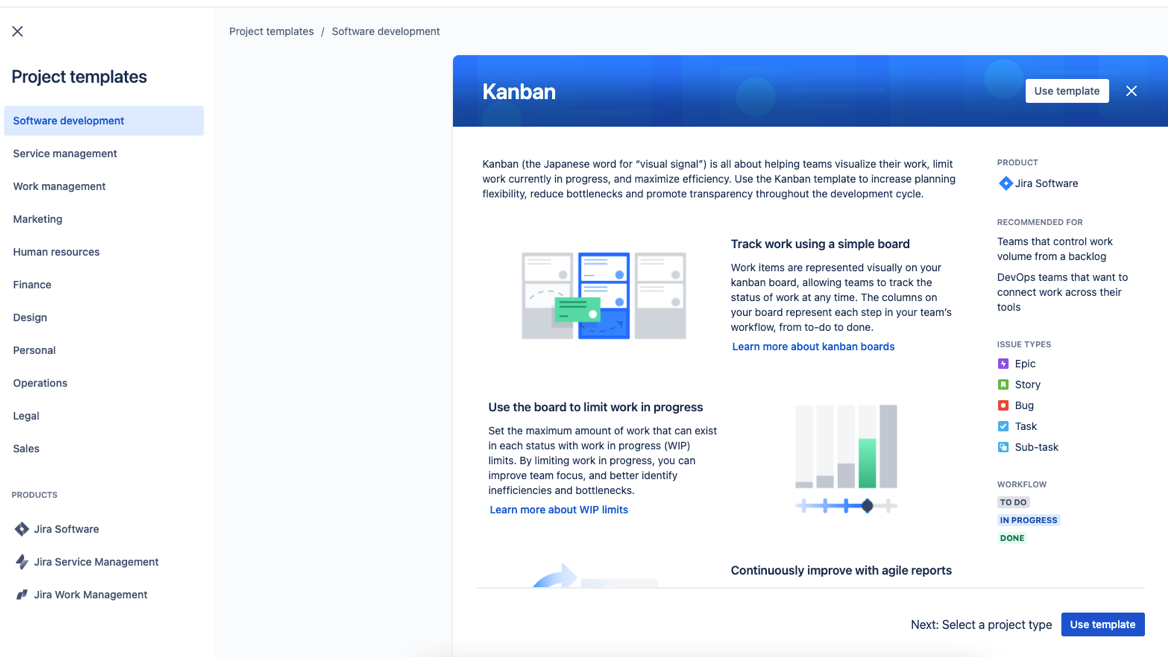
Select Create Project under the Projects tab on the top bar in Jira. We recommend the Kanban project template for its simple board and drag-and-drop features.
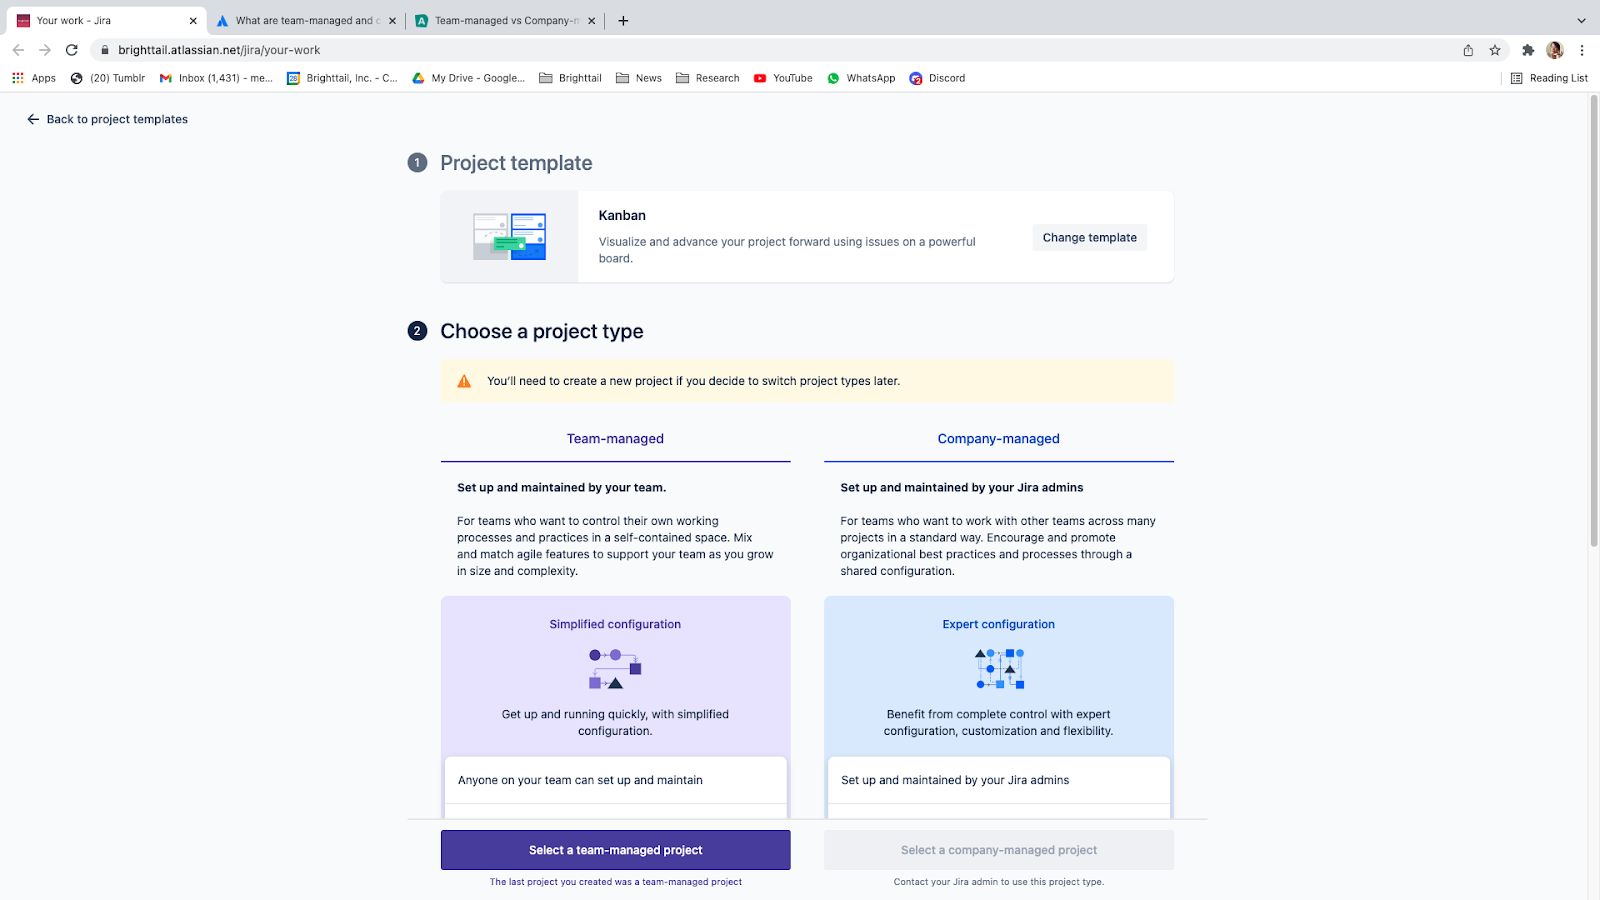
After you’ve selected a template, select one of the two project types – team-managed or company-managed. Team-managed projects are maintained by the working team. They use a simpler project configuration and don’t require the involvement of a Jira admin, making them the best choice for teams that want to have full control over their own processes and want to go at their own pace.
Company-managed projects are more complex, allowing parallel sprints and issues pulled from multiple projects. These projects allow you to have complete control over issue types and custom fields. You can even customize your workflows, statuses, and issue transitions. However, company-managed projects can only be set up and maintained by Jira admins.
Next, fill in the project’s details by including the name of the project and access level.
pro tip
Tick the option that allows you to connect repositories, documents, and more. This creates a dedicated space on Confluence that you can use to draft your OKRs and keep track of past goals. You can access connected work in the Pages, Code, or On-call tabs in your Jira project. Alternatively, you can create a page anywhere in Confluence and link that to the Jira project.
Step 2: Use epics as objectives and issues as key results
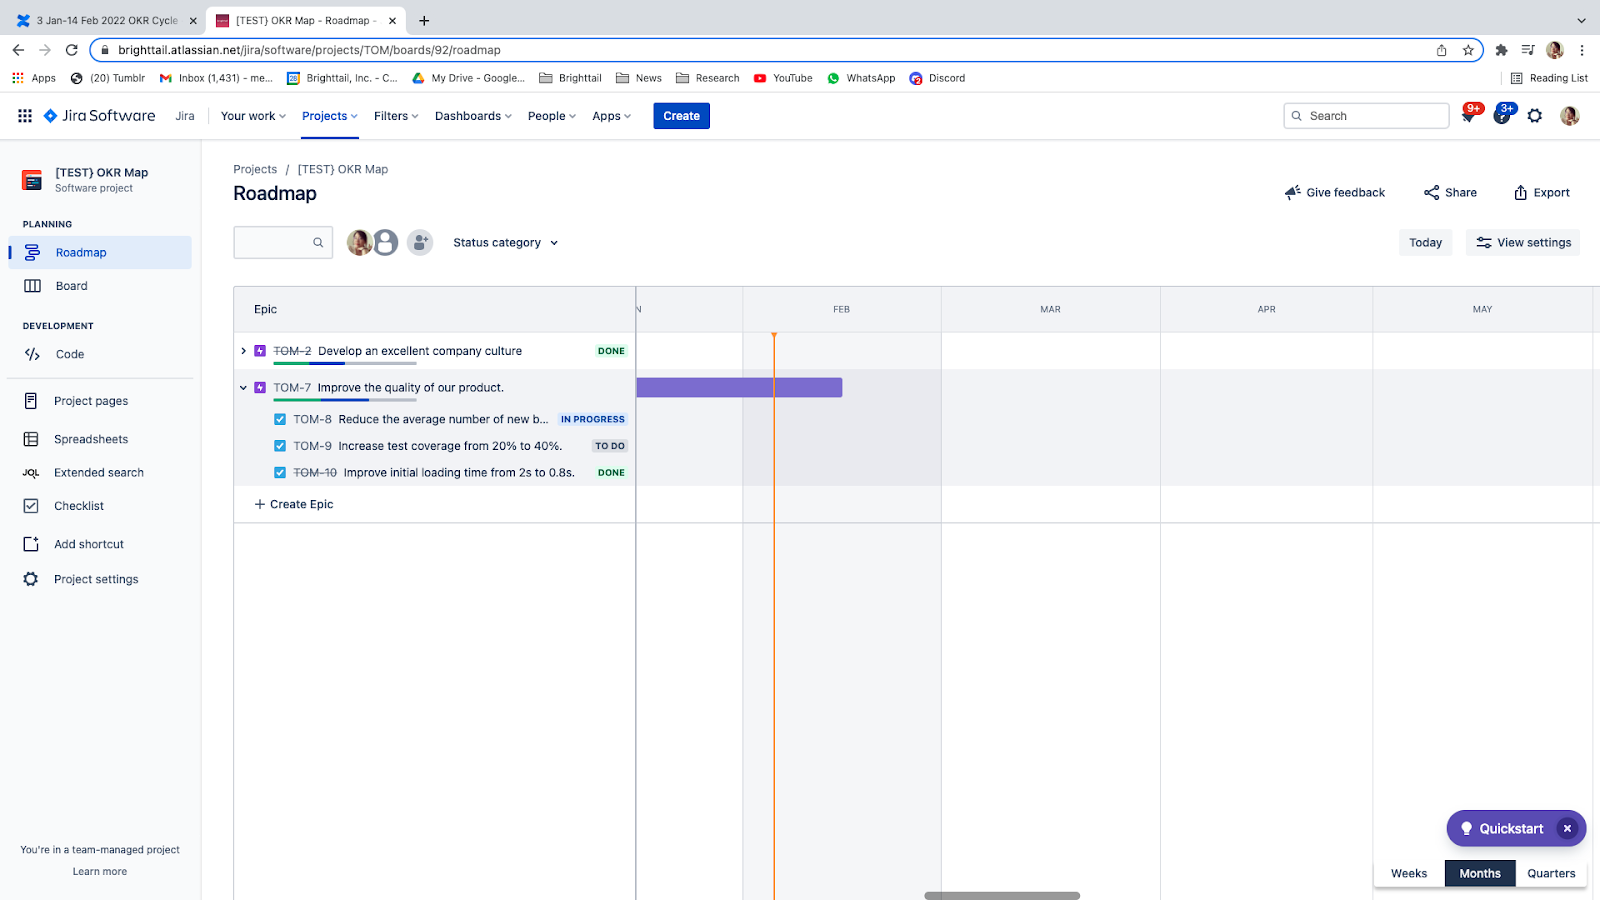
Before listing your OKRs, there are a few details you need to customize. For non-Jira admins, you can use Epics as Objectives and Tasks as Key Results. But if you’re a Jira admin, you can simply rename Epics to Objectives under Issues > Issue Types.
The Roadmap tab on the left sidebar functions as a broad overview of your OKRs. You’ll be able to see your OKR hierarchy and differentiate which key results fit under which objective. Maintaining a clear visual hierarchy is important. After all, the more visible, transparent, and updated your OKRs are, the easier it’ll be to keep them top of mind.
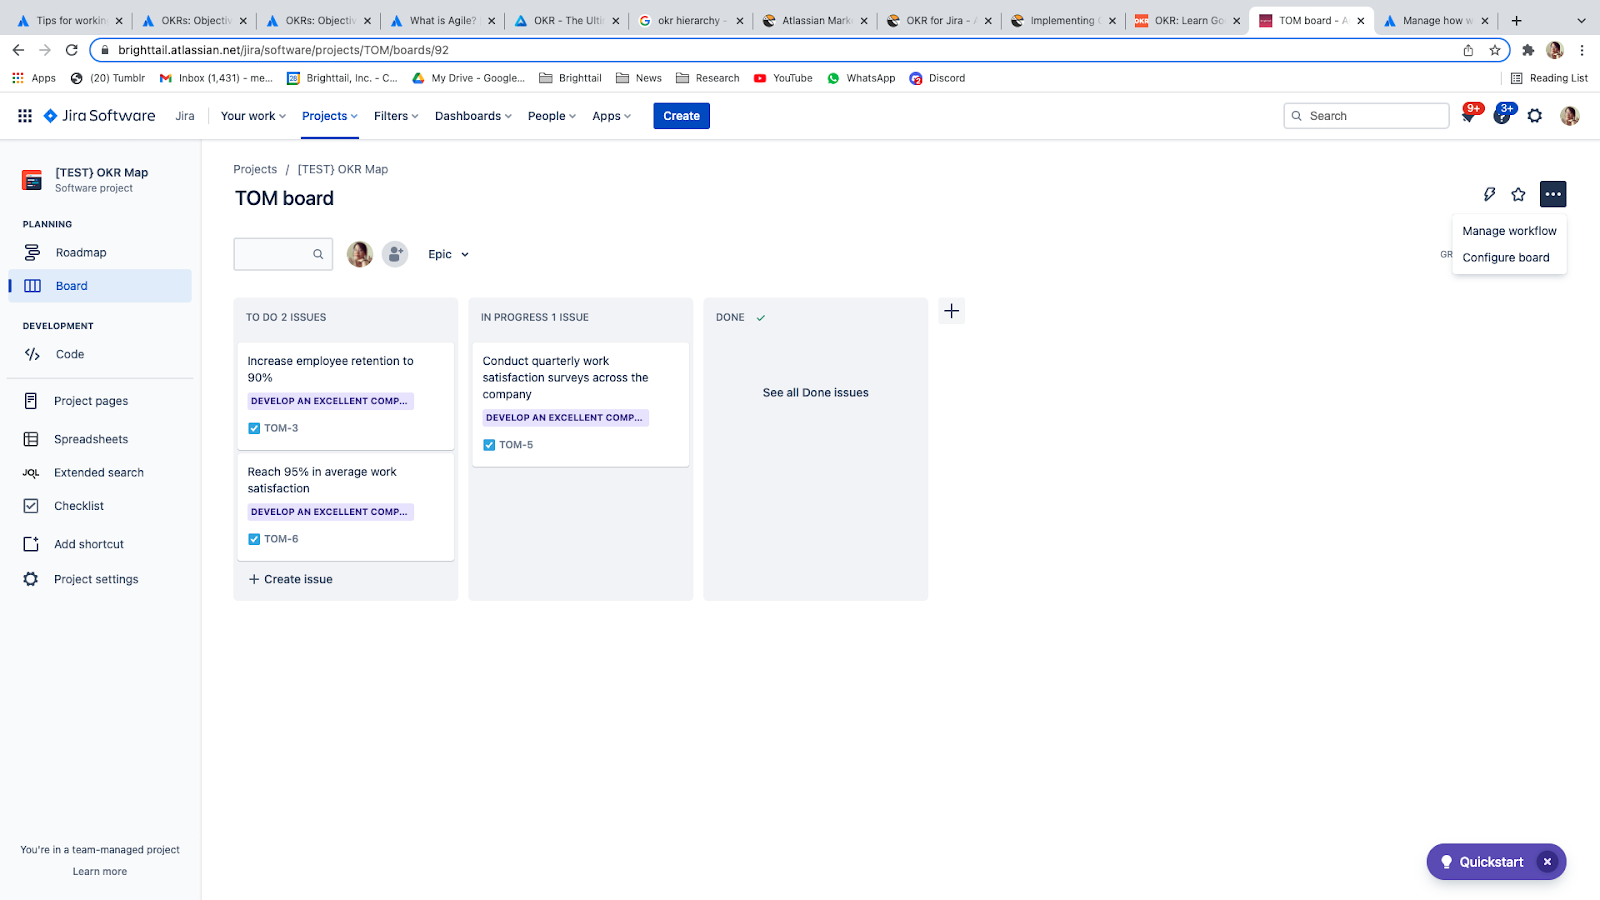
For more details on individual key results, refer to the Board tab. This is where the Kanban board feature comes in handy – you can easily drag and drop issues and tasks into their respective progress categories. You can also further customize your workflow by adding additional statuses as needed under the Configure Board option located at the top right corner.
Step 3: Create a Confluence page and link it to Jira
Jira is an excellent platform to get live updates on your current OKRs. Creating a Confluence page, however, gives you plenty of space to map out the details when planning your next OKR cycle.
If you selected the option to create a Confluence space when creating a Jira project in step one, you can use that space. If not, you can simply create a new space in Confluence by going to the Project pages tab and selecting the option to create a page. This will automatically link your Confluence page to the Jira project.
Although most Confluence pages start out blank, you don’t have to spend time creating an OKR chart from scratch. Confluence has a template for OKRs – use this as a base if you’re not sure how to start. You can find this under More templates, then scroll down to the OKRs option.

Step 4: Populate your page
The Confluence template uses a simple table format for you to list your team’s objectives, key results, and owner, as well as a basic scoring criterion.
Fill out your objectives, key results, and timeline with as much detail as possible.
Remember to tag the owner for each OKR in the space provided. This will serve as a reminder to be accountable for your OKRs.
pro tip
Tag each cycle with a different label (such as Jan21cycle) to keep everything organized. This will also help you easily filter your backlog. You can do this by assigning labels to each task on Jira under Details.
Step 5: Create issues in Jira based on the Confluence page
You can create issues in Confluence by either including the link to existing epics or issues in Jira, or you can highlight the line in the Confluence table and select Create Issue that appears above the highlighted portion. Make sure you select the correct project and issue type.
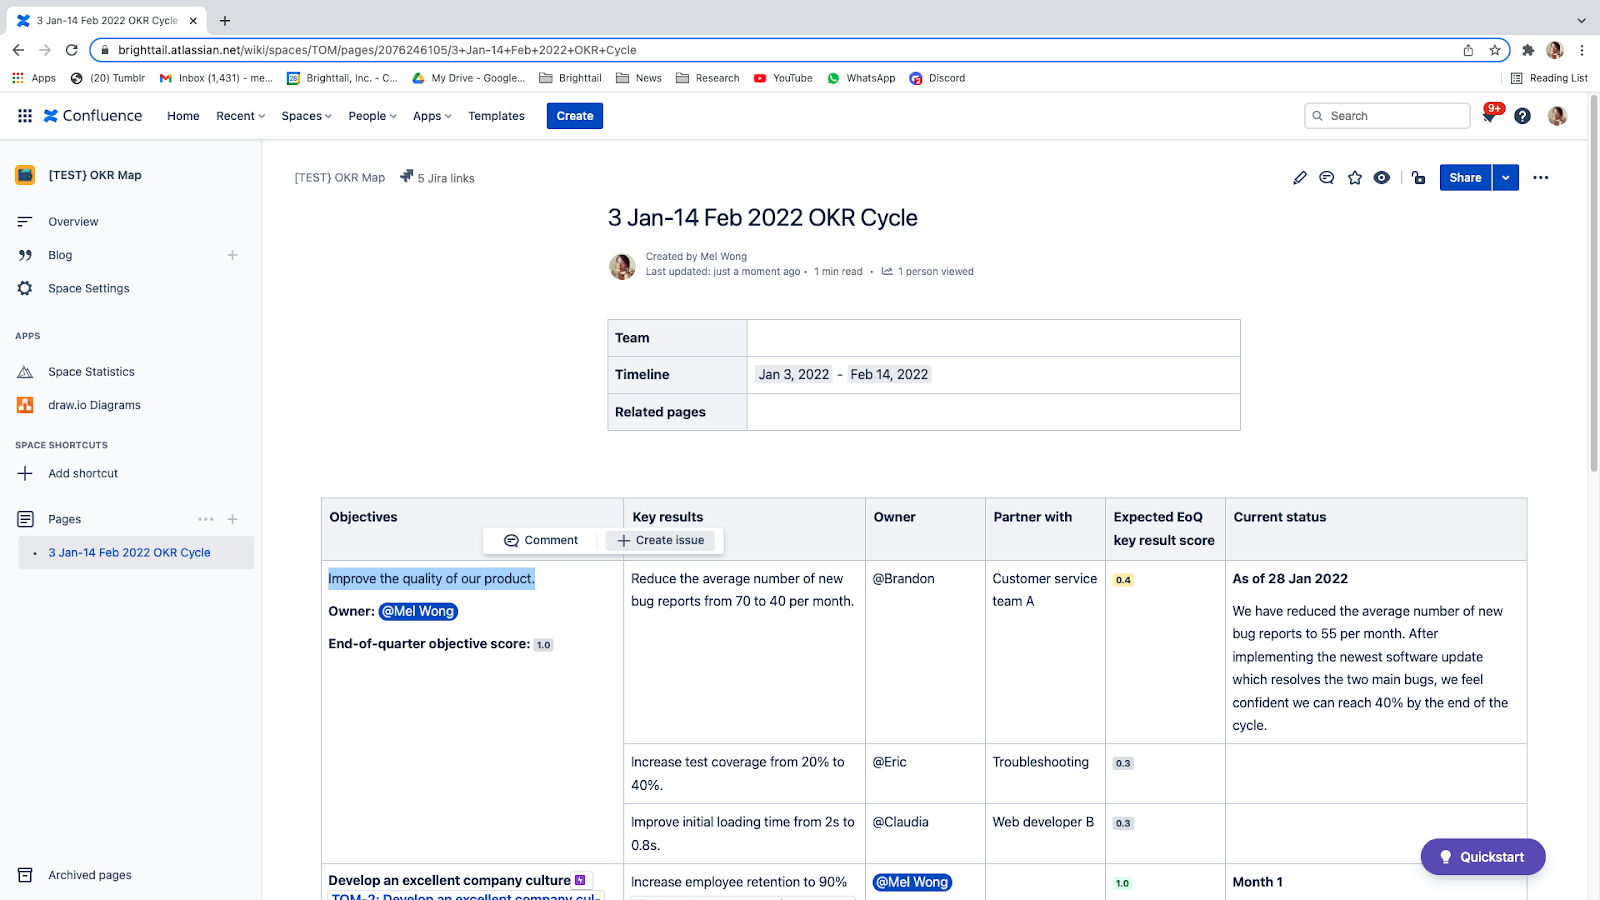
Create issues for all the OKRs. This will help you see the status of each OKR (whether it is listed as To-do, In Progress, or Done) directly in Confluence. If done correctly, you should be able to see the list of objectives, key results, and issues on the Roadmap tab in the Jira project.
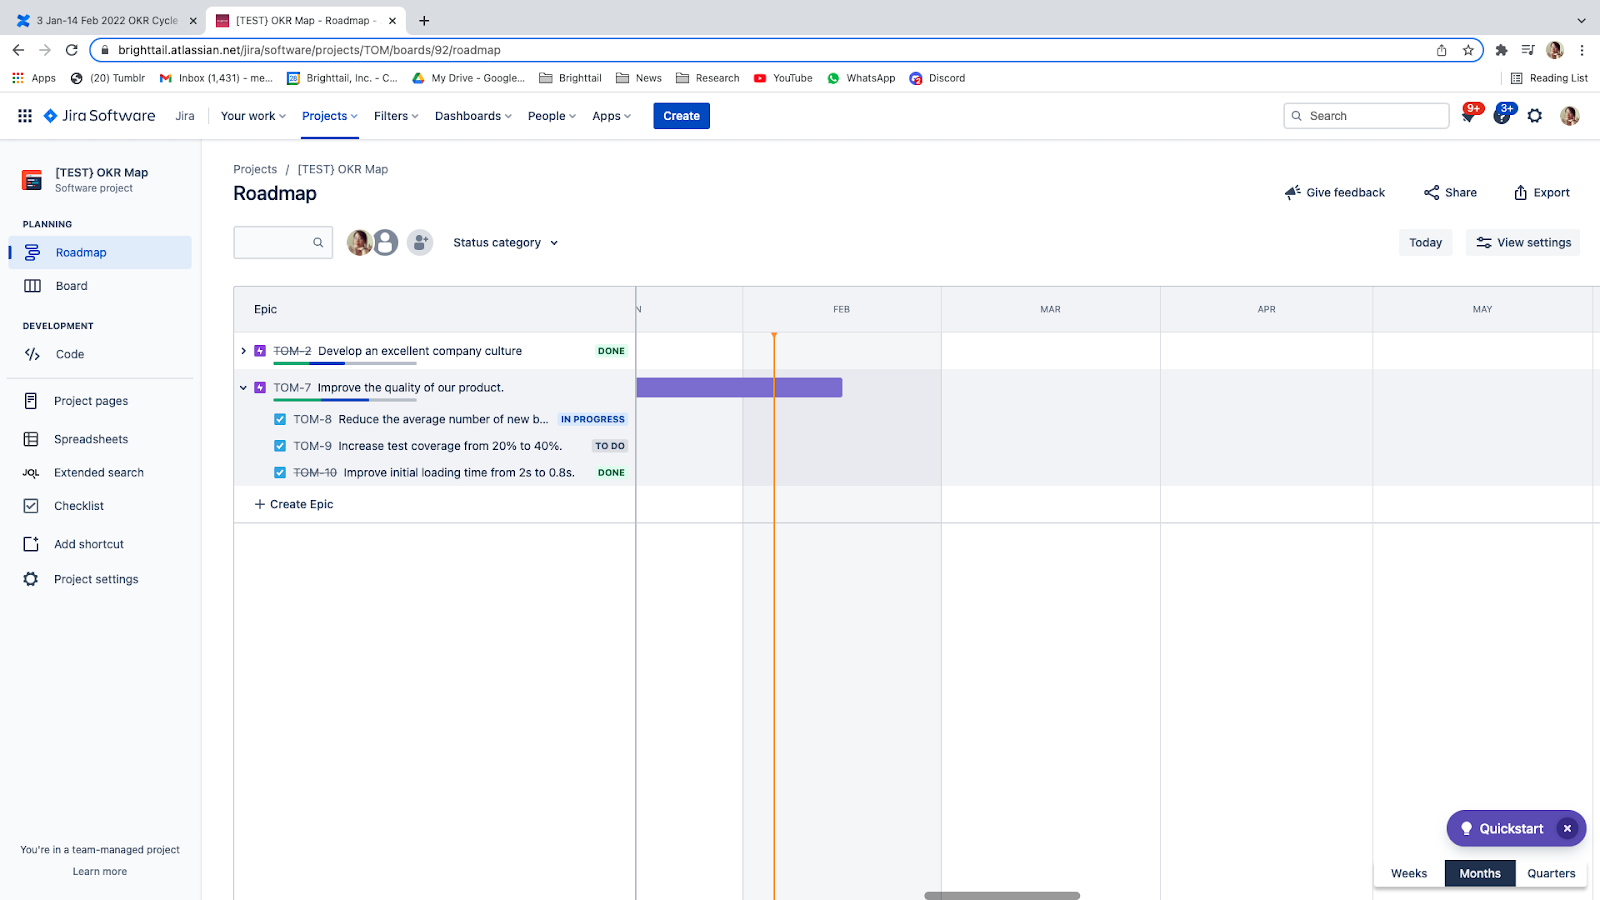
Check that the right key results are assigned to their respective parent objectives. If you created issues from Confluence, your key results may not be assigned to an objective. To fix this, go to your Board where you’ll find a full list of tasks. Assigned tasks will have the name of their objective (epic) highlighted in purple.

If there are specific tasks that must be done to complete a key result, you can add child issues under each one. For example, if your key result is to increase test coverage of your software to 40%, one of your tasks would be performing stress tests to determine a baseline. Running a stress test is an example of a child issue that can be added to Jira as a way to link tasks assigned to team members and their OKRs.
In the detailed task view, select Add a Child Issue at the top to see the child issue menu. You can either select an existing issue or create a new one by typing the new issue into the child issue field and then selecting Create.
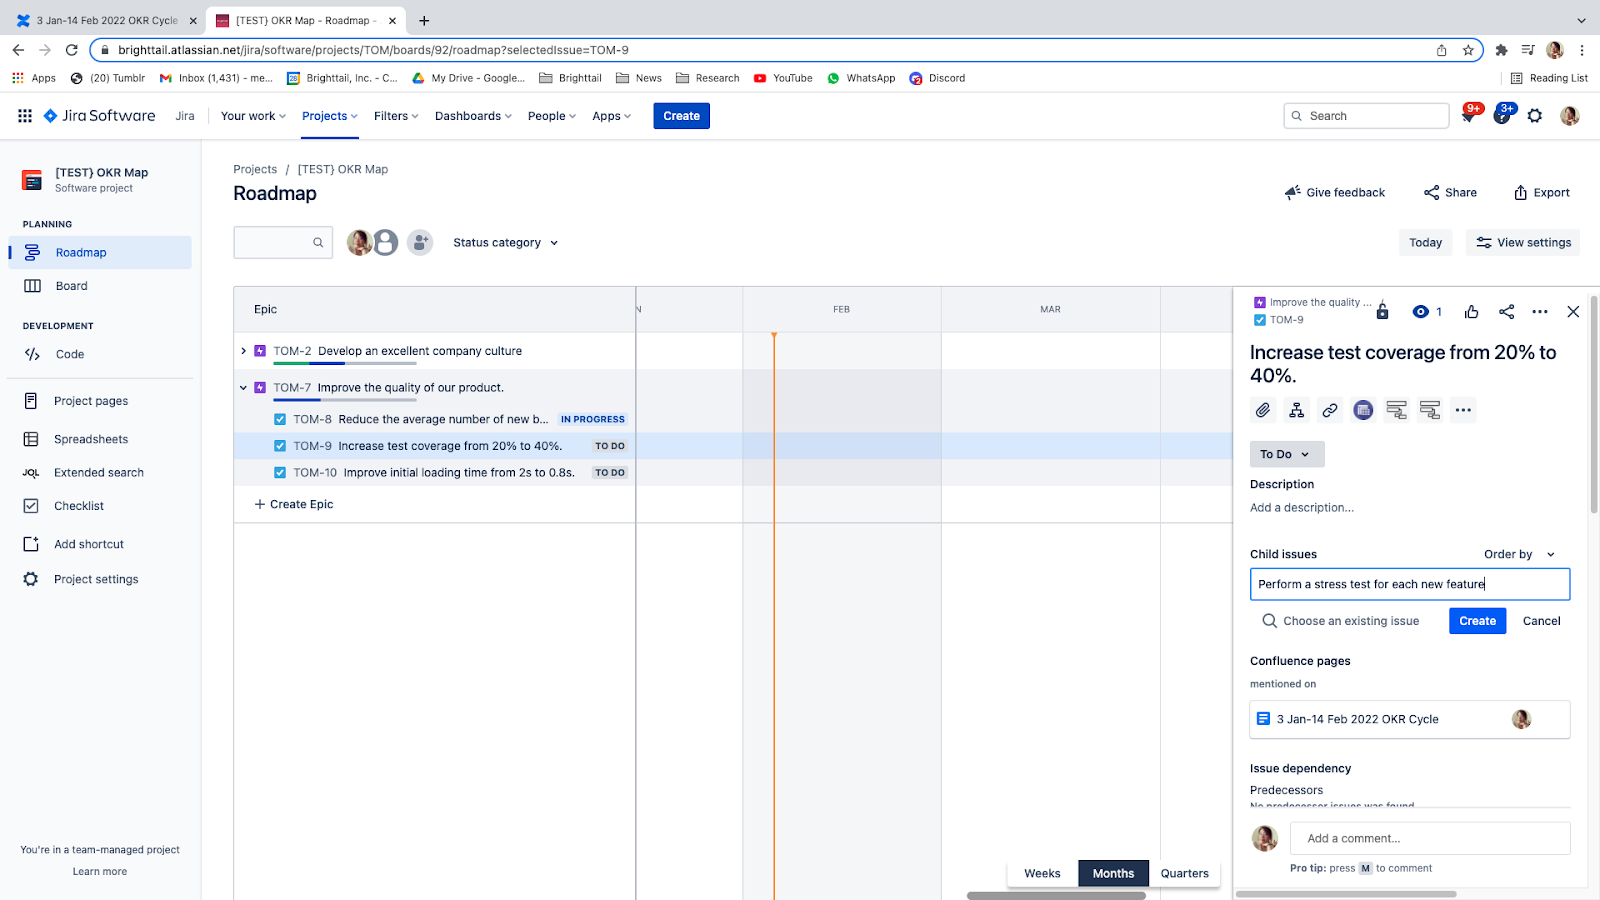
You can also link your OKRs to other Jira issues from other projects by clicking Link issues, web pages, and more.
Step 6: Update your tasks in Jira
The Confluence page will act as a summary report and will automatically update each time a Jira task is moved from To Do to In Progress and Done.
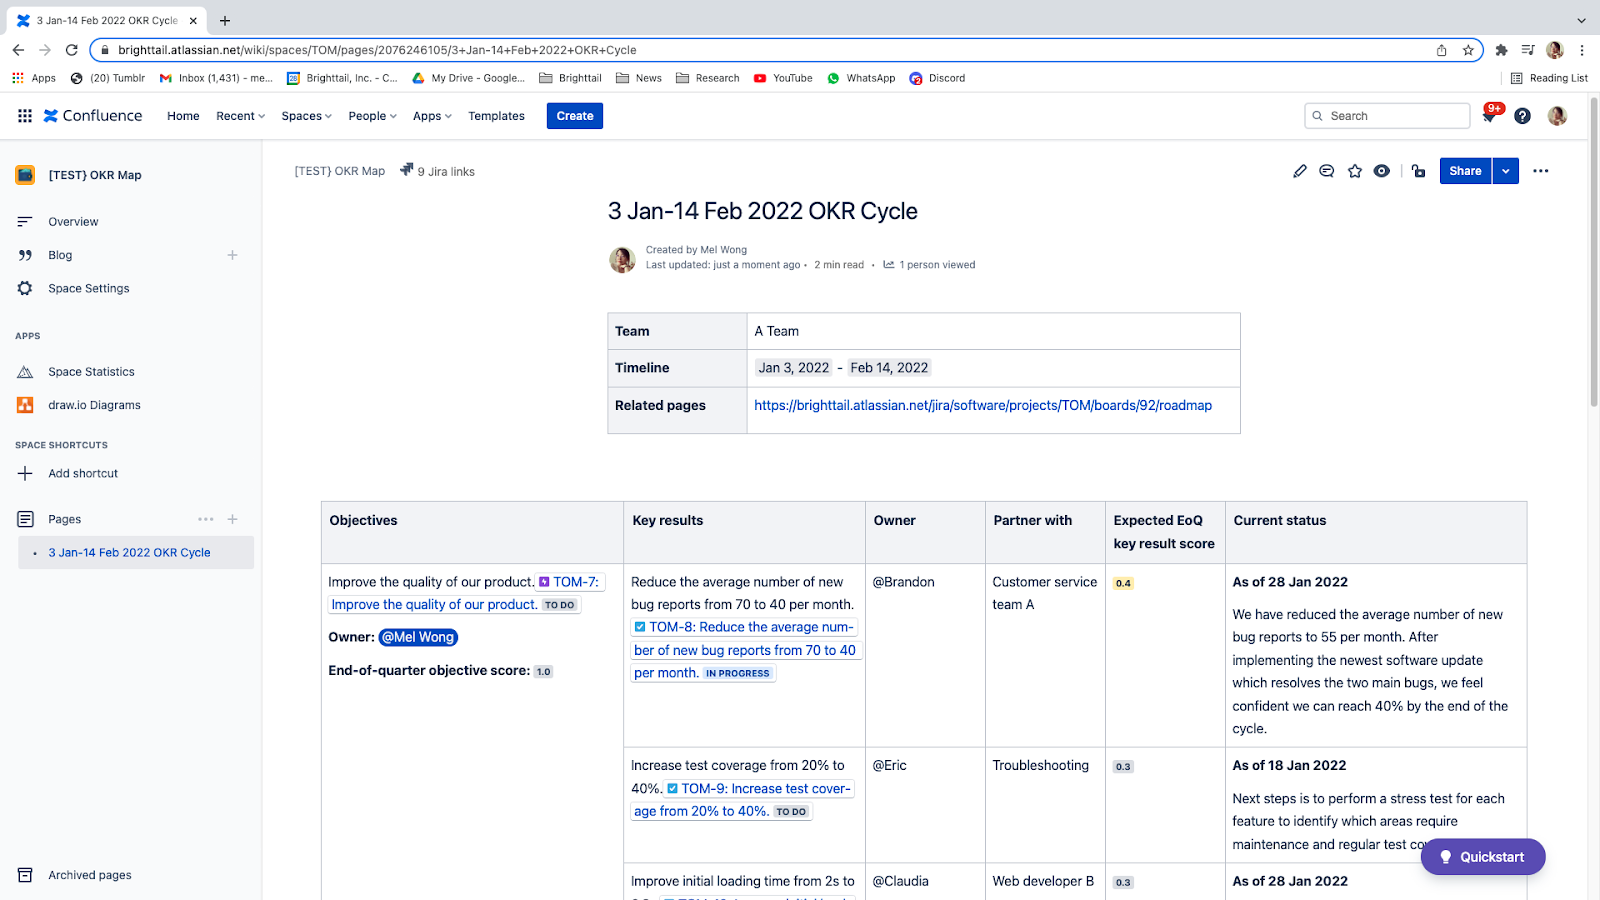
Also, note that whatever updates you make to the current status column on Confluence won’t be reflected in Jira.
Start tracking OKRs today
While there are other ways to track OKRs in Jira, configuring a Jira board to track objectives and key results is the best way without having to download additional apps. However, apps like OKR for Jira also make it easy to track them directly in Jira using prepared templates and customizations. OKR for Jira can also create a shared dashboard that’s complete with a progress tracker and timeline so that you can see how each objective is progressing throughout its cycle.
This is a guest post by Digital Toucan, an Atlassian Platinum Marketplace Partner dedicated to creating apps that bring data to life for agile teams.


