
Flux step by step
Facebook has recently presented a new way to compose applications, an application architecture they named Flux. They reported that as modern web applications grow in complexity, this model eases the maintenance and the cognitive load required to develop them.
I jumped in excitement (it’s true!) as I immediately saw the beauty of the model. But I wanted to understand it and confirm my intuition and itch about it. I am a tinkerer at heart so with this tutorial I share my current understanding and draw some conclusions on Flux. (This material will skip some details on React, the web framework that covers the presentation side of the model).
I’ll create a Flux application from scratch – borrowing the initial skeleton copiously from one of the examples, the neat web-chat app.
The code there is readable and well organised but how do you start from scratch with Flux? That’s where my humble guide fits in.
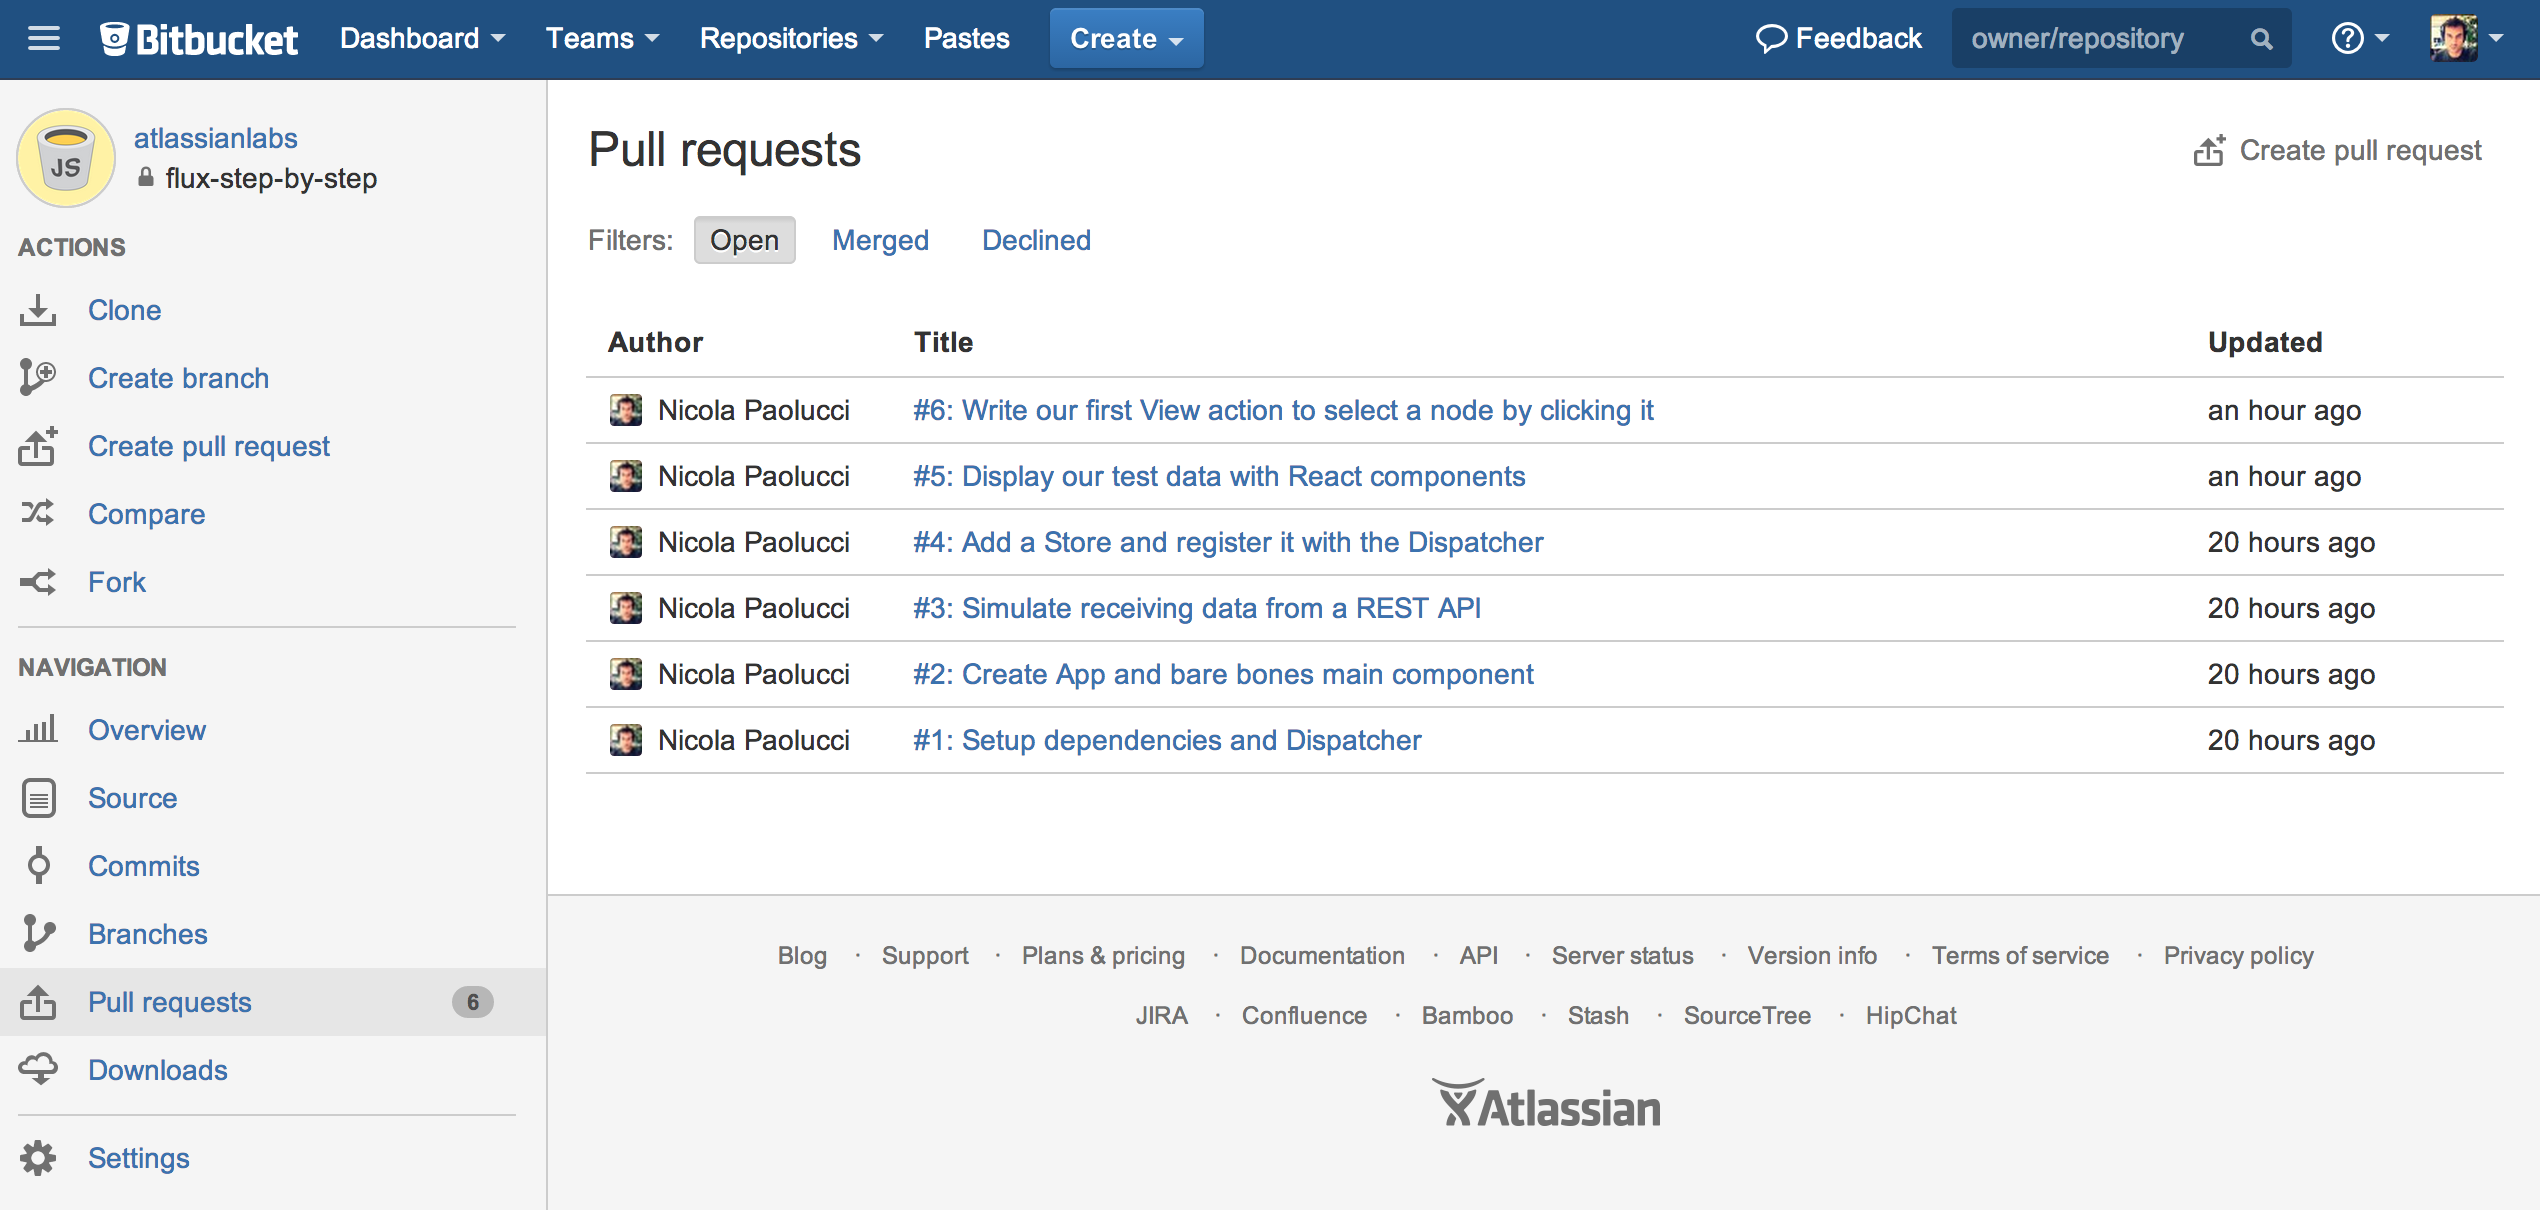
In the following you’ll be able to follow along and inspect the code as it evolves by looking at the pull requests I prepared on Bitbucket for each step.
For the impatient (I know you’re there!), here is the finished prototype, as it would stand at the end of this tutorial (with full source). And here is where it got with a few more nights and weekend hacking:
Flux mandates a uni-directional data flow
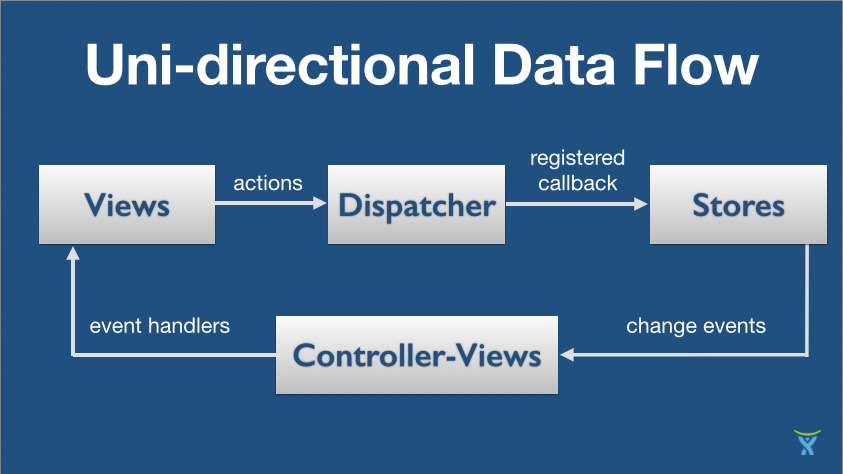
What is Flux? At its core the main concept in Flux is a directed loop, a uni-directional data flow where events and data proceed always in the same direction. This makes everything “easier to manage as it gets more complex” and removes a lot of ambiguities on the relation of the various components.

Starting from scratch
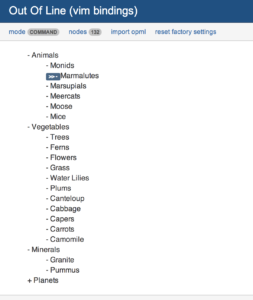
As an example application, to get familiar with the model, I decided to work on an Outline editor. Without further ado, let’s start!
Step 0: Setup dependencies and Dispatcher
You’ll obviously need node and npm installed before we proceed.
The minimal dependencies are stored in package.json and are small:
{

"name": "out-of-line",

"version": "0.0.1",

"description": "Outline Editor that uses Reactjs and the Flux architecture",

"main": "js/app.js",

"dependencies": {

"react": "~0.11"

},

"devDependencies": {

"browserify": "~4.2.2",

"envify": "~2.0.1",

"jest-cli": "~0.1.17",

"reactify": "~0.14.0",

"statics": "~0.1.0",

"uglify-js": "~2.4.15",

"watchify": "~0.10.2"

},

"scripts": {

"start": "STATIC_ROOT=./static watchify -o js/bundle.js -v -d .",

"build": "STATIC_ROOT=./static NODE_ENV=production browserify . | uglifyjs -cm > js/bundle.min.js",

"collect-static": "collect-static . ./static",

"test": "jest"

},

"author": "Nicola Paolucci",

"license": "Apache 2",

"browserify": {

"transform": [

"reactify",

"envify"

]

},

"jest": {

"rootDir": "./js"

}

}
The devDependencies allow us to easily watch our working directory for changes (with npm start), build the application, run the tests using jest. I am following Flux’s example toolkit this time and so I am using browserify for this.
Now we can install the dependencies by typing npm install in the root folder
and watch for live changes as we code with npm start.
At the very start of our effort we need the absolute bare minimum. An index.html page which loads our minified bundle.js – built with browserify – and we don’t even care about CSS at this moment.
The index.html is scarily bare:
〈!doctype html〉

〈html lang="en"〉

〈head〉

〈meta charset="utf-8"〉

〈title〉Out Of Line〈/title〉

〈/head〉

〈body〉

〈section id="react"〉〈/section〉

〈script src="js/bundle.js"〉〈/script〉

〈/body〉

〈/html〉
Add Flux’s Dispatcher
Final prerequisite is to add to our project Flux’s Dispatcher.js and invariant.js (you can take them from here).
We extend the generic Dispatcher with our own action categories. Let’s create an AppDispatcher.js in the dispatcher folder like so:
var Dispatcher = require('./Dispatcher');

var copyProperties = require('react/lib/copyProperties');

var AppDispatcher = copyProperties(new Dispatcher(), {

  /**
   * @param {object} action The details of the action, including the action's
   * type and additional data coming from the server.
   */
  handleServerAction: function(action) {
    var payload = {
      source: 'SERVER_ACTION',
      action: action
    };
    this.dispatch(payload);
  },

  /**
   * @param {object} action The details of the action, including the action's
   * type and additional data coming from the view.
   */
  handleViewAction: function(action) {
    var payload = {
      source: 'VIEW_ACTION',
      action: action
    };
    this.dispatch(payload);
  }

});

module.exports = AppDispatcher;
The Dispatcher will be the Nexus through which all activity goes through: Views will emit actions – which the Dispatcher will redistribute to the Stores who subscribe to those. Stores in turn will fire change events which will be captured by the Views so that they can update themselves.
Take a moment to check out our starting code above, I bundled it in a pull request on Bitbucket for your convenience.
Step 1: Create App and bare bones main component
Now let’s get on with our first React component. It will be slightly bare bones at the start. Let’s create it in the js/components folder and call it App.react.js:
var React = require('react');

var App = React.createClass({

  render: function() {
    return (
      〈div className="outlineapp"〉I am satisfied
      〈/div〉
    );
  }

});

module.exports = App;
We can now create the entry point of our application and save it in js/app.js:
var App = require('./components/App.react');
var React = require('react');

React.renderComponent(
  〈App /〉,
  document.getElementById('react')
);
If you need pointers on the code above have a look at the React Tutorial.
Step 2: Simulate receiving data from a REST API
Every user initiated change in the UI is communicated to the Dispatcher via an action (stored in js/actions). The same goes for server-side events, any data coming from a REST end-point can fire an action to the Dispatcher.
Before we can display our outline we need to create some sample data, code a way to fire an action when data arrives from the server, (and simulate we have a REST API to invoke to retrieve the data). To keep things simple we’ll start by storing the data in Localstorage:
js/actions/OutlineServerActionCreators.js
var AppDispatcher = require('../dispatcher/AppDispatcher');

module.exports = {

  receiveAll: function(rawNodes) {
    AppDispatcher.handleServerAction({
      type: "RECEIVE_RAW_NODES",
      rawNodes: rawNodes
    });
  },

};
We simulate a REST API endpoint in js/utils/OutlineWebAPIUtils.js:
var OutlineServerActionCreators = require('../actions/OutlineServerActionCreators');

module.exports = {

  getAllNodes: function() {
    // simulate retrieving data from a database
    var rawNodes = JSON.parse(localStorage.getItem('nodes'));

    // simulate success callback
    OutlineServerActionCreators.receiveAll(rawNodes);
  }

};
js/app.js changes now so that we can create the temporary data and pretend we are immediately receiving data from our REST API:
var App = require('./components/App.react');
var OutlineStartingData = require('./OutlineStartingData');
var OutlineWebAPIUtils = require('./utils/OutlineWebAPIUtils');
var React = require('react');

OutlineStartingData.init();

OutlineWebAPIUtils.getAllNodes();

React.renderComponent(
  〈App /〉,
  document.getElementById('react')
);
Test sample starting data I just created in js/OutlineStartingData.js and the pull request with the updates above is here.
Step 3: Add a Store and register it with the Dispatcher
So now we have some test data, a pretend REST API end-point that can populate our app initially. Going around the loop of the Flux architecture, when an action hits the Dispatcher, the Stores listening to those actions update their internal structures and fire events to the Views.
It’s time to create our Store, which will be maintaining a local up-to-date version of the data.
Our Store will have three distinct sections:
- Private name-space variables to hold the up-to-date data in memory
- A way for Views to listen to changes to the store and access the data
- A final section to register the store with the Dispatcher, returning a token that can be used for synchronisation with other Stores
Let’s see these sections in detail:
Let’s write js/stores/OutlineStore.js. It extends EventEmitter.
Because we only export OutlineStore from this module, the variable _nodes, which will hold our data, will be private and unaccessible from outside the module if not via a cleanly defined interface:
var AppDispatcher = require('../dispatcher/AppDispatcher');
var EventEmitter = require('events').EventEmitter;
var merge = require('react/lib/merge');

var CHANGE_EVENT = 'change';

var _nodes = {};
Allow Views to be notified when a change happen on the Store:
var OutlineStore = merge(EventEmitter.prototype, {

  emitChange: function() {
    this.emit(CHANGE_EVENT);
  },

  /**
   * @param {function} callback
   */
  addChangeListener: function(callback) {
    this.on(CHANGE_EVENT, callback);
  },

  get: function(id) {
    return _nodes[id];
  },

  getAll: function() {
    return _nodes;
  }

});
And register the OutlineStore interest with any action hitting the Dispatcher, at this early time we are only interested in action RECEIVE_RAW_NODES:
OutlineStore.dispatchToken = AppDispatcher.register(function(payload) {
  var action = payload.action;

  switch(action.type) {

    case "RECEIVE_RAW_NODES":
      _nodes = action.rawNodes;
      OutlineStore.emitChange();
      break;

    default:
      // do nothing
  }

});
As you can see we respond to an action by emitting a change event ourselves and the change event, in turn, will be notified to our Views.
Everything is very consistent in Flux, there are no surprises. Everything goes in the same direction and follows a predetermined and clean path. Understanding what to do next becomes trivial: a real pleasure to work with.
How do our components change now? When the OutlineStore fires a change event we can instruct our React component to update itself.
We need to give our App component an initial state and we need to listen for changes coming from the OutlineStore:
js/components/App.react.js
Define a helper function to get all the updated state from the Stores:
var OutlineStore = require('../stores/OutlineStore');
var React = require('react');

function getStateFromStores() {
  return {
    nodes: OutlineStore.getAll(),
  };
}


var App = React.createClass({

  getInitialState: function() {
    return getStateFromStores();
  },

  componentDidMount: function() {
    OutlineStore.addChangeListener(this._onChange);
  },

  render: function() {
    return (
      〈div className="outlineapp"〉I am satisfied
      〈/div〉
    );
  },

  /**
   * Event handler for 'change' events coming from the MessageStore
   */
  _onChange: function() {
    this.setState(getStateFromStores());
  }

});
getInitialState does what it says, it collects the initial state for the component when the component is first instantiated.
After the component has been instantiated we want to attach the callback that will monitor for change events in the OutlineStore. We do this in [componentDidMount][x].
Now whenever a change event is fired by the OutlineStore we’ll be able to refresh the state of our component:
  _onChange: function() {
    this.setState(getStateFromStores());
  }
Step 4: Display our test data with React components
We can now bubble up the data to our components. Display data using React components is the easy part! We just need to set their initial state and then render the view. At this time we just have to get the contents of the stores in getInitialState and display our Node in render.
function getStateFromStores() {
  return {
    nodes: OutlineStore.getAll(),
  };
}
[…]
getInitialState: function() {
  return getStateFromStores();
},
As a final step we want to be sure the view updates itself when the store notifies us that the underlying data has changed, we do that by setting the famous callback on the OutlineStore:
componentDidMount: function() {
  OutlineStore.addChangeListener(this._onChange);
},

_onChange: function() {
  this.setState(getStateFromStores());
}
Step 5: Write our first View action
Now we can add our first piece of interactivity to the app. We want to visually select an outline node whenever we click on one.
This will entail firing an action called selectNode which we’ll write. The action in turn will be dispatched by err the Dispatcher to all Stores, which will update their internal state and emit a change event for our Views to
update. Going full circle.
js/actions/OutlineServerActionCreators.js
var AppDispatcher = require('../dispatcher/AppDispatcher');

module.exports = {

  receiveAll: function(rawNodes) {
    AppDispatcher.handleServerAction({
      type: "RECEIVE_RAW_NODES",
      rawNodes: rawNodes
    });
  },

};
Now we can instruct the OutlineStore on intercepting the action and act on
it:
var _selected = -1;

var OutlineStore = merge(EventEmitter.prototype, {

  [...]

  getSelected: function() {
    return _selected;
  }

});

OutlineStore.dispatchToken = AppDispatcher.register(function(payload) {
  var action = payload.action;

  switch(action.type) {

    [...]

    case "SELECT_NODE":
      _selected = action.key;
      OutlineStore.emitChange();
      break;

    [...]
  }

});
The View component can now retrieve also the id of the selected node from the
store on initial creation:
js/components/Outline.react.js
function getStateFromStores() {
  return {
    nodes: OutlineStore.getAll(),
    selected: OutlineStore.getSelected(),
  };
}
Now we can use this.state.selected in our render() method to highlight the right node.
Conclusion
And so we’ve gone full circle around the Flux uni-directional flow. We loaded some data into our store, which emitted a change event, which triggered the Views to display the content in the stores. The View in turn fired an action when a Node was selected and the Dispatcher distributed the action to all Stores which registered with it and updated its internal structures, emitting a change event (again).
The consistency and repeatability of the Flux architecture is its beauty. Adding a feature becomes very logical, create an action, make sure the store knows how to handle the action, update the stores data, fire a change event and so on.
Hope you enjoyed this excursus as much as I enjoyed learning this new paradigm and feel free to give me feedback here or at @durdn or @atlassiandev for more varied awesomeness.
Credits
The tree structure used in this tutorial was kindly lifted from treed, a cool weekend hack I’ve been very impressed with.
Read more from our developers at developer.atlassian.com:
Rebuilding Hipchat with React.js