This is the second post in a three-part series about how we use our tools to power atlassianblog.wpengine.com. In part one we focused on using Jira Agile to manage the cadence and blog flow. Unlike a personal blog, content is a collaborative effort here at Atlassian; this allows for multiple perspectives and results in better quality content. Confluence is a key part in us producing and curating content for you, our readers. So in this post, focus on the content itself, and how Confluence helps us develop, review, and deliver great blog posts.
Step 1: Developing content
Page layouts are powerful way to capture best practices and deploy them across your organization. Since blogs at Atlassian have specific requirements that are easy to capture into page layouts, I created a simple one that mimics the format of a post on atlassianblog.wpengine.com.
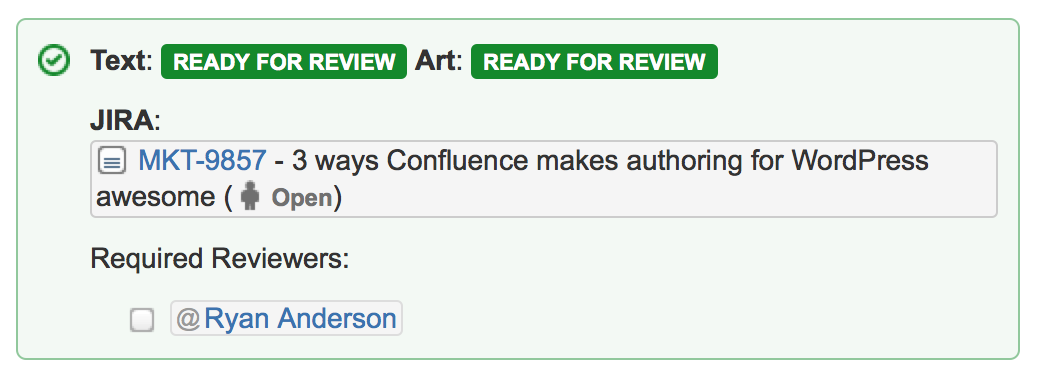
When developing blogs internally before they go live, each one has three components: text, supporting art, and a Jira ticket. The header in my page layout directly calls out the status of each one of these things. I use the status macro to track text and art, and communicate to the business whether or not an article is ready for review. When I paste the Jira issue’s URL (see How we manage Atlassian blogging with Jira Agile), Confluence automatically converts the URL into the Jira issue macro and links the Confluence page back to Jira.

Using the section and column macros in Confluence allows me to mirror the 600 pixel width layout in WordPress. Fixed-width layouts in Confluence are easy to do: Just create your fixed-width column and a relative size column in one section macro. The relative size column is required, because without it, the fixed width column will fill the entire horizontal space. The relative size column acts as a bound for the fixed size column.

Why do I enforce the 600 pixel limit in Confluence? I like to know how much vertical space my text takes up in an article, because it helps me lay out content and graphics within Confluence so that reviewers have a better sense for visual layout of the final content. Confluence also allows me to size full with images exactly to 600 pixels. The image size is editable right from the menu.
![]()
If your content requires specific HTML, you can use the HTML macro to capture that code. Having that code inside of confluence allows you reviewers to give feedback, and helps keep all of your assets in one place for the final article.
Step two: Reviewing content
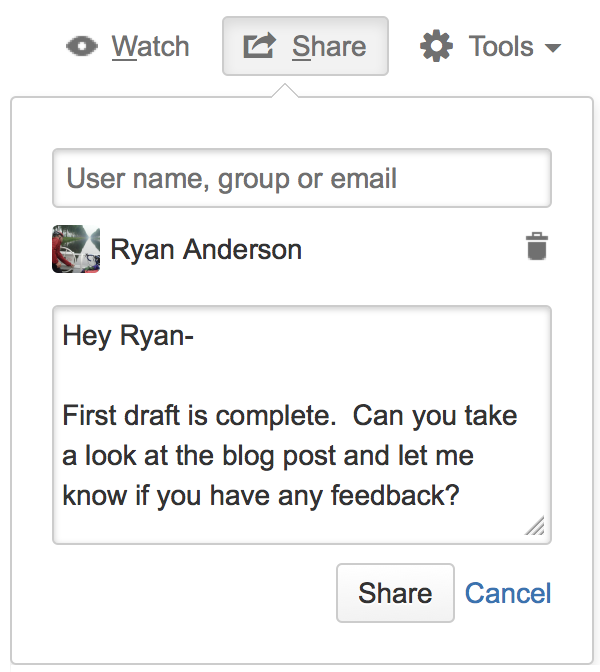
Once I’m feeling good about my article, it’s time to involve other people into the review process. Having another set of eyes gives perspective and helps me see different viewpoints I hadn’t considered in the beginning. Sharing in Confluence makes it easy to invite others into the review process.
Sometimes a particular person’s feedback is essential in the review process. In those cases, I add a specific Confluence task for that reviewer.

You’re probably thinking, why doesn’t he create an issue in Jira? In this case, it’s a matter of preference. Ultimately I’m responsible for this article, because the Jira issue is assigned to me. Confluence tasks are lightweight notifications that allow me to keep track of what’s going on inside of the article. If I don’t get feedback in time, I’ll just ping the reviewer in person. There’s nothing wrong with opening a Jira issue instead – both solutions have their merits.
Discussions in Confluence are the best way to collaborate on content, because it allows me to have one conversation with all of my reviewers. We can share ideas and engage with one another without having to chase various threads in emails.
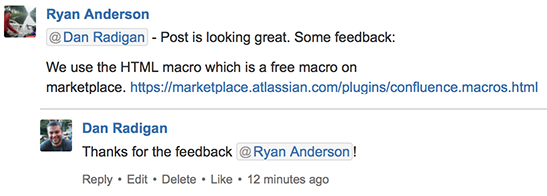
People can like ideas to show support or rally around opposing ideas to help make the article better. People can like the original article, or each comment, to show support for ideas.
![]()
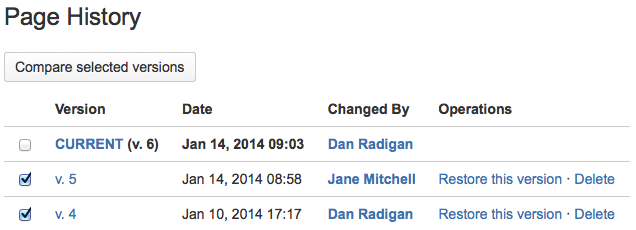
Since my article is one living document, Confluence tracks revision history with each edit. I can easily see how our copywriter checks for grammar and style, and also ensure that those changes don’t conflict with the overall messaging of the article. In this case, I swapped page layouts with blueprints as an example.
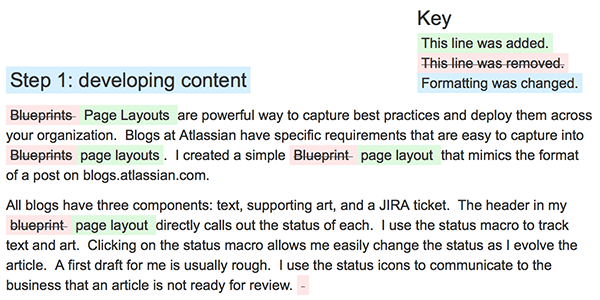
Sometimes I take my article in the wrong direction and need to revert back to a prior version. Confluence makes it easy to browse prior versions of an article. I can compare any two versions and see how my content has evolved over time.
Step 3: Delivering content
The rich text editors in Confluence and WordPress work very well together. Delivering content involves two steps: migrating text and images. I find that it’s easier to migrate the images first as then they are available for use as I migrate the text. Confluence allows you to export all of your images in one zip file on the attachments page under tools.
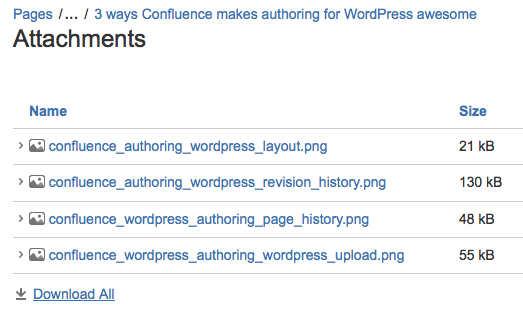
I then simply unzip the attachments and then upload them into WordPress as a group.
WordPress builds all of the necessary thumbnails and sizes automatically on upload. Migrating text is easy, too – I start from the beginning and select all of the text up to the first image, then paste that section of text into WordPress, then add the image. I then take the next block of text in Confluence and paste it into WordPress and add the next image. I repeat this process until all of the text and images have been placed into WordPress.
Once I’m done, it’s an easy press of the publish button to get content out to you, our readers. My next post will be connecting Team Calendars to Jira for powerful visualization options.