
Nowadays applying a fix to a project is as easy as creating a fork – which conjures up a full remote copy of the project for you to hack on – selecting the file you want to change, pressing Edit and committing your fixes.
What if you are at the receiving end of a pull request (abbreviated PR in the following) instead? Using a polished web UI is great and often that’s all you need. Click a button to Approve, click a button to Merge and you’re done.

But that’s not always the case! It’s a common occurrence to have to download the changes included in a pull request(PR) locally, run a few tests, see how they look in your IDE to make sense of what was done.
The steps to download – more explicitly fetch and checkout – your colleague’s or contributor’s pull requests are conceptually simple but they become even easier if you know a couple of important details and tips.
So let me guide you to a better understanding of the command line facilities git gives you to handle pull requests from the command line with ease.
Before we start: enrich your shell prompt with branch name and status
I am always surprised by how many people have a bare command prompt that doesn’t show the git branch they are on or whether they have modified/uncommitted files in their working directory. If you thought – Hey that’s me! – allow me to help you and blow your mind at the same time!
Please do yourself a favor and install something like the awesome liquid prompt which will give you excellent annotations on the status of your git working directory (and will support any other VCS, too):
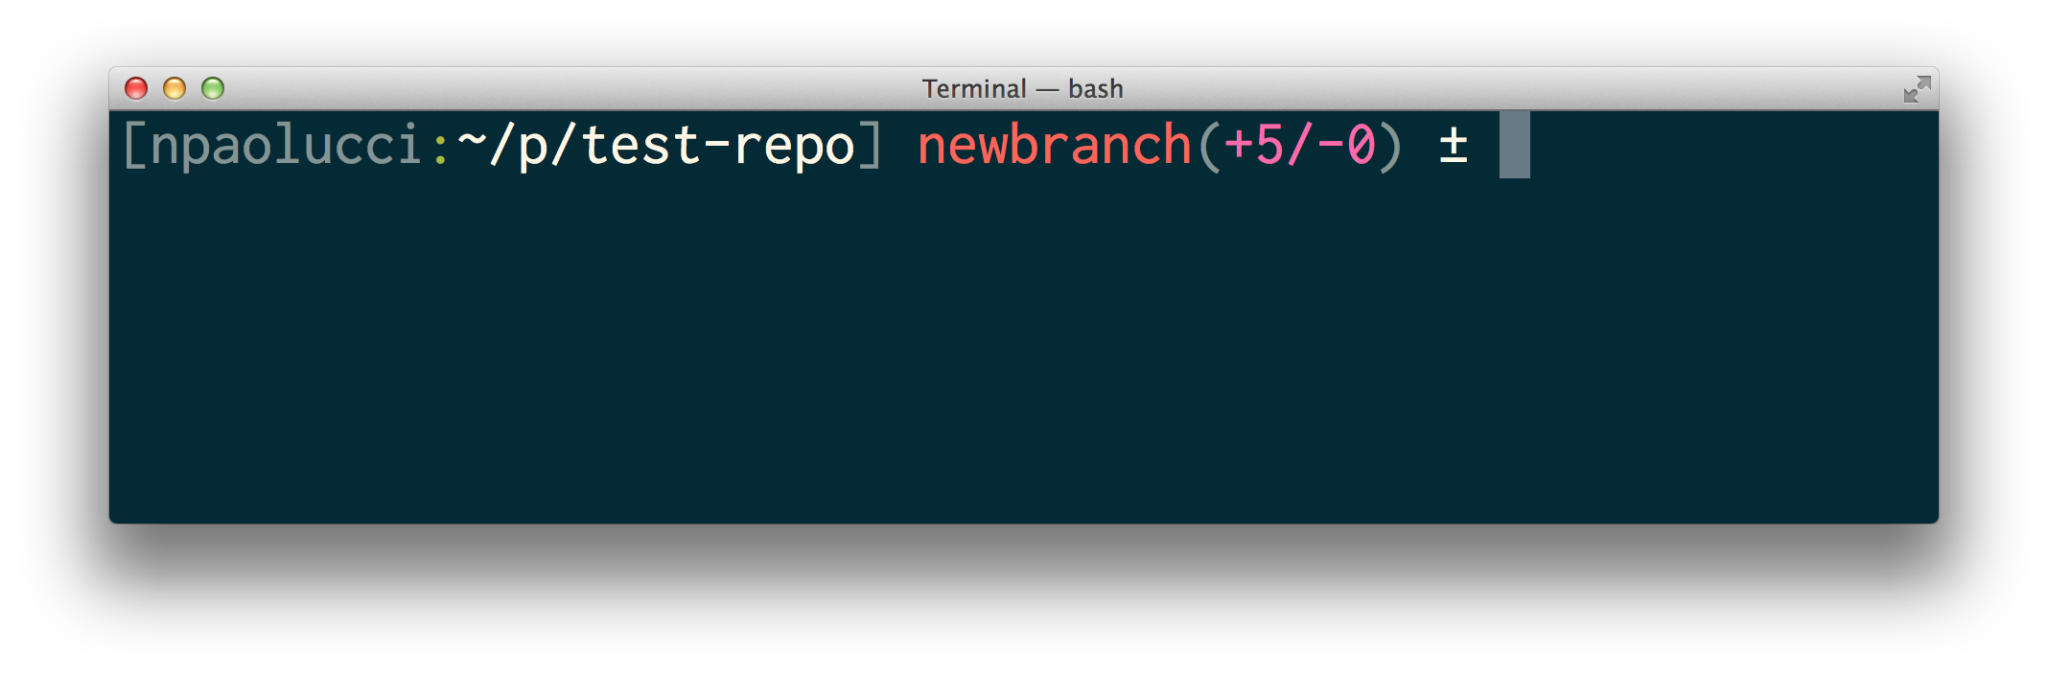

(In the above screenshot you see my prompt alerting me that I am on branch newbranch and have added 5 lines to the files I track in my working directory and I have removed 0)
Everyone working in the same repository
If you work on the same repository with your team the process of checking out a pull request is very straight forward: just fetch and checkout the branch from which the pull request was created:
- Get all the branches that were published on your shared repository:
git fetch origin - Create a local branch that tracks the remote branch you’re interested in:
git checkout -b PRJ-1234 origin/PRJ-1234 - Now you can diff, merge, test your heart out of this:
git diff master ./run-tests.sh - When you’re happy just go back to the Web UI and provide feedback or Approve the change outright.
Contributors working in their own forks
The process changes a bit when some of the contributors work in separate forks. In this case you can fetch the remote branch where the contribution or feature was committed:
- Add the contributor’s remote first:
git remote add jsmith http://bitbucket.org/jsmith/coolproject.git - Collect all the latest updates from origin first, your main repository:
git checkout master git fetch origin git merge master - Get all the branches that were published on the contributor’s fork:
git fetch jsmith - Create a local branch that tracks the remote branch you’re interested in:
git checkout -b jsmith-PRJ-1234 jsmith/PRJ-1234 - Now you can diff, merge, test your heart out of this:
git diff master

./run-tests.sh
Reducing work using pull request refs
The above works but several things can make your life worse:
- What if you have many collaborators, each with their own forks? Adding all their forks and handling them separately becomes impractical.
- What if you don’t even have access to some of the forks and you can’t checkout the source branch?
The solution to both the above issues it to use pull requests refs that some git servers provide. The procedure I’ll show is supported by some git servers and varies slightly depending on the one you use. In the following I’ll be covering how to fetch all pull requests on Stash and Github.
Do not fear the Refspecs
The first pre-requisite is to familiarize yourself with Refspecs. Refspecs are cool and you should not fear them. They are simple mappings from remote branches to local references, in other words a straight forward way to tell git “this remote branch (or this set of remote branches), should be mapped to these names locally, in this name space.”
For example a command like:
git fetch +refs/heads/master:refs/remotes/origin/master
Will map the remote branch master on your origin remote to a local origin/master so that you can type:
git checkout origin/master
And refer still to that remote branch. The plus sign (+) in the definition is there to indicate that we want git to update the reference even if it’s not fast-forward.
The way we use this to download all pull requests is to map how the remote repository stores the PR HEADs, and map them to a local name space for easy reference.
So provided you have an origin (or upstream) remote defined, here’s what to do.
Note: As justly noted by several Stash developers the refs I’ll demonstrate below are considered undocumented and private and could change anytime.
Download All pull requests: Stash
- Fork a repository.
- Clone your fork locally:
git clone git@stash.atlassian.com:durdn/tis.git - Add the upstream original repository as upstream.
git remote add upstream git@stash.atlassian.com:tpettersen/tis.git - Get the latest heads from the maintainer ‘upstream’
git fetch upstream - Add the refspec that will map remote pull requests heads to a local pr name space. You can do it with a config command:
git config --add remote.origin.fetch '+refs/pull-requests//from:refs/remotes/origin/pr/' - If you look in .git/config the fetch entries become:
[remote "upstream"] url = git@stash.atlassian.com:docker/libswarm.git fetch = +refs/heads/*:refs/remotes/upstream/* fetch = +refs/pull-requests/*/from:refs/remotes/upstream/pr/* - Now you can fetch all pull requests branches easily:
$ git fetch upstream remote: Counting objects: 417, done. remote: Compressing objects: 100% (274/274), done. remote: Total 417 (delta 226), reused 277 (delta 128) Receiving objects: 100% (417/417), 105.28 KiB | 0 bytes/s, done. Resolving deltas: 100% (226/226), done. From stash.atlassian.com:docker/libswarm * [new ref] refs/pull-requests/10/from-> upstream/pr/10 [...] * [new ref] refs/pull-requests/100/from -> upstream/pr/100 * [new ref] refs/pull-requests/101/from -> upstream/pr/101 [...] * [new ref] refs/pull-requests/109/from -> upstream/pr/109 * [new ref] refs/pull-requests/110/from -> upstream/pr/110 [...] - Now to switch to a particular pull request, you can simply:
git checkout pr/102
Download All pull requests: Github
If the forks or upstreams are on Github it works exactly as above but the config command changes to:
git config --add remote.origin.fetch '+refs/pull//head:refs/remotes/origin/pr/'
And the remote in .git/config will change to include an additional fetch configuration to map the PR heads to a local name space called pr:
    [remote "upstream"]
        url = git@github.com:docker/libswarm.git
        fetch = +refs/heads/*:refs/remotes/upstream/*
        fetch = +refs/pull/*/head:refs/remotes/upstream/pr/*
Fetch a single pull request using refs
If you don’t want to setup fetch entries in your .git/config and you just
want to quickly get to a pull request a single command works:
- Checkout a single PR in Stash:
git fetch refs/pull-requests/your-pr-number/from:local-branch-name - Checkout a single PR on Github:
git fetch refs/pull/your-pr-number/head:local-branch-name
And if you find yourself using the above a lot you can streamline the process by creating a git alias:
# For Stash
git config alias.spr '!sh -c "git fetch origin pull-requests/${1}/from:pr/${1}" -'

# For Github
git config alias.gpr '!sh -c "git fetch origin pull/${1}/head:pr/${1}" -'
With that alias configured we can fetch a pull request with a simple (thanks inuit):
git spr 100
Conclusions
Hope you found this useful! In the end keeping tabs on the work of your peers or contributors is easy once you create a couple of simple aliases or add the proper refspecs to your .git/config. Happy to answer any questions you might have on Twitter at @durdn.
Anyone can be good, but awesome takes teamwork.
Find tools to help your team work better together in our Git Essentials solution.