![]()

This is a guest post by Eric Chiang, Plugins Product Lead at Gliffy, which is a Confluence plugin that allows you to create stunning collaborative flow charts and diagrams in Confluence pages. This is the first of a three-part blog series that details how you can use Gliffy to add impressive visual diagrams to your intranet, technical documentation, or knowledge base.
Thousands of Confluence customers use Gliffy in a variety of different ways. Since we’re a diagramming tool that is embedded directly in a Confluence page, it takes no time at all to quickly sketch up an illustration or idea. And with our enhancements for Confluence 4.0, it’s now even easier to create a new diagram using the Macro Autocomplete feature!
http://youtu.be/28TW7h9PXOk
Hidden Features in Gliffy
- Permissions
- Versioning; and
- Linking to content
In this post we’ll focus on permissions and look at versioning and linking in subsequent posts.
Secure Your Diagrams with Permissions

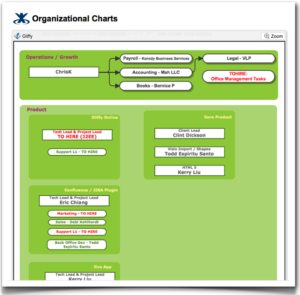
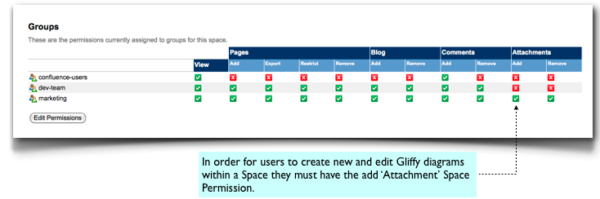
We want everyone at Gliffy to be able to view this diagram, but we don’t necessarily want all users to be able to edit it. To stop users giving themselves promotions, we leverage Confluence’s Space and Page Restrictions which are inherited by Gliffy diagrams. Since Gliffy diagrams live as an attachment on a Confluence page, controlling access to edit to a Gliffy diagram is a simple matter of editing your Space Permissions and removing the “Add” permission on attachments for the users you do not wish to have the ability to edit Gliffy diagrams.
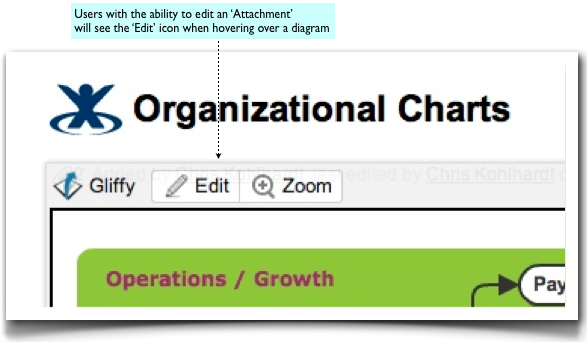
In the screenshot below you can see that the ‘dev-team’ group of users do not have the ‘Add Attachment’ Space Permission. This means they will not be able to create new or edit an existing Gliffy diagram in the Space.


Try Gliffy Today
Want to start using it today? Start a free 30-day trial by installing Gliffy in a single-click via the Confluence Plugin Manager.
New to Confluence? Start a free 30-Day trial of Confluence OnDemand with Gliffy already installed!
Starter License holders can get Gliffy for just $10
Learn more here.