

The future of automation at Atlassian: Generating Confluence automation rules with large language models
What is Confluence automation?
Confluence automation is an admin feature available in Confluence Premium and Enterprise that can help teams manage their content at scale. When admins create and enable automation rules, Confluence automation works behind the scenes to complete routine functions that would otherwise have to be done manually. For example, rules can automatically:
- Create new content in the correct format
- Send team updates on work progress
- Remind people about incomplete tasks
Depending on how your team uses Confluence (for collaborative work or as a knowledge base), automating certain functions may be more useful than others.
Why use natural language with automation?
Atlassian Automation is an extremely powerful tool that can unlock the full value of Jira & Confluence at scale. However, getting started can be an overwhelming experience due to the product’s complexity. In Confluence automation alone we offer over 42 different components each with unique configuration options and dynamic variables, which makes for a steep learning curve. With more and more components being added over time, the complexity of automation will only continue to grow over time.
This is why we want to simplify the experience of getting started and creating rules. Natural language input allows us to do just that by taking on the heavy lifting and allowing customers to focus on what really matters and save time!
Simply type the use case you are trying to automate or a description of the rule and let the AI work its magic!
How did we build it?
We harness the power of OpenAI’s models, taking advantage of the function calling feature in particular. Function calling forces the AI to return an object conforming to a JSON Schema provided as part of the prompt. This is how the AI can generate an entire automation rule at once, and how we can easily detect syntax errors in the AI’s responses.
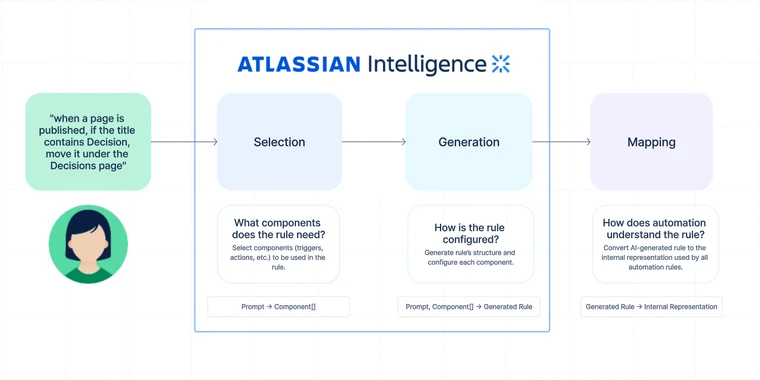
The overall process breaks down into 3 main steps. The first two depend on calling OpenAI’s models, while the last does not.

- Selection: In this step, we provide a name and short description for every automation component (e.g. triggers, actions, conditions) and instruct the AI to select the components the rule should use.
- Generation: In this step, we provide the AI with the full schemas for the selected components and ask it to generate the entire rule. This is where the magic happens. The rule is generated in a simplified format that is designed to be easier for the AI to generate than the internal representation used for storing rules.
- Mapping: In the final step, we map the generated rule to the internal representation of a rule. We also resolve any asset references during this step. Eg: Resolving “…in the Sales space…” into a Confluence space names “Sales” in a format the internal rule can use.
Why split the rule generation process into multiple steps?
There are two main reasons we split up the process.
One is the context limit of the AI. It can only understand so many tokens in one prompt. If we tried to provide every single component along with it’s entire definition of all the different configurations it supports and the possible values, we would well exceed the token limit.
Generating the rule with a single call to OpenAI would also be much more expensive. When deciding what components are needed for a rule, it isn’t necessary to know the exact configuration of every component. You don’t need to know exactly how a “label added trigger” is configured compared to a “page published trigger” to pick which one to use. By first selecting the needed components, and then using only those to generate the final rule, we reduce our overall token usage by 47% – a huge cost savings.
Technical deep dive
We’ll now do a deep dive into the entire rule generation process. We’ll trace the path of one example prompt to illustrate the processing done at each step.
The example prompt we’ll be looking at is: when a page is published, if the title contains Decision, move it under the Decisions page

The selection step
The selection step is like a gameshow: contestants compete to be chosen, and the judge can only pick a few of them. In this case, the contestants are automation components and the judge is AI.
This step is composed of two sub-steps, each following a common pattern. We send the AI a list of components to pick from, some general messages about what automation is and what its goal is, and an additional message with several input-output examples. The two sub-steps differ only in the components involved: the first sub-step involves only trigger components, and the second involves only non-trigger components (actions, conditions, and branches).
The function call schema provides an enum with all the component names, along with a description of what each component can do. The desired response is a comma separated list of component names.
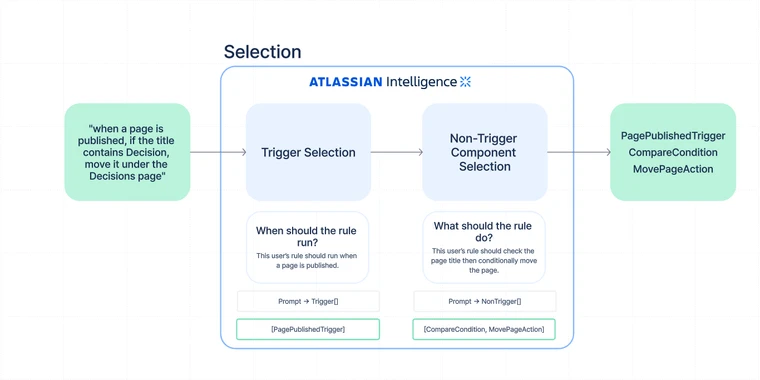
Trigger selection:
The first sub-step is trigger selection. This is where we select the automation rule trigger. Once we have a valid trigger selection, we then do component selection. We do not pass the selected trigger to the component selection step, so in theory we could do each sub-step in parallel and save time. If the trigger selection step fails for any reason: invalid trigger selected, no trigger present, multiple triggers present, we log it as an error, but we will still land the user in the rule builder and ask them to manually select and configure a trigger. This allows users to still get to the rule builder with a partially configured rule based on the rest of the prompt.
For our running example, when a page is published, if the title contains Decision, move it under the Decisions page, we expect the AI’s response for trigger selection to look like this:
["PagePublishedTrigger"]
Non-trigger component selection:
The second sub-step is additional component selection. This is where we select all components after the trigger such as actions and conditionals, which is a more complicated step for the AI.
By splitting the steps we can avoid hitting the token limit and give each sub-step more examples. This leads to increased cost for the selection step, but higher accuracy overall. This is why we place such an emphasis on reducing token count across the rule generation process: so we can use our tokens where we need them the most.
For our running example, when a page is published, if the title contains Decision, move it under the Decisions page, we expect the AI the AI’s response for non-trigger component selection to look like this:
["CompareCondition", "MovePageAction"]
Why we allow the AI to make “invalid” selections:
Common advice when using AI is that you should tell it exactly what you want it to do, and what it can and can’t do. We started off by telling the AI “rules MUST have EXACTLY one trigger, and must have one or more actions”. However, while you can tell the AI what to do, you can’t tell the users what to do. A user may ask for a rule with no triggers, or an unsupported action, or something else that is impossible to generate an automation rule for. If you force the AI to adhere to the business rules in the prompt, in can silently drop parts of the user’s intent in order to do what it’s told. We decided we don’t want to ignore the user’s intent without telling them (even if the intent is “wrong”).
Instead we have the AI generate exactly what the user asks for. For example, we allow the AI to select a list of triggers during trigger selection, even though a valid rule can only ever have one. We even allow the AI to hallucinate fake components. For example for a prompt “when a whiteboard is updated send me an email” the AI might select a “WhiteboardEditedTrigger” even though no such trigger exists. This is still useful as it would let us know that the user asked for something we don’t support.
This approach allows us to catch several distinct error cases simply by making assertions on the returned list of components.
Is the list empty? → Tell the user that we don’t know when their rule should run
Does the list have more than one value? → Tell the user that rules can only have one trigger
Does the list contain an invalid value? → Tell the user that they may be asking for an unsupported trigger
This way we can have specific, user-friendly error messages, and it doesn’t cost us anything extra. Win win!
Importantly, we tell the AI to only respond in this way for “bad” prompts. The AI knows that a rule should only have one trigger, and it knows which triggers are valid. But we explicitly allow the AI to break these rules in order to better express the user’s intent.
At some point we’d love to use the AI’s responses to create even more specific error messages, for example “It seems like you want a whiteboard edited trigger, is that correct? We don’t currently offer this.” This would also help us gather feedback on which components we should add next.
For a “bad” prompt like when a page is published and a comment is added, add a label 'test', trigger selection would output:
["PagePublishedTrigger", "CommentAddedTrigger"]
The generation step
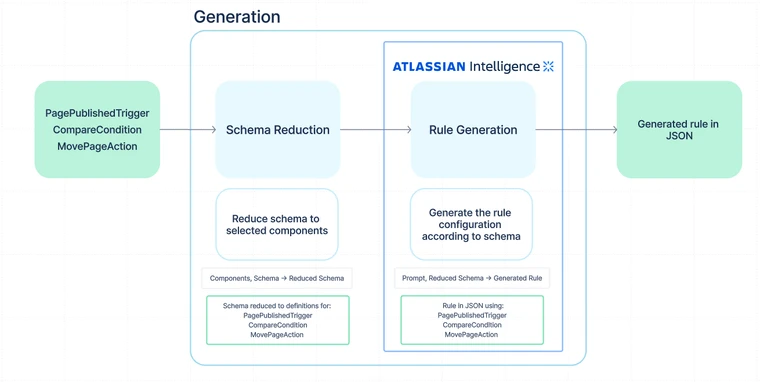
In the generation step we ask the AI to generate a rule given the original prompt and a JSON schema detailing the structure of a rule. Recall the list of selected components from our running example prompt, when a page is published, if the title contains Decision, move it under the Decisions page:
["PagePublishedTrigger", "CompareCondition", "MovePageAction"]
The JSON schema provides the AI with the entire structure of an automation rule: a trigger, at least one action, zero or more branches and conditions, and a title to be shown in the UI. But we pare down the schema to only include info from the components selected in the selection step. For our running example, this means the only option listed for the trigger is the page-published trigger, the only option listed for the actions is the move-page action, and so on.
Redacting the full schema in this way gives the AI a very small solution space. Rather than figuring out which components to use and how to configure them all together in a rule, the AI can focus just on the second problem. So if the user says “pages published where the title contains AI”, it will fill in the compare condition with the needed smart value and comparison to check for that. Or if they say “when a page is published by Sid Phillips”, it will fill in the user condition with the name Sid Phillips and let the mapping step handle resolving that into a real user.
What are smart values?
Smart values in Confluence automation | Cloud automation Cloud | Atlassian Support
Smart values are dynamic variables that can make your rule more flexible. Each smart value is constructed using a specific syntax called dot notation inside double mustache brackets.
Eg: {{page.title}}, {{page.author.fullName}}, and so on.
Note that this step relies on the selection step providing the right components. If bad components get passed in, the resulting rule will likely be invalid. This is something we address with a lot of examples and other tricks.
Here’s an example of what a component looks like when converted to JSON Schema:
{
  "type": "object",
  "properties": {
    "config": {
      "type": "object",
      "properties": {
        "comparisonOperator": {
          "type": "string",
          "enum": [
            "EQUAL",
            "NOT_EQUAL",
            "GREATER_THAN",
            "LESS_THAN",
            "STARTS_WITH",
            "CONTAINS",
            "NOT_CONTAINS"
          ]
        },
        "valueToCompare": {
          "type": "string"
        },
        "valueToCompareAgainst": {
          "type": "string"
        }
      }
    },
    "type": {
      "type": "string",
      "enum": [
        "ComparatorCondition"
      ]
    }
  }
}
Importantly, we do not generate these JSON schemas directly from our pre-existing internal models. Each component gets a new, AI-optimized model from which the schema is generated. We add this layer of indirection for a number of reasons:
- It gives us more control over what the AI can do. If we have to manually map its output to the real config type, then there’s no possibility that it can output components that we don’t want it to, or include rule settings that we don’t want.
- It lets us make the config easier for the AI to use. For example, with the scheduled trigger, the existing config is just a rule string. That’s very flexible, but makes it possible to create a rule that is incompatible with the UI. So we created a custom interface that matches the UI for the AI to use.
- It allows us to make the AI more accurate. We found that certain fields could have their accuracy improved with a simple naming convention.
For example, calling the field on the CQL Condition “validConfluenceQueryLanguage”, rather than something generic like “text”.
We also found that when there is a lot of fields and objects in the config, and putting the resource name in front of each field greatly helped the understanding of the AI and prevented it from confusing things.
For example, if you have a page and space object, rather than calling the id field on each id, calling it “pageId” and “spaceId” helped provide context for which field it was setting.
- There are some JSON schema features we need that don’t work with the existing config structures, such as defining constants as single-value enums. We use these single value constant strings for the “type” of the component since you don’t have a class reference or name in a JSON schema and just have the JSON object.
- Sometimes we need custom types for certain fields in order to do object resolution. We have to be able to use a “resolvable” type in the schema and explain to the AI how to use it.
Of course, this approach introduces a significant engineering burden: whenever a new component is added or an existing component is modified, a corresponding AI-optimized model has to be created or changed.
The mapping step
In the mapping step, we take what the AI generated and build a rule configuration that can be saved in the database along with every other automation rule. Note that this step involves no calls to OpenAI’s API.

Object resolution
Many rule configurations require customer-specific entities to be provided, such as pages, users, or spaces. Consider our example prompt, when a page is published, if the title contains Decision, move it under the Decisions page. Any rule that satisfies this prompt will need a reference to the “Decisions” page on the customer’s site; without that reference, the rule won’t know where to move new decision pages. The problem is that the AI can’t provide a reference to the actual parent page, because it has no access to the customer’s data – it only knows that some page named “Decisions” probably exists on the site.
Object resolution is our solution to this problem. Rather than giving the AI access to the customer’s site data, we tell the AI to provide unknown entities as “resolvable objects.” A resolvable object has several optional fields that our backend can use to search for the “real” object. For example, if the user asks for a page to be published in the “Team Meetings” space, the AI will have reason to believe a space named “Team Meetings” exists. To use this space in a rule, the AI supplies a resolvable space. The resolvable space may look like this: {name: 'Team Meetings'} from which we can find the actual space by querying the database for spaces named “Team Meetings”.
The more detail the user includes in their prompt, the more fields the AI can provide on the resolvable object to help narrow down the search. Resolvable objects can even be composed together!
As an example, here’s the AI-optimized schema for the “move page” action:
interface MovePageAction {
    ResolvablePageDestination getPageDestination();
}
Where ResolvablePageDestination is defined as follows:
interface ResolvablePageDestination {
    Optional<ResolvableSpace> getSpace();
    Optional<ResolvablePage> getParentPage();
}
And ResolvablePage looks like this:
interface ResolvablePage {
    Optional<String> getPageTitle();
    Optional<String> getId();
    Optional<String> getSpaceKey();
}
In our running example, the user only mentions the title of the destination page, “Decisions.” So the resolvable object for the destination page may look like this: {pageTitle: "Decisions"}. This will often be sufficient to find the desired page. But what if multiple pages on the customer’s site are named “Decisions”? In that case, we need more information before we can resolve the object and use it in the rule.
One way we can glean more information is by examining the user’s current automation scope. Confluence is broken up into spaces, so there are two different scopes for Confluence automation: space automation (operates within a single space, available to a space’s admins) and global automation (operates across all spaces, and available only to global admins). If the user submitted their prompt from space automation, and there is a page with the “Decisions” title in the current space, we assume the user wanted that page. However, if the user submitted their prompt from global automation, we have no way of determining which “Decisions” page the user wanted. In that case the page will not get resolved, and the user must pick their desired page manually after the rule preview is generated.
Life is a little easier if the user provides more information directly in the prompt. For example, suppose our running example prompt included the parent page’s space:
when a page is published, if the title contains Decision,
move it under the Decisions page in the Team Reference space.
Now there’s no ambiguity – pages within a single space always have unique names, and so there can be at most one page with the name “Decisions.”
Object resolution allows the AI to represent the user’s intent without needing to access the user’s data.
Component mapping
At the end of the generation step, we have the generated rule in the form of an object conforming to our JSON schema. For our example prompt, when a page is published, if the title contains Decision, move it under the Decisions page, the generated rule will look like this:
{
  title: "Move pages with 'Decision' in the title to the 'Decisions' page",
  trigger: {
    type: "PagePublishedTrigger"
  },
  components: [
    {
      type: "CompareCondition",
      config: {
        valueToCompare: "{{page.title}}",
        valueToCompareAgainst: "Decision",
        comparisonOperator: "CONTAINS"
      },
      {
        type: "MovePageAction",
        config: {
          pageDestination: {
            parentPage: {
              pageTitle: "Decisions"
            }
          }
        }
      }
    }
  ]
}
To get a rule that is ready to be displayed in the UI and saved in the database, each of the components in this rule must be mapped to the internal representation used by all automation rules.
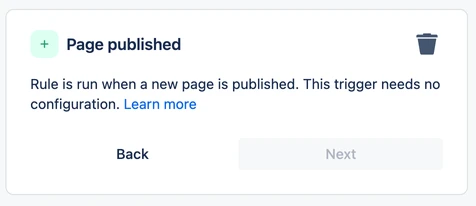
For any components with no configuration, such as the PagePublishedTrigger in our example, the mapping is as simple as creating a new instance of the internal representation. Here’s what this trigger will look like in the UI (note the lack of any input fields to configure the component):
For components with a simple configuration consisting only of primitive types, the mapping is only slightly more involved. We instantiate a new instance of the internal representation, and then set any available fields. Here’s what that might look like for the CompareCondition:
final var config = new CompareConfig(
    generatedComponent.getValueToCompare(),
    generatedComponent.getValueToCompareAgainst(),
    generatedComponent.getComparisonOperator()
);
And for our example prompt, here’s what that condition will look like in the UI :

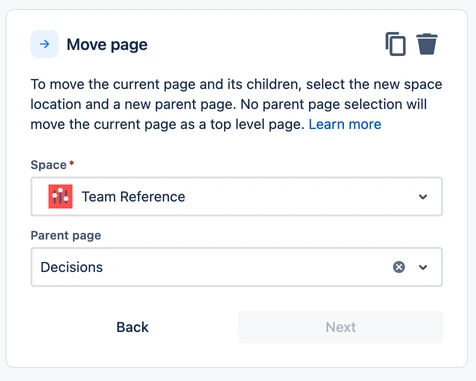
The most complicated components are those with resolvable objects in the configuration, such as the MovePageAction in our example. For these components, we first go through the object resolution process, then configure the internal representation as we would with simpler components. Here’s what the action will look like in the UI after the mapping process completes:
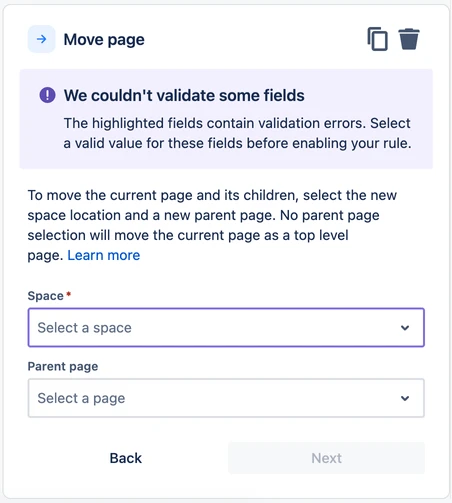
If object resolution fails (in other words, if we can’t find the object), we will leave the configuration partially incomplete. The rule will still be created and displayed in the UI, but the user will be prompted to fill in any missing fields.
Displaying the rule
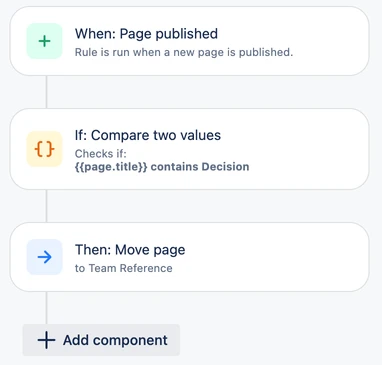
At this point the rule can now be returned to the user as a “draft”, and they can choose to publish the rule as is, tweak the component configurations, or discard the draft and try again.
What we’ve learned by building an AI product
We discovered that a blank text box can be quite daunting for new users, no matter how intelligent the AI is behind that text box. If the user is unfamiliar with the product, they won’t know what features are available or how to use them. That’s why it’s crucial to provide clear examples and documentation that explain what automation can do and how best to use to generate rules with AI. This gives the users a starting point to work from.
We also noticed that users often ask the AI to create rules that are beyond its capabilities. Eg: “When a whiteboard is created send an email” – but we do not currently have support for whiteboards. This is likely because they’re accustomed to powerful AI assistants like ChatGPT that can seemingly respond to any request. However, automation is built on structured building blocks, which, while versatile, cannot perform arbitrary actions.
To address this, we’ve designed our AI to handle such situations intelligently. Instead of producing a random valid component, it returns a friendly message to the user, explaining that it can’t perform the requested action. It then creates the best rule that it can without that action.
For instance, if a user doesn’t provide a trigger or provides an invalid one, we guide them to the rule creation stage without a trigger, rather than stopping the generation process altogether. This approach gets them into the rule builder faster, which is our ultimate goal along with making them feel more confident.
If we didn’t do this and instead forced the AI to always chose a valid component, then we would create rules for users that are not doing what they intended, and if they didn’t check carefully the rule might do something they did not expect.
On the technical side, a key lesson was that prompt engineering is more an art than a science, but steps can taken to move it closer to a science. Having an evaluation framework in place is crucial to assess the impact of changes to the prompts or code. This empirical data helps us understand if the changes are enhancing or diminishing the quality of responses. As your product scales, without such a framework, you might find yourself blindly tweaking a black box, which is not sustainable. We also found it important to reduce the problem space as much as possible as mentioned throughout the blog.
This project also helped us establish precedents for the ethical implementation of AI features. Automation is a very powerful tool, and some automation rules have outcomes that can’t be reversed. We took several steps to limit the possible fallout of the AI misbehaving or misunderstanding the prompt. The generated rules are initially shown in a preview state, so the user can inspect a rule before deciding to active it. All submitted prompts pass through an AI-powered ethical filter before the generation process starts. Some automation components are excluded from AI generation, such as the “Send web request” action which can send arbitrary data to the rest of the Internet. Components with potentially major consequences (such as the “Grant space permission” action) can be generated by AI, but we require the user to manually configure such components.