
This is the second blog of a two-part blog series about requirements documentation for agile teams. Last blog post we looked at walking the documentation tightrope in an agile world – the challenges faced by teams switching over from a “traditional” product requirements document to other techniques used to define problems. We reminded ourselves that writing a requirements document should be considered as just one of many different ways we can define customer problems.
So you’ve discussed a set of user stories with your engineer and designer. Gone back and forth, had a few whiteboard sessions and concluded there are a few more dimensions you need to consider for this feature that you are working on. You need to flesh out some assumptions you’re making, think deeper about how this fits in the overall scheme of things and keep track of all the open questions you need to answer. What next?
Requirements on-a-page
What does requirements on a single page look like? For all the details you can look at the requirements Blueprint we shipped in Confluence 5.1, which has been modelled from what we see many agile teams doing as well as from how we do requirements internally at Atlassian.
The rough outline of the structure is as follows:
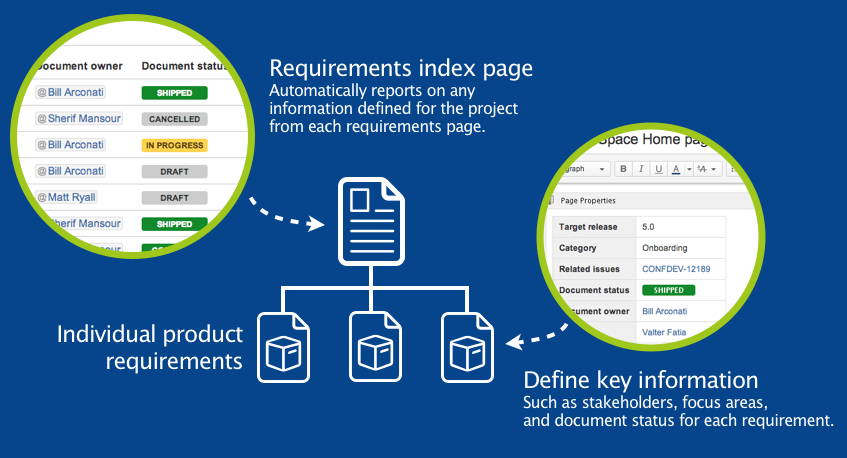
1. Define document properties
Some brief metadata about the document (Such things as the owner, stakeholders, status, target release etc…). This helps get everyone on the same page in terms of who is responsible for what and communicating our target release goals. We use these properties to also report and quickly access previous requirements on an index page showing all the requirements:
2. Communicate the overall goals
Be short and straight to the point to explain what you are trying to achieve.
3. Background and strategic fit
Why are we doing this? How does this fit into our overall vision of our product, company or epic?
4. Assumptions
List the technical, business or user assumptions you might be making. This is very helpful in providing context as someone reads your user stories.
5. User Stories
We list the user stories involved here typically in a tabular format. Where possible, try to include context. Link to customer interviews, take screenshots of what you’ve seen. Embed audio or multimedia content of your customers. Provide as much detail as you need to tell the story. How will we know we’ve succeeded? We often note success metrics for each story in this section as well.
6. User interaction and design
Quite often filled out after we discuss the problems and flesh them out, we keep the designs embedded or linked from the same page.
7. Questions
As we are thinking about our problems, we often uncover new questions that need answering. So we typically have a table of the “things we need to decide on or do further research”. This table typically grows towards the definition phase and as we start implementing we find ourselves coming back to it and updating it as decisions are made.
8. Not doing
This is often very helpful in getting your team focused. Write down a list of related things which may be out-of-scope or you might look at in a later date. I often find this list keeps on growing as you explore the problems in depth. You realise there are many orthogonal problems which you could solve, but you need to stay focused. I’ve spoken to quite a few customers that have re-iterated the importance of this list in terms of getting everyone on the same page. This helps reduce any ambiguity and gives the team greater focus as well as providing management greater predictability of what is in and out.
But why?
Why bother? What value do I or my team get out of something like this? If you are to take away anything from this blog, understand the “why” – the not “what”. The “what” is the easy part to create, the “why” will help you explore what is best for your team. Here are the benefits and challenges we’ve observed with this approach:
Benefits
1. One page, one source, one problem
Keeping it simple. The requirements page becomes the “landing page” for everything related to the set of problems within a particular epic. Having something that is the central go-to location saves your team members time in accessing this information and gives them a concise view.
2. A page enables you to be agile
One of the awesome things about using a simple page to collaborate on verses a dedicated requirements management tool is that you can be agile about your documentation! You don’t have to follow a format every time – do what you need, when you need it and be agile about it. In fact, I encourage you to customise the Requirements Blueprint as you learn what works for your team so you can model your processes easily. Chop and change as required.
3. Dive in for context and detail
We often forget how powerful a simple link can be. We embed a lot of links within our requirements landing page. It helps abstract out the complexity and progressively disclose the information as it is needed to the reader. Linking detailed resources my included such things as:
- Customer interviews for background, validation or further context for the feature
- Pages or blogs where similar ideas were proposed
- Previous discussion or technical documentation and diagrams
- Videos of product demos or other related content from external sources
4. Living Stories: Stay updated, track and report on progress
I see a lot of customers do this as well. Once the stories have been roughly thought out – we often use the Jira integration features in Confluence to link the two. From the page you can easily create your backlog stories. These are automatically embedded with two-way syncing from Jira. So you instantly get progress reports of how the story is tracking with your dev team, right from your requirements landing page. Learn more.
5. Use your collective team and organisational wisdom
Especially if you are in a large organisation – documenting requirements Confluence makes it easy for other people in different teams to contribute and make suggestions. In the Confluence team, I’ve been amazed at the amount of times someone else from another team jumps into the conversation with a comment providing great feedback, suggestions, or lessons learnt from similar projects. It really does help a large organisation feel like a small team.
6. Make them dynamic and engaging
Use diagramming tools like Gliffy or Balsamiq to better communicate the problems to your team or embed external images, videos and dynamic content.
7. Collaborate!
The most important aspect of all this is getting everyone involved. Never write a requirements document by yourself you should always have a developer with you and write it together. Share the page with the team and get feedback. Comment, ask questions, encourage others to contribute with thoughts and ideas. This is also a huge asset for a distributed team.
Challenges
With every approach there are challenges. Here there are two main challenges we’ve experienced and observed from customers as well:
1. Documentation can go stale
What happens when you implement a story and get feedback and then modify the solution? Does someone go back and update Confluence with the final implementation? This is a general challenge with any type of documentation – It’s always worth questioning the value of this for your organisation. Talk to your team about what you would do in a scenario like this.
2. Culture of open collaboration
“What can I do to encourage people to comment?”, “How can I encourage people to write more specs and stories on Confluence?”. This is really a tough one to crack and really comes back down to various wiki adoption techniques in your organisation. There are plenty of resources to help you here. There maybe cultural issues you might need to look at as well.
What next?
Give it a try
Last post, we looked at the different techniques you can use to define customer problems. In this blog, we dived into requirements documentation on a page. I hope this gives you some insights for how we, and many of our agile customers define product requirements in an agile world. To help you get started we’ve shipped the Requirements Blueprint in Confluence 5.1. Try it and let us know what you think!
The most important thing here to remember is: You shouldn’t stick to this method every time. Be agile. Scott Ambler puts it well when he says
“…by understanding the needs of your customers you will be able to deliver succinct and sufficient documentation…” – Scott Ambler, Best Practices for Agile Documentation).
I’d love to hear form you: Are there other techniques you’ve deployed to define customer problems with your teams? What works? What doesn’t?
P.S. We’re hiring! Has this post got you interested in what we do Product Management at Atlassian? Interested in joining our team? We’ve got plenty of open product positions right now. Why not join us on our quest to enable teams to build great software!
For more, visit atlassian.com/agile. Or follow @ChetRong on Twitter! (Just don’t follow his advice.)